Saturday, 29 January 2022

Editor's January Pick #20: Here goes nothing with the chocolate pot!

Editor's note: Personally, I don't drink or cook with milk anymore but that doesn't mean I don't still get chocolate cravings - every nine seconds if I'm honest. But milk-free chocolate is usually either horrid, boring, uninspiring or all of the above. Reading the second part of the chocolate melting pot review, I'm inspired to borrow the melting pot and have a go at zhuzhing up some milk-free chocolate with a big fat tub of peanut butter. Watch out Reeces! Or there may be a better idea...


Here goes nothing!

The instructions are straight forward and the base unit easy to understand. You preheat the base unit with a melting pot inside for 10 minutes, then add the chocolate, stirring occasionally until melted :


Remove the melting pot from the base and pour a small blob of melted chocolate onto each circle on the parchment :


Using the back of a spoon – I used a dessert spoon – in a circular motion gently ease the melted chocolate out to fill the circle :


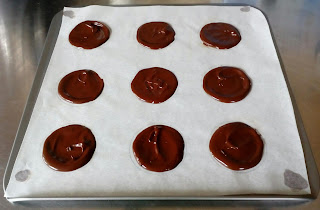
Do not panic if you overrun the circle – it's not the end of the world – practice makes perfect, it's like using a piping bag for the first time – give yourself a break.


Editor's January Pick #19: New piece of kit

Editor's note: There are a lot of different topics covered by MiamMiam but one of my favourites is the kitchen kit section. Being a very rudimentary cook myself as in sauce pan, frying pan, oven and done - (not Bear Grylls up a mountain with a twig and a sock type stuff) it is fab to read about accoutrements that I wouldn't normally be exposed to. Take this week's selection that includes a chocolate melting pot. As the blog mentions, the old bowl in a saucepan kinda works for me but I am absolutely going to forget and grab the bowl so this would definitely be safer!


My new piece of kit.

Those of you who follow the blog regularly will know that I'm not one for spending dosh on kit for it to gather dust. With that in mind I thought I'd treat myself to a chocolate melting machine.

I melt chocolate frequently and I'm an old fashioned kinda gal and always use the steam method – saucepan with the bowl on top – never a microwave, personally I don't think you can control the chocolate and microwaves vary. The only downside to the old fashioned method is that it creates washing up. When I saw the Chocolate Melting Pot in Lakeland, I thought it looked neat and, reasonably priced at £19.99, it wouldn't break the bank.

Here it is :


Never let it be said that I don't have your best interests at heart - for the purpose of its inaugural outing I'm keeping it simple.

The plan :


You'll need :


a baking sheet measuring 30x30 cms


a piece of baking parchment measuring 29x29 cms

- slightly narrower than your baking sheet


4 large paper clips


the chocolate melting pot base and one melting pot


Before you begin


Secure your parchment to the baking sheet with the four paperclips


Draw circles on the parchment measuring approximately

6 cms in diameter – I used a straight sided pastry cutter – anything

circular will do


As a guide you'll get approximately 9 circles on the parchment.

Leave space between each circle.


When you've drawn your circles turn the parchment over

so that the pencil side is face down, then secure again with

the paperclips


Off we jolly well go!


Editor's January Pick #18: The dressing to go with the chicken salad (or whatever you fancy!)

Editor's note: I've been on a "fly by the seat of my pants" cooking phase at the moment so stumbling on little recipes like this one are a joy - better still stop me wandering aimlessly around the supermarket wondering where they've moved everything to this week. An extra bonus, if it ever goes terribly wrong I don't have to tell anyone so win-win! Fantastic flavours that go with chickpeas as well as chicken.


The dressing … to go with the chicken salad

Who would have thought you'd be drizzling a quintessential Italian combination of extra virgin olive oil and balsamic vinegar – a marriage we already know is made in heaven – with another Indian classic – tandoori chicken tikka.


The dressing


4 tbsps extra virgin olive oil

1½ tbsps balsamic vinegar

1½ tsps brown sugar

¼ tsp coarse black pepper

¼ tsp cumin powder

pinch of salt


Whilst the chicken is cooking, with a whisk mix together all the dressing ingredients and leave to one side.

A few thoughts so far :

I'd wear gloves when you coat the chicken – turmeric and chilli will stain your hands as well as equipment.

Make sure your “oven tray” has sides – unless you have a burning desire to clean your oven!

I used soft dark muscovado sugar in the dressing.

I marinaded the chicken from 11am – 7.30pm. It's very important that you cover the chicken marinade and keep it in a cold place. If you keep it in your fridge then bear in mind it's raw chicken and as such should be kept on the bottom shelf and more importantly that it is kept away from cooked food.

When the chicken is cooked I know you'll want to taste it – cook's privilege after all – a lot depends on your palate and that of your guests but tasted on its own you may find it a tad hot. I'd suggest that before you rush to judgement wait until you've assembled and tasted the completed salad.

A word about the “heat” of the spices. Remember recipes are meant to be a guide they are not set in stone. If you find the spices too powerful don't let it put you off – try reducing the green chilli paste, turmeric and red chilli powder from 1½ tsps to 1 tsp each.

It's personal taste after all – it's whatever suits you.


Editor's January Pick #17: Julienne Peeler

Editor's note: After last week's selections it would be remiss of me not to round them off nicely with a further related tip from the archives in the form of a julienne peeler. Now I'm a pretty modern person and rather rashly thought at first glance "That's just a peeler" but aha! How little do I know, this little gadget is ingenious and I'm eternally grateful for the tip. Grateful. Is this mic on? Anyway, £10 and change on Amazon and will do you more than just coleslaw. And into the bargain I now know what julienne means! 


The coleslaw conundrum …continued … say hello to your new best friend!

The julienne peeler - every serious cook should have one!

Here's another thing that gets on my wick – entirely related to shop bought coleslaw you understand – carrots either sliced so finely they are mush or so chunky and uneven you have to make an unscheduled trip to the dentist – without being ridiculous your slaw should be of a similar size.

Carrots bleed if you grate them – not to mention pebble dashing every nook and cranny in your kitchen – how is it possible that grated carrot can jettison so far?

Ta dah – enter the julienne peeler.

Here it is, along with the uniformly sliced strips of carrot it produces :


A neat piece of kit and inexpensive too.

The result of all your hard work looks like this :


Of course you could, if you prefer, dust off one of the gazillion attachments that belongs to your food processor/mixer for which you paid an exorbitant price and, if you can remember which bit goes where, use the slicer cum grater. Oh and create a washing up mountain to boot!


Saturday, 22 January 2022

Editor's January Pick #16: Coleslaw Conundrum - an uphill battle!

Editor's note: It's hard to read a single blog post and then not carry on, and whilst I wouldn't want to overstay my welcome so I've chosen the follow up post that talks through more options and tips on making coleslaw - it's too good to miss. I wholeheartedly agree that buying ready made from a shop is at best a form of culinary roulette!


The coleslaw conundrum - an uphill battle!

I have friends and students who really dislike coleslaw and would pull a face that you're not supposed to see and then decline. The most frequent comments are - “it's tasteless and too much dressing” “I like the combination of vegetables but the dressing is too creamy and sickly”

I do like a challenge and consequently was delighted to hear “completely different to shop bought” “the dressing is very light not like the shop bought stuff”, “refreshing, tangy and delicious”.

If you don't want to be bothered with slicing and dicing then you could choose a good quality or your favourite shop bought brand of coleslaw and enhance it – there is without doubt a world of difference out there – it does not necessarily follow that the most expensive is the best, if you get my drift.

Obviously industrial processors are used for the mass produced product, hence the huge chunks of tough, woody cabbage in the mixture. So, if you are going to use a ready prepared version and make it your own you might want to fish out the larger pieces of cabbage and slice/chop/dice at will!

Add any of the variations mentioned in the Coronation Slaw recipe – to begin with the curry powder, lime juice and mango chutney then the apricots and sultanas. Add chopped nuts – walnuts or pecans would work well or a sharp flavoured apple, peeled quartered and diced. It's whatever floats your boat but is more practical if you don't have the time to slice and julienne the cabbage and carrots.

There is another speedier option – you can buy bags of coleslaw mix – in theory ready to use. The downside is that this product is mass produced as is the ready-made coleslaw and suffers the same fate - large inedible slices of cabbage et al. However it's nothing a chefs knife can't put right – tip it onto a chopping board and refine! The upside is it's practical and if you want to road test creating your own slaw it's worth a shot.

I don't want you to get the idea that I'm a coleslaw snob – too late was the cry!

Editor's January Pick #15: Coleslaw Conundrum

Editor's note: I often find myself with random cravings for food and coleslaw is one of the foods one which hopefully isn't that unusual. So when I do it's a sure-fire thing there'll be a blog post up on MiamMiam to either talk me through what I'm doing, give me inspiration to try a twist, or tell me where I might be going slightly wrong. So for one of the finest takes, I present from 2017...

(As a side note and not connected with this piece at all I found out whilst glancing through the blog that deglazing a pan it turns out does not involve a power sander, and I wish I was making that up...)


The coleslaw conundrum - Coronation Slaw


My quest for a good quality coleslaw has been going almost as long as the vegetarian burger.

I mentioned the slaw in My Quest with a photo of it, alongside the corn and chickpea burger and promised that the recipe would follow, here it is :


Coronation Slaw


110g white cabbage, finely sliced – approximately

one third of a medium size cabbage


1 carrot – peeled and sliced with a

julienne peeler

1 spring onion – 15g finely sliced


salt and black pepper


30g ready to eat apricots, finely diced

30g sultanas soaked in mango and apple juice


50g mayo

50g sour cream

1 tsp mild curry powder


squirt of lime juice

1 tbsp mango chutney


If there's one thing that gets on my wick it the huge lumps of woody cabbage you always find in shop bought coleslaw.

If you are of a similar mind and decide to try this recipe, I promise you that attention to detail is worth the effort. Here's what I mean :

First up slice a “cheek” of cabbage – a sharp paring knife is the best piece of kit – smaller and more easy to control – with care!


The recipe given will give you a box of slaw – measuring approximately 11cms x 6.5cms x 5cms. One box lasted me a week, a spoonful here and a spoonful there – you'd be surprised how well it fits as a side to lots of main dishes and particularly as part of a sandwich.

To be continued ...


Editor's January Pick #14: Kofta canapés, meatballs and burgers

Editor's note: Now you've read the rules, time to expand on them if you so wish! It didn't feel right to bring up the recipe without showing off the accompanying photo-guide. And, possibly more importantly, the idea of using the recipe for other dishes, like a burger. Same deal, same process, just a different shape and how you zhuzh it up. 


Kofta canapés, meatballs and burgers …

the photo guide

Use a foil tray with 2 tbsp plain flour – it enables you to roll around the koftas to coat with flour without having to “assist” them.


If you would prefer a larger version then use a dessert spoon of mixture, treated in exactly the same way, like these :


Finally, if you're in the mood for a burger – but one with Indian flavours, have a look at these :


These burgers are 110g or 4oz in old money.