Wednesday, 23 December 2020

A doorstep delivery and a taste test …

My plan is to do a doorstep delivery to a couple of friends – what can possibly go wrong - at least my friend won't have to make dessert for the evening meal. I cut a slice for H – here I'm on dangerous ground – cheesecake isn't his favourite but if he enjoys it then I'm in with a chance. When I served the slice I said “... I know it's huge just give it a try and leave what you can't finish”. Silence is good – an empty plate even better!

I received a message from my friends, here it is :

... Wow, that dessert was awesome, each layer was

delicious. We have never tasted such a cheesecake,

well done and thank you”.


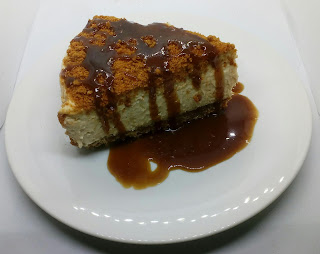
If you're a fan of cheesecake and salted caramel then this is a match made in heaven.

It has to be said I'm not a dessert person – but even I enjoyed my taster - it was the salted caramel that did it!

Now all your plans have been tipped upside down here's a thought – you could make the cheesecake and do a doorstep delivery giving a slice to people who have a sweet tooth and are now on their own?

Here's to a happier and safer New Year and, as you'd expect, there's more to follow.

With love

Fingers crossed it works ...

It does – eureka!


Take your time and gently does it


To ease the cheesecake from the base use a

palette knife, gently and slide it on to the cling

film – the base is set firm, especially if you've

used a tamper. Sprinkle the additional 80g of

crushed biscuit topping over the cheesecake 


salted caramel sauce – made ahead

at a time that suits you – all that remains is to cut

a slice and drizzle


Here it is in all its glory!


Now for a doorstep delivery and a taste test ...


The cheesecake filling and another piece of kit!

You'll need two medium mixing bowls – one for the soft cheese and Biscoff spread and another for the cream, vanilla essence or bean paste and icing sugar.

Here's the cheese and biscoff spread – you'll

find life easier if you add the spread to the cheese and

mix gently by hand, then continue with the electric hand mixer


Sift the icing sugar directly into your other mixing bowl (with

your scales set to zero, through a sieve) whisk in the

measured cream and the vanilla, gradually, then use the

electric hand mixer until you have firm peaks


Gradually fold in the cream mixture to the cheese and spread

mixture – I used a spatula


Here it is – ready for the fridge

The piece of kit you're looking for is a vase – the one I used measures 12cms/5” in diameter x 20cms/8” high – upside down.


It's not easy to photograph but you get

the idea!


Here's why I used the vase


Fingers crossed it works!


Time to get cooking and the photos!

After the miserable news at the weekend spoiling plans for Christmas I'm glad I decided to crack on with the cheesecake. It's not much I know but a distraction creating a delicious dessert – she says hopefully, might help.

Here goes with the photo guide :

I always prep the liners ahead, it's a

fiddly job but well worth the effort, ready to grease

and secure with unsalted butter


It's so much easier decanting the biscuits

in a bag, ready to crush and crumb with your

rolling pin


Ta dah – no mess and easy to see the texture


My trusted tamper – the perfect piece of kit

to press down the biscuit base in the tin


Coming next – the filling and another piece of kit!


Saturday, 19 December 2020

The salted caramel sauce

Here's the method for the sauce, given in the original recipe :

Next make the salted caramel sauce. Place the sugar and 120ml water into a saucepan. You will need a medium sized plan as the mixture will bubble up a lot. Heat the mixture on a low heat until the sugar is completely dissolved. Add the butter and stir until melted. Again I prefer to use unsalted butter.

Keeping the heat on low heat the mixture for 15 minutes. Do not stir the sauce in this time. Don't walk away and leave unattended!

Remove the sauce from the heat and immediately whisk in the double cream, vanilla essence and salt. Be very careful as the sugar mixture will be very hot and will bubble a lot whilst adding the cream. You can use vanilla bean paste if you prefer – ½ tsp.

Whisk the sauce until it is well combined. Set aside to cool.

Personally I find this sauce recipe a bit of a faff. Set down below is my version, with an optional extra of stem ginger.

I prefer my salted caramel sauce to be rich and dark in colour too which is why I use soft dark brown sugar.

110g/4oz unsalted butter

225g/8oz soft dark brown sugar

2oz chopped stem ginger (optional)

275ml/10 fl oz double cream (or whipping cream)

1½ tsp salt


Heat together the butter, sugar and ginger. When dissolved add the salt and whisk in the cream.

Simmer for 15 minutes, stirring.

The stem ginger in this recipe is optional but it gives a sharpness against the richness of the cheesecake.

One batch of the recipe produces approximately 539g of the sauce and you can portion and freeze for convenience.

Time to get cooking and take some photos too!


Biscoff and Salted Caramel Cheesecake – the method

What follows is the method taken exactly from the recipe. My tweaks and hints and tips are designed to help and underlined.

Method

Line the base of your tin with baking parchment. This will help you lift the cheesecake when it's set. I'd line the sides of the tin as well as the base, it will be easier to remove and won't catch.

Break all of the biscuits up into crumbs. You can do this with a mortar and pestle or in a cloth with a rolling pin. Transfer the biscuit crumbs to a large bowl. You'll find it less messy if you place the biscuits in a food bag, clip and then roll the biscuits until you get the crumb desired!

Add the melted butter and salt to the crumbs and mix until the biscuit is well coated. I use unsalted butter.

Firmly press the crumb mix into the base of the cake tin to create an even base. Chill the base for at least 30 minutes before making the filling. I'd leave the base for as long as is convenient – the longer the better.

Place the soft cheese and Biscoff spread into a large bowl.

In other large bowl place the cream, vanilla extract and icing sugar. You could use 1 tsp of vanilla bean paste, rather than extract.

Beat the soft cheese with an electric whisk until the Biscoff spread is thoroughly mixed in.

Next whip the cream mixture until you can see firm peaks.

Carefully fold the cream mixture into the soft cheese mixture until mixed through. Do not over mix. Add the cream mixture to the cheese mixture gradually and slowly.

Once the base has set fully spread the filling carefully over the base making sure you do not pull crumbs from the base into the filling. Smooth over the surface to create a level finish. Set aside in a refrigerator to set for at least 1 hour. Leave for longer than an hour if that's convenient. If you intend to leave longer cover the tin with cling film.

For the salted caramel sauce see the recipe that follows together with an alternative.

When the cheesecake is fully set bring it out of the fridge and take it out of the cake tin. Take it steady – the reason I suggested lining the sides of the tin as well as the base is so that it should comply! I'd suggest using a sturdy vase, turned upside down – one that has a wide base. Place the tin on the top of the base and gently slide the tin downwards, leaving the cheesecake on the base. Have your serving plate at the ready – you have options here – cheat and leave the base and lining where it is or use a palette knife and gently lift the edge of the lining paper and slide off the base on to the serving plate.

Break up the remaining biscuits into a chunky crumb. Once again I'd use a food bag, clipped and a rolling pin – you can control the consistency of the crumb because you can see it – if you wrap the biscuits in a cloth you can't see.

Make sure the sauce is full cooled then drizzle around a third of it on top of the cheesecake. Sprinkle on the biscuit crumbs then drizzle on another third of the sauce. Reserve the final third of the sauce to drizzle on to the cheesecake slice by slice as you serve it.

The cheesecake should be fridged and eaten within two to three days – ha ha!

Next up - the sauce and an alternative ...

Back to the dessert!

This is definitely decadent and not chocolate. The recipe comes from the Vegetarian Society Cookery School. Before you close down and run – it's called Biscoff and Salted Caramel Cheesecake – interested?

I've been a member of the Vegetarian Society for decades. I get seasonal magazines which are brilliant, full of information and ideas. You don't have to be a vegetarian or vegan for that matter – it's all knowledge! When I received the Summer/Autumn magazine I was intrigued to read about their “Online Cookery Classes” - you could choose Easy Veggie Favourites (Part 1) or a Vegan version. For £15 you get six months' unlimited access to video content. You're also able to download and keep the recipes plus other stuff too.

It seems like a good deal for £15 plus the fact I saw two recipes advertised that I really liked the look of. Cheesy Lattice Pie and Biscoff and Salted Caramel Cheesecake.

I'm always telling you not to try a recipe for the first time when you're under pressure - you've no idea how accurate the recipe is and whether it needs tweaking – into the unknown! My Christmas is going to be very strange and quiet this year so I'm road testing this cheesecake now, ignoring all my own rules, so that if you fancy having a go it might be an idea for New Year?

What follows is the verbatim recipe and method – I'll add my tweaks and hints and tips with the method. It might look long winded but the upside here is you can spread the tasks and the elements aren't difficult.

Here goes :

Biscoff and Salted Caramel Cheesecake

Serves 10


Preparation – 30 mins plus 1½ hours setting time

Cooking – 20 minutes


You will need an 8” deep spring-clip or loose bottom

cake tin


For the base

150g oat biscuits

125g Biscoff Lotus biscuits

125g butter, melted

large pinch of salt


For the filling

500g plain full fat soft cheese

300ml double cream

100g icing sugar, sifted

3 tbsp Biscoff crunchy spread

2 tsp of vanilla extract


For the sauce

200g golden caster sugar

60g butter

125ml double cream

1 tsp vanilla extract

1½ tsp salt


For the topping

80g Biscoff Lotus biscuits


Method and tips up next!


I have a list!

Before I move on to the dessert I promised, I've a hotchpotch of bits and pieces I've been meaning to tell you before the Christmas Box took over!

None of what follows is connected – hopefully it will entertain.

Do you remember back in September and in particular “pasty gate”? I wasn't happy with M&S and their attempt at a cheese & onion pasty and went on to give you my version of a Greggs masterpiece.

Here are extracts from an article written by Marina O'Loughlin – (for those who don't know her Ms. O'Loughlin is the Food Critic for The Sunday Times). Apart from her weekly restaurant review she occasionally adds a short piece entitled “Plate of the nation” :

Back in poverty-stricken days I had a real fondness for these squidgy calorific parcels …

A couple of years back I revisited the cheese and onion pasty of my youth and found it dry, dusty, not in any way pleasurable, chalking my distaste down to some kind of maturity.

Perhaps it's time to give my former fetish another go? It's still calorific and, God help me, blandly splendid. The pastry is crisp at the edges, gooey in the centre – I'm a bit of a fan of the pastry soggy bottom.

Greggs is a raging success story for a reason: cheap, filling, unchallenging food that sometimes hits the spot you had forgotten you even had...”

Thank you Ms. O'Loughlin!

Next on my list a bit of fun with potatoes, specifically roasties. It was my Grandaughter Alyce's birthday at the end of November and she lives in the North West so no visiting, no nowt as we say up North. Alyce has a passion for roast potatoes and, I'm flattered to say, mine in particular. I decided to throw caution to the wind and send a brown paper package, suitably packed and ice packed I might add, of roast potatoes for her birthday. Expensive roast potatoes I hear you say – you'd be right, however sometimes you've just got to make someone smile and send a gift they aren't expecting. Did it work? It surely did – the reason I'm telling you this story – it'll make you smile too.

The final tick off my list is another idea for a festive box – not necessarily for Christmas, for any occasion. I found a striped box which had a lid that closed on a small circle of velcro – aha I thought lets give it a zhuzh with a fancy bow and see what happens – have a look :


I used the box for one of my “brown paper packages … Christmas box” hampers and delivered it – at a distance and safely of course – last week. It was very well received I'm delighted to say and the moral of this story – you never know what you've got stashed away that might have another life!

Note to self – if you do venture forth even just supermarket shopping after the holidays you'll probably find boxes at bargain prices along with the ribbon too.

Back to the dessert I promised!

Saturday, 12 December 2020

My final mornay treat ...

is cauliflower cheese. You never see cauliflower cheese served with a Christmas Dinner. It's probably a good idea since cauliflower cheese deserves your whole attention, here's what I do :

Cauliflower Cheese

There's only one problem with cauliflower cheese – you always seem to finish up with watery sauce, which I hate!

I steam a whole head of cauliflower (medium to large), minus its leaves, until tender and then set it aside on a tray lined with layers of kitchen roll. This allows all the moisture to drain away from the cauliflower, ready to finish later on. Steam your cauliflower the day before you need it – replace the kitchen roll two or three times, then double wrap the cauliflower in cling film, bag and fridge for the next day. Next make a mornay sauce – which can be made ahead and fridged if more convenient. I also grate Parmesan cheese in readiness to garnish the cauliflower dish and plan to be generous and sprinkle liberally!

Pat the cauliflower dry with kitchen roll and remove the florets – keep them to a similar size if you can and place in your serving dish greased with unsalted butter. (23x23cms as a guide). Season the cauliflower with celery salt and black pepper, spoon over the mornay sauce, sprinkle with Parmesan and add more black pepper.

It's all cooked so will only need 30 minutes at 180fan/200c/Gas 6.

Yum!

The moral of the mornay sauce is, simply, by making one sauce your options are endless.

Christmas comfort food doesn't have to be thrown onto a plate – it should be delicious comfort, preferably served in a pasta bowl which sits neatly on top of your lap with a spoon or bread for dunking. Not to be served until after you've walked the dog for two hours – you won't feel guilty.

My final treat for the shopping list … a small Camembert cheese - ensuring it's in a stapled box, ready to be baked for 15 minutes with some baked sourdough straight out of the oven, torn and ready to dunk. What's not to love.

More holiday comfort food coming up – now it's time for a dessert!


The mornay sauce and the fishcakes … and my second treat

By the time Boxing Day arrives we'll all be yearning for a lunch or a supper that's simple and doesn't include turkey or any of the usual suspects!

The following recipe comes from The Ivy – The Restaurant and its Recipes by AA Gill.

The best fishcakes in the whole world!

The Ivy Fishcakes


(makes 8 – freeze what you don't use)

800g dry mashed potato, no cream or butter added

650g salmon fillet poached in fish stock and flaked

2 tbsp tomato ketchup

2 tsp anchovy essence

3 tsp English mustard

salt and black pepper

Plain flour for coating

Mix together the potato, half the salmon, the ketchup, anchovy essence, mustard and seasoning until smooth. Fold in the rest of the salmon. Mould the mixture into 8 round cakes and refrigerate.

When you're ready to serve preheat the oven 180fan/200c/gas 6. Lightly flour the fishcakes and fry them until they are coloured on both sides. Bake for 10/15 minutes.

You'll see that the recipe includes 3 tsps of English mustard – who'd have guessed! The combination of the tomato ketchup, anchovy essence and the mustard produces the best fishcakes – high praise.

The Ivy serves the fishcakes with Sorrel Sauce & Spinach – I serve them with the Mornay sauce and a raw slaw. You could serve them on a bed of mushy peas (pea purée if you want posh) home-made mayo or even a curry sauce – choose your own guilty pleasure!

My final Mornay treat.


My secret ingredient

Looking at the recipe for the Mornay sauce and the Dijon mustard in particular reminds me of another mustard that's always in the fridge and a spare in the pantry too.

Mustard generally is an acquired taste – English mustard is too hot for my taste – I don't want my head blown off, even the tiniest amount seems to overpower. There are exceptions to every rule I know – English mustard is part of The Ivy's Fishcakes recipe – you wouldn't know it's there but that's the skill of developing a legendary recipe but more about the fishcakes later.

Dijon mustard is an essential – it's delicate but distinctive flavour in sauces is perfect - in my house I use Dijon mustard with cheese on a sandwich, more famously of course it's part of a Croque Monsieur.

Here's my secret – Dijon mustard with honey. If you're not convinced about mustard I'd recommend you try it – it's mild and smooth with the slightly sweet hit of the honey. If you want a decadent sandwich with a difference, toast two slices of wholemeal bread, spread one slice with mayo and the other with Dijon honey mustard and add thin slices of mature Cheddar cheese.

There are various makes of Dijon and I'm sure there are good and bad. My favourite has to be Maille - originally made in France and around since 1747 (now a subsidiary of Unilever)

Here's the original and the honey version :


Add a jar to your shopping list - you won't be sorry!

Back to the Mornay sauce and the fishcakes and my second treat.


A message to the cook!

Christmas this year will be like no other - any plans we had are gone and it'll be Christmas at home “a deux”. Nevertheless meals have to be planned and shopping lists prepared.

My message to the cook is, don't forget yourself. We all have our favourites and guilty pleasures – sweet or savoury - so adjust your shopping list accordingly!

I have planned a Christmas Day menu and it's probably as traditional as it has been for many years - it's not difficult if you're a list maker and well organised. Whether there are two of you or twenty two the work is pretty much the same – may be not so many roast potatoes – actually cancel that, is there such a thing as too many roast potatoes?!

What tends to happen though is the Cook is so busy looking after everyone else she (or he) forgets to include herself (or himself). I don't mean on Christmas Day itself – the Cook is generally exhausted and fit for nothing other than a large G&T when everyone is sat down at the table.

I'm taking my own advice and have planned a treat or two. I'll enjoy my treat on Boxing Day or the days following.

It may seem a strange choice but top of my treat list is a Mornay Sauce. Once the sauce is made it can be divided into pots and “freezered” (my new word). Next up – how I'll use it.

Boxing Day brunch will be a mushroom omelette which may include a handful of grated cheese – it could be Gruyere or Mature Cheddar whichever is most convenient. I'll treat myself to Portobellini mushrooms and when I'm in the kitchen doing all things Christmas I'll fry the mushrooms so that all the liquid is absorbed – nobody wants a soggy omelette! I'll box and fridge them until I'm ready. On the day if it's to serve one person (me!) I'll whisk a couple of eggs and add the cheese. I'll heat a small non-stick frying pan, add the cooked mushrooms to the eggs and cheese, add a sprinkle of celery salt and then tip into the pan. Cook for 2/3 minutes then flip and repeat, serve on a warmed plate.

I don't want you to think that I've left H out – he's not keen on mushrooms so he'll get an omelette with ingredients of his choice!

Where does the Mornay sauce fit in? I'll have taken a pot out of the freezer the previous night and fridged. Whilst my omelette is cooking I'll warm the sauce on the hob and then drizzle, generously, over the omelette. It may sound strange – if you're fond of the ingredients you'll love it. I'll serve myself a small jug of extra sauce on the side – just in case.

Here's the recipe :

Mornay Sauce

Serves 4-6


40g unsalted butter

40g plain flour

600ml of milk – I use semi skimmed

150g mature Cheddar cheese

(or a combination of Cheddar and Gruyere)

salt and black pepper

½ tsp Dijon mustard - optional


Melt the butter in a pan and stir in the flour. Cook gently for a minute, stirring – make sure you don't brown the mixture. Gradually add the milk whisking constantly and eventually bring to the boil, whisking until it's smooth and thick. Lower the heat and simmer for 2 minutes, then add the cheese, mustard and season. I'd taste before you add salt – there's salt in the cheese – adjust accordingly.

I can taste it now - Happy Boxing Day brunch!

P.s. If of course you have like minded family and or friends with you then you can make a larger version of the omelette or even two, remembering of course to take out sufficient pots of the Mornay sauce for everyone.

Coming up – my secret ingredient!


Saturday, 5 December 2020

A post script … I didn't forget the syrup!

I think you'll find this little gem really useful, here's the recipe - it's easy peasy :

Lemon syrup

200g icing sugar, sifted

8 tblsp lemon juice

To make the syrup place the lemon juice and icing sugar into a small saucepan and heat gently so that the sugar dissolves. Set aside to cool.

This will give you 300ml(approx) of syrup.

Sifting the sugar ensures it dissolves evenly, no lumps required!

The syrup deserved to look fancy schmancy – here's what I found :


This was perfect for my Christmas Box idea, the exact size to nestle into the box – 50ml. I paid £19.99 for 12 x 50ml bottles, complete with cork lids, labels and twine, by Maison & White – you won't be surprised to learn that I bought them from Amazon.co.uk. There are all sorts of different shapes and sizes to choose from.


Ta dah!

Your serving choices :

Soft drink, a drop of syrup in a tall glass, top with chilled soda water and just swizzle.

Still soft – drizzle over ice cream, add a square or six of Rocky Road and fresh fruit for an instant dessert.

Spiked – add a generous drop of Limoncello liqueur.

Sparkling and special – for the festive season add a drop in a Champagne flute or a Martini glass, top with Prosecco, swizzle and enjoy.

Sounds like a great plan – any of the above – something for everyone!

Thursday, 3 December 2020

The brown paper package and the Christmas box – the photos


here are my offerings, in the box


my understated brown paper package, tied

up with string


my overstated brown paper package, tied

up with festive ribbon – the bow stays put

because the ribbon is wired at the edges and

it's 6cms/2¼” wide

I hope this series has given you some inspiration – small gifts - made and given with love. I have another couple of final bits for you.

In the meantime, Merry Christmas but most of all stay safe and well.


3 Cheese Dainties - the photos


here they are, double egg washed, edged

and sprinkled, ready to bake or chill if you prefer

note the “dessert fork” edging


fresh from the oven!


bagged and tagged – ready for the Christmas

Box

The final packaging ...


3 Cheese Dainties

This is the latest of my cheese and onion variations on a theme and perfect for a snack or part of a “picky bits” supper during the festive season and the last recipe in this Brown paper packages … Christmas Box series.

3 Cheese dainties

100g mature Cheddar, 75g Red Leicester

and 75g Gruyere, grated

1 large onion, finely chopped

drop of rapeseed oil

2 tbsp chopped flat leaf parsley

celery salt and black pepper

1tbsp of Dijon mustard

1 x 320g puff pastry sheet

1 egg, beaten

1 tbsp Nigella seeds


Pre-heat oven 180fan/200c/Gas 6

Use a medium sized saucepan, heat the oil and then add the onion and sweat on a low heat for 5 minutes until softened. This element can be prepped ahead, cooled, boxed and fridged until required.

Unroll your pastry sheet on a board or work surface – don't remove the pastry from the paper liner – it's perfect for your baking sheet for cutting out, filling and then lifting on to your tray and baking. No mess! The sheet will give you 15 circles using an 8cms/3” cutter. You may need to re-roll the pastry for the final 3.

Add the cheeses, seasoning, mustard and parsley to the onion. Place a teaspoon of filling in the centre of each circle, edge half the circle with the beaten egg, then fold to create your dainty, use a dessert fork to edge the dainty then egg wash. Use two teaspoons to form the filling, it helps to keep it firm and easy to place. Make a mental note where you begin to egg wash, leave for a couple of minutes, then repeat. Place the tray of dainties in the fridge until required.

Sprinkle with Nigella seeds and then bake for 20 minutes – check after 15, until golden brown.

A word of warning … it's very difficult not to consume these when taken out of the oven – you might want to plan another batch!

If you want to make ahead, having double egg washed and fridged, you can then freeze them on the tray until frozen and then bag, ready for when required. At least that way you won't be able to eat them all!

Here's a photo or two …

Hokey-Pokey – aka honeycomb and chocolate

You have to be a certain age to remember cinder toffee – it's downside was that it almost always stuck to your teeth – not a good look! The recipe that follows gives you a honeycomb hit but because it's with toasted salted pecans, chocolate and bashed crunchie bars it's dangerously moorish!

Hokey-Pokey


75g unsalted butter

100g pecan halves, roughly chopped

sea salt flakes

300g dark chocolate

2 tbsp golden syrup

3 x 40g Crunchie bars

Heat a small knob of butter in a pan and when foaming, tip in the pecans with a pinch of sea salt flakes. Stir over a medium heat for 3-4 minutes or until toasted – you will smell them when they are ready. Tip the nuts into a bowl and leave to cool.

Break the chocolate into small pieces and melt, in a medium pan, with the rest of the butter and the syrup, stirring. Once the chocolate mixture is smooth, take the pan off the heat. Bash the Crunchie bars (in the wrappers – less messy!). Add the Crunchie pieces, along with the toasted pecans, to the chocolate mixture. Gently mix together before transferring to an 18cm round or square foil tray 23x23cms/9x9” (or cake tin if you prefer to wash-up!)

Leave to set in the fridge.

Remove the slab from the foil tray and cut in half – have the long side in front of you. Cut into similar size strips – cut those strips in half and keep going until you have small squares measuring 1.5cms/½”. As a guide if you follow the above you'll get 84 pieces per half, so 168 in total. If you want larger squares you'll obviously get less. I find a Chef's knife is the best kit to cut the squares.

Without doubt what lifts this treat to another level is the salted toasted pecans – make ahead and box when cooled until you're ready.

If you haven't made this before then be prepared … to get repeat orders, you'll be a very popular person.

The final recipe … the dainties


Cheese Scones

Everyone has their own favourite “go to” recipe for scones so it may be a complete waste of time! For those who don't I know that this works for me :

Cheese Scones

500g plain flour (1lb 2oz)

1 tsp salt

2 tsps bicarb

4½ tsps cream of tartar

125g (5oz) unsalted butter

75g (3oz) mature Cheddar cheese, grated

300ml milk

1 large egg, beaten

6.5cms/2½” fluted cutter

flour on the side to dip the cutter

Pre-heat oven 200fan/220c/Gas 7

Sift the flour, salt, bicarb and cream of tartar into a large mixing bowl. Rub in the butter until you've got breadcrumbs, add the grated cheese then add the milk – all of it – mix with a round bladed knife, roughly and then tip onto a floured surface and knead lightly so that you have a dough. It should be 3cms/1¼” thick. Remember to dip your cutter into the flour before cutting.

How many scones you get depends on the size of the cutter you use – using a 6.5cms/2½” fluted cutter you'll get 12 – they are huge. If you're intending to use as part of a Christmas Box/Brown paper package then you might want to consider using a smaller cutter – scaled down they'll look neater when bagged and tagged to go in your Box! 5/2” or 6cms/2¼” approx would be perfect.

Place on a baking sheet, dusted with flour, then brush with beaten egg. Bake for 10 minutes – risen and golden brown.

It might seem an odd contribution to a Christmas Box – all I can say is that if ever I'm asked to cook or bake for a gathering cheese scones are top of the list. Give your family and friends what they love - not what the season dictates - a person can only suffer so many boxes of dates or the orange and lemon slices from yesteryear.

Now for the Hokey-Pokey – chocolate and honeycomb that is to say!

Design your own!

 This idea morphed when I discovered that my Nephew Lucas (and Editor in Chief and IT Adviser) declined the original version because he hates cherries! I like a challenge, so the “design your own” came to pass :

Design your own Rocky Road

Traditionally Rocky Road is made using Brazil nuts,

glacé cherries and marshmallow.


Rules are meant to be broken - take a look at the

list below and if you'd like to design your own

Rocky Road swap any or all of the three

ingredients in the original recipe for the

same weight


(or may be four if you want to stay true

to Rocky Road and include the mini marshmallows)


Cashew

Peanut

Pistachio

Pecan

Hazelnut


Glacé cherry

Dried sour cherries

Cranberry

Apricot

Banana chips

Pineapple

Sultanas


Nougat

Turkish Delight

Fudge

Toblerone

Praline

Salted Caramel

Mini Marshmallow

Popping Candy


My latest versions are :


Pecans with dark cherries and vanilla fudge

Pistachios, apricots and Turkish Delight


Cheese scones on their way!


Rocky Road – don't make life difficult!

As I said at the beginning of Brown paper packages … use tried and tested recipes – what's your signature bake or preserve or pastry? This sweet treat has always been a resounding hit so it's a must have in my Christmas Box – here's the recipe :

Rocky Road

250g dark chocolate

150g milk chocolate

175g soft butter, unsalted

4 x 15ml tbsp golden syrup

200g hobnobs


*150g shelled Brazil nuts

*150g red glace cherries

*125g mini marshmallows


Put the biscuits into a freezer bag and roll with a rolling pin until you get a mixture of rubble.

Chop the Brazil nuts into different sizes.

Chop both sorts of chocolate into small pieces, or use chocolate buttons made for melting and then put them into a heavy-based saucepan to melt with the butter and syrup over a gentle heat.

Take the pan off the heat and add the biscuit and nuts, cherries and mini marshmallows. Turn carefully so that all the ingredients are coated with the syrupy chocolate.

Tip into a foil try (I use a tray bake 31x19x3.5cms/12½x7½x1¼”), smoothing the top as best you can, although it is meant to be lumpy.

Refrigerate until firm enough to cut, which will take about 1½-2 hours although it doesn't matter if you get sidetracked and leave it longer. Take the set block out of the tray. With the long side in front of you cut in half – set aside the other for the moment. Cut into 8 strips and then across – you are aiming to cut into 2cm/1” squares – there's no need to stress – approximately will do. If you manage to cut 2cm/1” you'll get 92 squares per half, 184 in total.

You can make the Rocky Road into whatever shape you want - cut into bars or squares. Store in an airtight container in a cool place for up to 1 week or freeze for up to 1 month.

This is the basic Rocky Road recipe. If you really want to push the boat out you can make it festive and use crispy Amaretti biscuits, crushed instead of the hobnobs.

If you'd like to personalise it design a version of Rocky Road as a special gift for a special person.

The three ingredients marked “*” can be swapped to suit.

Check out the “Design your own Rocky Road” sheet up next for some ideas.


Cranberry and red onion relish – the photos!


I was able to get preserving sugar, which was

a surprise


dice the red onion as finely as you can manage

it makes for a more refined texture – if that makes

any sort of sense!


I used good quality cranberries – the American variety

if you can get them – plumptious

Here are the jars I'd stashed in my garage


Here's the finished relish – delish


A choice of jars – those mentioned above

and a small kilner jar


Now for the Rocky Road!

The “Brown paper packages” and “Christmas Box” series

First up - Cranberry and red onion relish.

I think I prefer a relish to a chutney – I like the combination of fruit and a vegetable, letting the remainder of the ingredients do their thing. The other huge plus is that it doesn't take long. A chutney is fruit with additional spices and aromatics – usually taking at least an hour to cook and you have to live with the aroma in your kitchen for quite a while.

Here goes :

Cranberry and red onion relish

300g dried cranberries

3 medium red onions, finely diced

3 tbsp olive oil

7 fl oz of Balsamic vinegar

3 tbsp of preserving sugar

celery salt and black pepper


6 jars – my discovered stash, they

are 7 sided and measure 5cms/1¾” in diameter

x 7cms/2¾” high

Sweat the onion in the olive oil. Add the cranberries, vinegar and sugar and simmer gently for 25/30 minutes until sticky and reduced, season with celery salt and black pepper.

This recipe will give you 780g of relish – I filled seven jars as per the photos that follow.

If you can't get hold the preserving sugar you can use granulated.

Here come the photos!


Choices to make … boxes to fill!

Remember that nothing is set in stone and you can change your mind and tweak – make a list of what comes to mind and then sleep on it – or in my case go for a run – fresh air helps clear away the “broken biscuits” in my head when I can't think straight!

I've decided to mix savoury and sweet and I've based my packaging choices to suit the size of the cardboard box already illustrated. An odd number of treats look good when arranging – take account too of the size of “preserve pots” or jars – they don't have to be exactly the same but a smaller pot or jar looks better than, as an example, an average jar of jam which is approximately 450g.

Here are my choices :

Cranberry and red onion relish

Rocky Road

Cheese scones

Hokey pokey

Three Cheese Dainties

I haven't forgotten the syrup – I have a couple of extra ideas up my sleeve – all will be revealed!

Action plan :

The relish can be made now and fridged, ready

to label and zhuzh


The Rocky Road and the Hokey Pokey ditto – and

then bagged and into the freezer ready to transfer to

your bag or box of choice


The scones and dainties I'll leave until nearer the

time so they'll be fresh and give the giftee the choice

of freezing or demolishing immediately

Sounds like a plan – next up is the series of recipes with photos to help, mentioned during my chat with Bernie Keith, on his Radio Show, The Bernie Keith Show, BBC Radio Northampton on Thursday 10th December 2020 at 10.45am - these are the Brown Paper Packages tied up with string and Christmas Box ideas just in case you'd like to have a go at making your own gifts!