Saturday, 29 August 2020

The back catalogue – the jam and a new idea


I wasn't going to make jam from this current harvest but then I received a What's App message from my Dil (daughter in law) pleading for a jar. I couldn't refuse, it's her favourite – here it is :


different size jars to suit everyone

Can't say I'm a huge jam fan and the only time H would ever have it is on a Sunday morning on top of a slice of toast. I treated him this morning - during the week I might add - and presented him with a slice of morning toast liberally spread with the new jam and his cup of tea of course – verdict – yum, it was worth it.

Then I had another thought, hence another experiment. I had half a tub of roasted damsons in the fridge. I thought a more refined syrup or drizzle if you like, was called for. Not everyone wants whole fruits. I tipped the damsons into a fine sieve set over a jug and forced the fruit against the sides to release the syrup. I discarded the squished damsons then boxed and fridged, ready for use. Another idea for the freezer too, if you prefer.

Here's the result :


looks fab – I know I shouldn't
say so – it tastes delish

You never know when it might come in handy – poured over desserts or breakfasts!

P.s. I'm so glad I made the jam.

Next, a final back catalogue damson recipe, perfect for this time of year


Not in the back catalogue – the damson gin photos


As I said the thought of creating damson gin really appealed to H so I made sure he had everything to hand – here's the story so far :


Day 1
three ingredients, from the bottom up -
sugar, fruit and gin!


Day 2
a shake and you'll see already the colour
change – not very appealing I grant you but
hold that thought


Day 3
that's more like it – starting to look that
lovely ruby colour – you'll notice there are
two Kilner jars – we've already received an order!

The process was easy and H really enjoyed himself.

Watch this space, I'll keep you posted!


Not in the back catalogue …


but definitely damsons.

I'm going to mention Christmas – bear with me, there's a valid reason.

I wanted to produce something different from the harvest – it does require a smidge of organisation I'm hoping it's going to be worth it. It certainly got H's attention!

There's a fashion for flavoured spirits these days. Here's my contribution, damson gin – which will be ready for Christmas!

It's not my recipe but, as you'll see, it's easy :

Damson Gin

500g damsons
250g golden caster sugar
1 litre bottle of gin (or vodka if you prefer)

Rinse and pick over the damsons, removing any leaves or stalks, pat dry place in a good quality freezer bag and freeze overnight. The following day bash the bag to break the fruits then tip into a 2 litre Kilner jar or divide between two smaller jars.

Pour in the sugar and the gin and secure with the lid. Shake well. For the following week shake each day until the sugar has dissolved then put it in a cool dark place and leave for 2/3 months.

Line a plastic sleeve with a square of muslin and strain the gin through it. Decant into clean, dry bottles, seal and label. It's ready to drink but will get better over time – it will keep for over a year – very funny!

Next – the story so far, a few photos.


The back catalogue – what to do with the Asian Plum Sauce


I know it's not rocket science – but the sauce screams stir fry so here it is :

Serves 2


300g chicken fillet, cut into thin strips
Use quorn fillet for a veggie option
1 dessertspoon of rapeseed oil
200g of julienne veggies – of your choice
spring onions, finely chopped
carrots
sweet peppers
sweetheart cabbage

1 tsp ginger
100ml of plum sauce
40g of cashews – chopped
1 tbsp soy sauce

Serve with a side of kecap manis – aka sweet soy sauce

Before we begin – just in case you're not sure – julienne is a term that means your veggies should be cut into short thin strips – 1/8” wide if you want to be specific! You could use your trusted julienne peeler – that way you're certain to get a uniform “strip”.

Heat the oil in a wok or large frying pan on high, add the chicken and stir fry for 3 minutes or until golden. Transfer to a heatproof bowl.

Stir fry the veggies in the oil and ginger for 2/3 minutes, add the chicken and the plum sauce, cashews and soy and stir fry for a further 2 minutes until the sauce thickens.

You can serve with rice or noodles, in either case they should be cooked and ready to serve. Place a portion in each bowl and then top with the stir fry.

Two notes :

If you've made your own plum sauce you may find it's a tad thin. You can thicken it, ahead, with arrowroot then set aside. Arrowroot thickens well – it also gives you a glossy shine and it has no taste so will not interfere with your sauce. Mix 1tsp with a drop of water, heat 100ml of sauce and then gradually add the arrowroot to thicken. Ready to use.

If you've not made your own sauce you could of course buy a ready made version!

Your julienne veggies are available in the supermarket so if you're feeling lazy then you can buy them ready to use. You might want to check – without being too finicky – that they are all of a similar size.

Next up … a treat that's not in the back catalogue - other than it contains damsons - so it qualifies!

Saturday, 22 August 2020

The back catalogue – the best till last – Asian plum sauce


All the damson recipes given have one thing in common – they are “faff free”.

Here's another, this time for savoury dishes – could it be a stir fry this weekend?

Asian plum sauce

400g plums, stoned and quartered
50g demerara sugar
75ml (3fl oz) white wine vinegar
pinch of chilli flakes
1 whole star anise or ½ tsp of ground star anise

Cook for 20/25 minutes until the plums are soft. Leave to cool and then pass through a sieve and leave to cool. Box in portions to suit you then fridge or freeze. The recipe will give you 200ml of Asian Plum Sauce.

Here it is :


Ready for the freezer!

What to do with your sauce? Recipe up next ...

The back catalogue – an ice cream and a new crumble


This ripple ice cream became a great favourite – definitely worth repeating!

Damson Ripple Ice Cream

I lifted the outer skins from the roasted damsons in readiness for folding into the ice cream. I have a useful piece of kit a pair of small tongs – absolutely perfect for this task – quick and easy – you don't have to remove the outer skin – I just thought it would give a better finished “ripple” effect.

It goes without saying that the ice cream base is my old faithful no-churn vanilla (see the Ice Cream label and Ritzy Rhubarb Ripple which gives the recipe) plus 300g of roasted damsons. Make up the recipe as usual but ensure that it's a stiff consistency – you need to make allowance for the fact that you are adding the fruit and will therefore loosen the mixture.

Crumble topping

This is a new version of crumble. Crumble is personal, some like it soggy, others not.

For those who don't like that uncooked line of crumble you always seem to get when baking straight on top of the fruit, then this is for you!

Serves 6-8
depending on portion size!

120g cold unsalted butter, cubed
120g plain flour
60g caster sugar
60g demerara sugar

Pre-heat the oven to 180fan/200c/Gas 6.

Using a large mixing bowl, add the flour and butter and rub in until you have fine breadcrumbs, then add the sugar and combine. Place on a baking sheet and bake for 15 minutes. Remove the baking sheet and leave to cool. Box and fridge when cool.

Here it is :


A buttery, biscuity crumble and no uncooked
layer in the middle!

Add to the fruit base when you're ready and pop into a pre-heated oven as above for 10 minutes.

Next up – the best till last.

The back catalogue – a couple of photos and the jam


The damsons - before and after photos :


Plumptious!


Eat me!

I served the “test run” cold with vanilla ice cream. Verdict – oh boy, yum – bring on the crumble!

A week later I harvested the next batch – another 7kg and for those who don't like metric measurements 1kg is equal to 2.2lbs in old money – it's time to call friends. There's no way I can keep pace with the volume and the tree is still loaded.

I gave away 4kgs together with recipe sheets and roasted my way through the remaining 3kgs – then transferred the treasure to the chest – freezer!

Time to take a breath!

Here's the jam recipe :

Damson jam

1kg damsons
300ml water
1kg jam sugar


Wash the damsons and remove any stalks. Place them in a large wide pan with the water and simmer gently until the fruit is soft. Press the damsons against the side of the pan as they cook to help the fruit give up the stones. Use a slotted spoon to remove the stones from the pan.

Simmer the jam until it has reduced by approximately half.

Add the sugar, stir until dissolved. Bring the jam to the boil and boil rapidly for about 10 minutes until the jam sets when tested.

Allow to cool for 10 minutes then remove the scum with a slotted spoon. Pour into warmed sterilised jars, fill right to the top then cover immediately with waxed discs and cellophane tops or lids.

To test for a setting point you can be fancy and spend money if you like and buy a sugar thermometer, boiling the jam until it reaches 105c or, the old fashioned way, place a saucer in the fridge. When the jam has boiled for 5 minutes place a teaspoon of jam on the saucer and return it to the fridge. After a couple of minutes, run your finger through the jam, it should wrinkle and feel thicker. If it's runny then continue boiling and test again. Don't continue to cook the jam whilst testing – you can overcook it, so turn the heat down as low as it will go.

The jam will keep in a cool, dark place for up to a year – if it lasts that long!

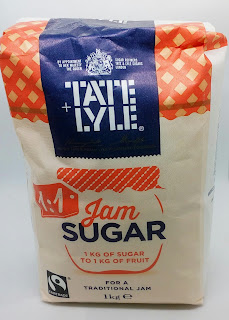
You can buy jam sugar – here's what it looks like :


I wasn't hopeful when shopping – who knows these days what's available.

Joy of joys!

Next … a back catalogue ice cream and a new crumble.


The back catalogue – a diversion


Before I continue with more easy, make ahead al fresco picnic ideas I'm interrupting myself – I've been overtaken by events … the damson harvest.

To recap damsons are tiny sour plums too bitter to eat like you would a plum - but they do make great jam and other stuff too.

You have to be quick – those that fall - “windfalls” are easy prey for the wasps and bruise. The last good harvest was way back in August 2017 the yield has been so poor since there weren't enough to make a batch of jam or anything much else for that matter.

This year the tree is heaving and with the hot weather and intermittent storms I don't want to risk losing them.

Here's the tree :


Now is the time I'm grateful for my back catalogue stash of damson recipes!

The damsons are early this year. As a test run I picked a kilo of fruit the first week in August, left the damsons spread out on kitchen roll to ripen a little more and then begin cooking. If I had a tip at this early stage it would be to choose a recipe/dish that takes a kilo of damsons. You'll get fed up very quickly with looking at heaps of damsons. Bag them in kilos and fridge.

I began with my favourite damson recipe – roasting them. I halved the following recipe which took no time at all.

Roasting damsons

2kg plums – halved and stoned – prepped as suggested
150 caster sugar

Pre heat your oven 200c/180fan/Gas 6.

Toss the plum halves in the sugar and place in a large roasting tray – the one I used measures 42x30cms and 2.5cms deep.

Roast for 25/30 minutes until the fruit is soft.

Cover and leave to cool before using.

Cooking is personal - there are heaps of damson recipes out there but for me roasting suits my purpose since a crumble or a pie base is very popular in my house. They freeze well too so no waste!

Next up a couple of photos and the jam.

Saturday, 15 August 2020

The back catalogue - Garlic roti


This recipe came from “Mildreds” - a vegetarian restaurant in Soho. Whilst it may not be safe and convenient for everyone to visit at the moment, I can confirm that as at today, it's open for business. For future reference Mildreds is at 45 Lexington Street, London W1F 9AN – www.mildreds.co.uk.

In the meantime, if you feel like treating yourself to their cookery book, Mildreds is the one! It's full and great ideas and recipes – what I also liked is that it gives you guidance on Gluten Free and Vegan options too.

Here's their recipe for Garlic Rotis :

20g unsalted butter
3 garlic cloves, finely chopped (or paste)
½ tsp dried chilli flakes (or a pinch of powder)
200g self raising flour (plus extra for dusting)
50g wholemeal self raising flour
80-100ml water
vegetable oil

Warm the butter in a small saucepan over a low heat, add the garlic and chilli and cook, stirring, for a minute until the garlic begins to release its flavour but not coloured. Tip into a mixing bowl with the flours and gradually add the water, using a wooden spoon, until you have a moist (not sticky) dough. Knead the dough for a few minutes until smooth and then cover with a clean damp cloth and leave to rise for 30 minutes until nearly doubled in size.

Divide into 8 pieces and form into balls. Dust with a little flour and then roll into thin circles of about 5mm (¼ inch) thick. Use a heavy based frying pan - add a drop of vegetable oil to grease. Cook the rotis on a medium heat – one at a time for 2-3 minutes each side until puffed up and brown. Serve immediately or cover with a clean tea towel and reheat in a low oven when needed.

I made them ahead and then reheated before serving and my only addition was to finish them off with a brush of melted butter and a sprinkle of garlic salt.

I hope you enjoy your time with your family and friends and that I've given you some ideas for food to share with everyone and have some fun!

More easy, make ahead al fresco/picnic ideas …


The back catalogue – pancakes anyone?


Another choice from Italian cicchetti – very useful in that these frittatine, or egg pancakes are made ahead, they are delicious stuffed with the broad bean cream.

Rotolini alla crema di fave
or
Stuffed mini pancakes with broad
bean cream

Serves 4

250g broad beans, fresh or frozen
30g robiola or similar cream cheese *
1 tbsp grated pecorino
4 eggs
3 tbsp milk
1 tbsp plain flour
2-3 tbsp finely chopped flat leaf parsley
salt and black pepper
2 tbsp rapeseed oil
4 slices cooked ham (Italian if you can
get it)


Boil the broad beans until softened in lightly salted water for 5 minutes. Drain, cool and “pop”.** Place in a food processor with the cream cheese and the pecorino and blend until smooth. Season to taste.

Beat the eggs in a bowl with the milk, flour, flat leaf parsley and salt and pepper.

In a lightly oiled, non-stick pan, use this mixture to make about eight small flat, thin omelettes, cooking them on each side for about four minutes. Make sure they are cooked through but soft enough to roll up. Leave to cool.***

Lay a slice of ham on top of each little pancake and spread with the broad bean and cheese mixture, then roll up and cut across into bite-size pieces, sealing each one safely closed with a wooden cocktail stick.

Chill until required.


*Robiola is very difficult to get hold of. You could use ordinary cream cheese or, for an extra tang, try Boursin – I appreciate that Boursin is French and Robiola is Italian but hey, needs must!


** and *** are elements that can and as far as the omelettes are concerned should be made ahead. To “pop” the broad beans, once cooled remove the outer thick skin.

Up next … another bread idea


The back catalogue – a Lebanese salad


The following recipe is a take on a Lebanese mezze dish, it's a perfect vegetarian addition to a mezze.

Halloumi and pomegranate salad

Serves 6 as an appetiser

50g walnuts, toasted and chopped
250g Halloumi – sliced
salt, black pepper and a heaped teaspoon
of sumac – optional - see below
2 tbsp olive oil
cherry tomatoes, halved

Warm the oil in a frying pan. Mix the salt, pepper and sumac in a container with a lid and shake well to combine. Coat the sliced halloumi and fry for 1-2 minutes each side – set aside and keep warm, add the tomatoes. Serve in small bowls, sprinkle with walnuts and drizzle with dressing.


Pomegranate Dressing

2 tbsp pomegranate molasses
juice of two limes
2 tbsp sweet chilli sauce
Generous pinch of nigella seeds
1-2 tsps sumac

Mix all the ingredients together. Drizzle over the halloumi and tomatoes.

In case you've not come across sumac, it's a spice used in the Middle East made from ground berries which give a sweet and sour fruit flavour. It's used as a substitute for lemons in stews but also as a “sprinkle” over meats and salads. There's a spice blend called Za'atar and sumac is one of the key ingredients.

It's a question of personal taste - if you're a fan of “zingy” flavours - whether you coat the halloumi with sumac, as well as including it in the dressing.

Serve with warmed mini pitta breads!

Mini pancakes anyone?


The back catalogue – something different


Most of us only eat dates when hidden in a sticky toffee pudding – in other words when they don't resemble dates.

This next recipe is another cicchetti choice – it's “outside the box” - there's no avoiding the dates but it's worth the risk - the combination of sweet, salty and savoury works like a charm and is a perfect addition to your fusion mezze menu.

Dates wrapped in Parma ham

for 20 canapés

1 tsp of vegetable oil for greasing
20 dried dates – stones removed
20 small cubes of Parmesan or other hard cheese
10 slice of Parma ham, halved


Pre-heat the oven to 170fan/190c/Gas 5. Lightly grease a baking tray, large enough to fit all the dates. Remove the stone from the dates and replace it with a little cube of cheese.

Wrap each date in half a slice of Parma ham and fix each one closed with a wooden cocktail stick. Lay the dates on the lightly greased baking tray.

Bake for about 10 minutes or until the ham begins to crisp.

Serve hot.

Prep ahead, cover and fridge until you're ready to bake.

The fact that this morsel contains dates lends itself very much to Middle Eastern cuisine too and so, despite Italian in origin, it's the epitome of fusion and perfect for your mezze spread.

Up next … a Lebanese salad

Saturday, 8 August 2020

The back catalogue – portable pizza

for little fingers

This idea fits the bill for the kiddies – it comes from “cicchetti”, the Italian style of tapas and is a small version of a pizza shaped like a pinwheel.

Stromboli

400g prepared pizza dough
4 tbsp tomato paste
100g thinly sliced salami
120g baby spinach
100g thinly sliced mozzarella cheese
1 tbsp olive oil
Generous sprinkle of oregano or garlic Italian seasoning


Pre-heat your oven 220fan/200c/Gas 8. Place a large baking tray in the oven.

Place a dampened J cloth on your work surface. Place a piece of baking parchment on top of the cloth – it will stop it sliding – make sure you leave enough to get hold of – you're going to lift it onto the hot baking tray that's in the oven at the moment. Unroll the pizza dough gently on the parchment.

Spread the tomato paste onto the base. Add the slices of salami, followed by the spinach and then the mozzarella and sprinkle with the oregano or garlic Italian seasoning. Roll up the base from the shortest side and brush with the olive oil - make sure it's seam-side down when placed on the tray.

WITH CARE remove the tray from the oven and then carefully lift the parchment and the rolled up pizza onto it. Place back in the oven for 20/25 minutes until golden brown – check at 20 minutes.

When removed from the oven slice into portions to suit and serve.

This pizza is a big hit. Make your own pizza dough or not - choose any of your favourite pizza toppings to create your own Stromboli – it's the fastest pizza you'll ever make and a great addition to a mezze, thali or, in this case cicchetti – covers all the bases - sorry.

If you buy a ready to use pizza dough bear in mind it needs to be rectangular – to save your legs, especially at the moment – Asda make an excellent product which is found in the chiller, close by the butter.

Coming up – final bits and pieces for your mezze, thali, tapas or cicchetti!


The back catalogue – koftas or burgers

This is another idea for your mezze or thali – it is great for little fingers to handle and we all know how much the kiddies like getting messy!

Koftas
makes 25/30 ish

500g of minced lamb

*salt and black pepper
*2 cloves of garlic, crushed or 2 tsps of paste
*1 tsp of ground cumin
*1 tsp of ground coriander
*pinch of garam masala
*pinch of chilli powder

1 heaped tbsp of tomato paste
1 egg

sprinkle of plain flour
kitchen gloves or damp hands

Rapeseed oil for shallow frying

a foil tray 23cms x 23cms

Place the mince in a large mixing bowl then add the ingredients marked * and mix well. Add the tomato paste and the egg and combine. If you find the mixture too wet, then sprinkle a little plain flour into the mixture and fold in gently.

Using either gloves or damp hands your mixture should aim to be the size of a walnut (or 1 heaped teaspoon). Roll the mixture between your hands and when you've 8 or so heat the oil in a large frying pan. Seal the koftas on a low heat and carefully shake the pan to turn them – use tongs if you are accident prone!

At this stage you can continue to cook the koftas in the pan or you can transfer to an oven-proof dish and pop into a pre-heated oven 160fan/180c/Gas 4 for 15 minutes.

Alternatively let the koftas cool once sealed, transfer to freezer bags and freeze until required. Defrost and then place in a foil tray and warm in a pre-heated oven as above for 15 minutes.

You can “size” the koftas to suit. You could even turn them into a kofta burger.

I'd serve bowls of raita and mango for dipping too.

Next … an idea for little fingers


The back catalogue - Chicken salad …

for the Thali

This “salad” is excellent hot or cold and is a great idea to include as part of a mezze or thali as they say in India!

It stands perfectly well on its own but better still as part of a party table. It's convenient in that you can marinade overnight and just pop into the oven when you're ready.

Tandoori chicken tikka salad

Serves 4

700g (1lb 8oz) chicken breast, cut
into chunks

Marinade

1½ tbsps ginger and garlic paste
½ tsp salt
1½ tsps green chilli paste
2½ tbsps white vinegar
5 tbsps vegetable oil
1½ tsps turmeric
1½ tsps red chilli powder
1½ tsps cumin powder
2 tsps garam masala
160g (5½ oz) Greek yoghurt
or low fat version

For the dressing

4 tbsps extra virgin olive oil
1½ tbsps balsamic vinegar
1½ tsps brown sugar
¼ tsp coarse black pepper
¼ tsp cumin powder
pinch of salt

In a bowl mix the chicken pieces with the ginger and garlic paste, salt, green chilli paste and the white vinegar and leave to one side.

In a separate mixing bowl, whisk the oil and turmeric. Add the red chilli powder, cumin poweder and garam masala to the bowl then mix well before adding the yoghurt. Combine the mixture thoroughly.

Add the chicken pieces to the yoghurt mixture. Use your hands to ensure the chicken pieces are evenly coated in the yoghurt marinade. Leave the chicken to marinade for at least an hour. You can leave it in the marinade overnight, this way the chicken will absorb all the flavours thoroughly.

Once the chicken has been marinated, place the pieces on an oven tray. Cook in a pre-heated oven at 160fan/180c/Gas 4 for 20-25 minutes.

If you prefer a vegetarian or vegan version you can use Quorn pieces.

You'll not be disappointed!


The back catalogue – Middle Eastern main

for the mezze

My favourite piece of kitchen kit is my slow cooker, it's a modern equivalent of the Middle Eastern cooking pot the tagine - the main difference being it uses liquid to cook the meat slowly – the results are the same, tender, melt in the mouth but with a bonus of a spiced gravy.

The word “stew” does not conjure up appetising thoughts. My back catalogue idea for a Middle Eastern main is many years old. The original recipe came from “Nigella Bites” called Aromatic Lamb-Shank Stew. The recipe serves whole shanks and includes lentils and also suggests serving with couscous.

What follows is my version which was tailored to suit my family and what they love and, more to the point, don't love!

4 tbsp rapeseed or vegetable oil
6 lamb shanks
2 onions, finely chopped
4 tsps garlic paste
sprinkle of salt
1 tbsp turmeric
1 tsp ground ginger
¼ tsp dried chilli flakes
2 tsps cinnamon
¼ tsp freshly grated nutmeg
black pepper
3 tbsps honey
1 tbsp soy sauce
3 tbsp Marsala

Using the oil, brown the shanks and place in your slow cooker. Fry the onion and garlic paste until soft, sprinkling with salt. Stir in the turmeric, ginger, chilli, cinnamon and nutmeg and season with pepper. Add the honey, soy and Marsala. Tip the mixture over the shanks and cover with boiling water. Leave for as long as you like. 4 to 6 hours. Remove the shanks and strip off the meat – add the meat back to the gravy in the slow cooker.

The lamb is ready to serve when you are, fridge until required. You can cook ahead and freeze if that's more convenient, it gets better!

My mob isn't wild about couscous, however, they do love roast potatoes, so I serve this “stew” with the biggest pan of roasties I can. There's loads of spicy gravy and roast potatoes somehow fit. New potatoes would work just as well, just not as crunchy.

Seriously, I don't think I've ever seen food disappear quite so fast – absolutely nothing left – so, if you like the idea of a spicy roast “main” then this is for you, it's worth every second of prep and it's not complicated.

Then there's the thali ...


Saturday, 1 August 2020

The back catalogue – the spuds

The following potato recipe would be a great addition to your mezze. It's different to the traditional tapas dish “patatas bravas” - quite obviously because it doesn't contain the traditional tomato sauce. The soured cream is served separately which gives your guests a choice.

Here goes :

Spanish Spuds

800g potatoes, cut into cubes
1 tbsp olive oil
1 onion, chopped finely
1 garlic clove, chopped finely or
1 tsp garlic paste
1 medium red chilli, seeds removed
chopped finely
1 tsp smoked paprika
1 tsp ground cumin
Pot of soured cream to serve

Boil the potatoes for 5 minutes. Heat the oil in a large frying pan and gently fry the onion until it colours. Add the garlic and spices, fry for 2 minutes.

Drain the potatoes and tip into the mixture. Turn to a high heat and shake the pan so that the potatoes are covered with the onion/spice mixture. Cook for 10 minutes until tender. Serve with soured cream.

I realise the recipe given is for a large quantity – it's difficult to say how many servings – it depends on the size of appetites - I would say eight to ten. You could halve the quantities if you wish but I've learnt from experience that potato based dishes are very popular. If you have leftovers they'd soon vanish the following day – part of a lunch box or a cold supper?

Next up, Middle Eastern and Indian mains ...

The back catalogue – the pide photos

If you want to keep it simple add a sprinkle of celery salt and/or garlic granules and a sprinkle of grated cheese – any cheese that melts will do!

Have a look :
 
I sprinkled mine with extra semolina and
Nigella seeds


More sprinkles – this time grated cheese

It makes a great snack served with bowls of extra virgin olive oil and balsamic vinegar for dunking – a glug of each – a glug = 2 tablespoons.

Make sure you've serviettes ready or may be even a bib!

Then there's the spuds ...

The back catalogue – pide

Don't be scared – this is not difficult. All you have to think about is are you around the house in a morning or an afternoon, to be able to complete the stages, none of which are long winded, it's perfect to slot in around the chores you know you've got to tackle so why not get home-made bread as a bonus!

Here goes :

You can choose whether you use the salt, oil and sesame seeds as a topping or roll in semolina and sprinkle with Nigella seeds before baking.

Pide

one sachet of easy-blend yeast – 7g
pinch of salt
700g plain white flour
plus extra
1 egg, beaten
100ml olive oil
400ml lukewarm water
30g sesame seeds and coarse sea salt
2 tbsp semolina
or extra semolina and Nigella seeds to sprinkle

Put the flour into a large bowl and make a well in the centre. Pour in the yeast and the olive oil reserving a little to brush over the bread prior to proving, add the water.

Mix until the dough forms into a firm ball, leaving the sides of the bowl. Cover with a clean damp cloth and leave to rise in a warm place until doubled in size. 1 – 1½ hours.

Lightly flour two baking sheets.

Knock down the dough - divide into two, shape each into a round ball and then roll each in 1 tbsp of semolina . Roll out and shape into two ovals and place on the baking sheets. Brush with beaten egg, sprinkle with sea salt, the reserved oil and sesame seeds. Alternatively you can sprinkle with additional semolina and Nigella seeds. Leave to prove for 30 minutes in a warm place.

Pre-heat your oven 210c/190fan/Gas 7.

Make dimples all over the surface of the bread – use your index finger vertically into the bread and you'll achieve the same size.

Bake in a hot oven for 15-20 minutes until golden brown and when the base is tapped the bread sounds hollow.

From the recipe given you'll get two pide – 30x20cms or 12x8” in old money.

You don't have to be an accomplished bread maker – it's easy. There are variations on the theme of pide in Asia, the Middle East and Eastern Europe. In Turkey there are pide street food shops called “pideci”.

You can top pide with your favourite ingredients – feta, mozzarella, cheese with leek and potato – break an egg in the middle and bake with the bread.

Here's a photo or two ...

The back catalogue

I took my own advice and had a look through the back catalogue – a voyage of discovery!

Hoping that we'll be able to be more sociable and get together with our family and friends, here are some ideas from the back catalogue of dishes that can be what you want them to be – portable for a picnic – al fresco in your garden or even indoors at the dining table.

You can cheat if you want and buy some of the elements, it's entirely up to you – where there's a recipe I'll give you an alternative or as near to, that you can buy.

These ideas are based on a Mezze … or is it Thali, Tapas or Cicchetti - a selection of dishes suitable for all of the above venues.

It'll be fun to mix it up - Middle Eastern, Indian, Spanish and Italian, whatever takes your fancy.

Everything changes when you're sat round a table, inside or out - you are much more likely to try dishes you've not tasted before or even to re-visit a dish you've previously disliked. It's like the salad bar principle, because you can serve yourself and there's no pressure - if a dish looks colourful and tempting you give it a go and who knows – you might like it!

There's something really decadent about picking and choosing from a table laden with different tempting dishes. Another essential must be delicious bread.

Speaking of delicious bread – you can buy great varieties, sourdough, focaccia stuffed with olives or not, wraps, the list is endless. Most supermarkets have a good selection of freshly baked artisan breads or you may be lucky and have an artisan bakery on your doorstep. One of my favourites is “Pide” (pronounced pee-day) - a Turkish bread that uses semolina – a perfect addition to a mezze style of eating.

There are so many mezze dishes to choose from – there are the usual suspects that we're all familiar with and that are available ready-made - hummus made with chickpeas, tarama (which is known as taramasalata in Greece) made with smoked cod's roe and baba ganoush (ghanouj) made with aubergine, to name but three.

Whichever cuisine takes your fancy the end result is the same – who doesn't like tearing and sharing bread and dipping in.

You can make your own pide if you fancy having a go …