Sunday, 26 December 2021

Editor's December Pick #16 - Back to the dessert!

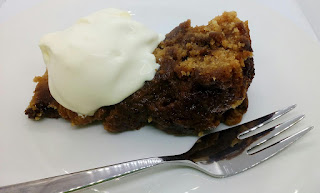
Editor's note: If you want a summary on why this dessert is worth a whirl, then fast-forward to the end of this post for a photo of the finished article. Once you've seen it, whizz straight back to the top for the ingredients. Like a lot of the editors picks, the important information is in the hints and tips that came separately, so after the post you'll find a link to the MiamMiam method - absolutely indispensable. An excellent choice for New Year!


Back to the dessert!

This is definitely decadent and not chocolate. The recipe comes from the Vegetarian Society Cookery School. Before you close down and run – it's called Biscoff and Salted Caramel Cheesecake – interested?

I've been a member of the Vegetarian Society for decades. I get seasonal magazines which are brilliant, full of information and ideas. You don't have to be a vegetarian or vegan for that matter – it's all knowledge! When I received the Summer/Autumn magazine I was intrigued to read about their “Online Cookery Classes” - you could choose Easy Veggie Favourites (Part 1) or a Vegan version. For £15 you get six months' unlimited access to video content. You're also able to download and keep the recipes plus other stuff too.

It seems like a good deal for £15 plus the fact I saw two recipes advertised that I really liked the look of. Cheesy Lattice Pie and Biscoff and Salted Caramel Cheesecake.

I'm always telling you not to try a recipe for the first time when you're under pressure - you've no idea how accurate the recipe is and whether it needs tweaking – into the unknown! My Christmas is going to be very strange and quiet this year so I'm road testing this cheesecake now, ignoring all my own rules, so that if you fancy having a go it might be an idea for New Year?

What follows is the verbatim recipe and method – I'll add my tweaks and hints and tips with the method. It might look long winded but the upside here is you can spread the tasks and the elements aren't difficult.

Here goes :


Biscoff and Salted Caramel Cheesecake

Serves 10


Preparation – 30 mins plus 1½ hours setting time

Cooking – 20 minutes


You will need an 8” deep spring-clip or loose bottom

cake tin


For the base


150g oat biscuits

125g Biscoff Lotus biscuits

125g butter, melted

large pinch of salt


For the filling


500g plain full fat soft cheese

300ml double cream

100g icing sugar, sifted

3 tbsp Biscoff crunchy spread

2 tsp of vanilla extract


For the sauce


200g golden caster sugar

60g butter

125ml double cream

1 tsp vanilla extract

1½ tsp salt


For the topping


80g Biscoff Lotus biscuits


Method and tips are to be found here - http://www.miammiamcookery.com/2020/12/biscoff-and-salted-caramel-cheesecake.html


Editor's December Pick #15 - Cheesy Lattice Pie - My version

Editor's note: Now for this selection I'm just going to let the photos do the talking. If like me, you have to know how to make your own, then the recipe is here: http://www.miammiamcookery.com/2021/01/cheesy-lattice-pie-my-version.html

The first bite really is with the eyes!


My version - photo guide

Here they are :


shallots, finely diced sweated

with the garlic and sweet paprika


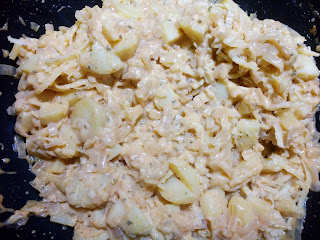
add the cheese, potato and parsley


ready to go!


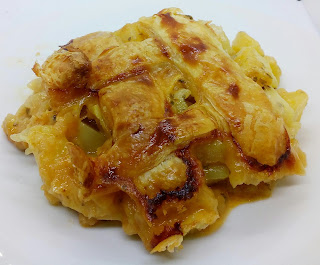
with the lattice top and egg washed


baked and ready to inhale!


Editor's December Pick #14 - MWM Curry - Sides and asides

I couldn't mention the creamy curry recipe without also highlighting the sides that go along with it. I don't think of myself as completely inept in the kitchen but it's posts like this one that push me a little more out of my comfort zone. Usually I'd just throw rice on to boil and bank on the curry to do the heavy lifting in the taste department but don't do yourself a disservice - take some time for the rice and it'll really elevate the whole meal.


MWM Curry – sides and asides

It's confession time – I don't “cook” rice - at least not when I'm in a hurry. I do have an absolute foolproof pilau rice recipe which I will definitely share at a later date but, in the interest of speed, frozen rice is another compulsory staple for your freezer.

You can make it special. I love rice with sultanas and flaked almonds. Soak 110g (4oz) of sultanas in apple juice overnight – they become plump and juicy. Toast 110g (4oz) of flaked almonds.

Depending on the appetites, work on the basis of 180g of rice per person. Whilst your rice is “cooking” in the microwave, heat 1tbsp of vegetable oil in a large wok, add a finely diced onion – a sweet variety is great – add the cooked rice and toss together. Drain the sultanas and add, along with the almonds. My final tweak is to add marrowfat peas – drain a can, rinse, pat dry and add to the rice. You've got colour and texture too. As a guide a small can gives you 180g drained weight. If you're not a lover of marrowfat peas try petit pois or red kidney beans. Serve immediately with your curry.

I said in “MWM Curry – there's more” you don't have to use chicken. Try the “kofta canapés” recipe and add the tiny meatballs to the curry sauce.

If you've not seen what the koftas look like, check out “Canapés, meatballs and burgers” for photos.

The kit to go with the koftas” will give you an onion salad.

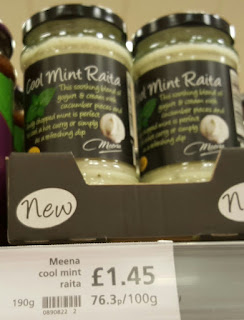
By the way – it's definitely worthwhile making your own raita – check out this photo and the cost!


Look after the pennies ...


Editor's December Pick #13 - Post Holiday Blues

I don't know about everyone else but by the time Christmas rolls around I am soup-ed out. I've had my fill of casseroles and the like and I'm usually craving something with some spice to it. Luckily as I was browsing MiamMiam I came across this post that covers just that scenario, so if you're in the same boat, have a read for something a bit different over the festive period!


Post holiday blues …

feeling gloomy after all the festivities – time for some simple stuff I think!

Indian cuisine is fantastic – each region specialising in its own style – for me the vegetarian food is definitely up there in my top five.

I'll stop waffling – here's my New Year gift to you – basically a creamy chicken curry :

I first came across a version of this recipe years ago by Madhur Jaffrey, here's mine :


Malai wali murghi

(aka MWM)


1.35kg/3lb chicken fillet, diced


*1½ tsp salt

*2 tsps cumin

*2 tsps coriander

*½ tsp turmeric

*½ tsp cayenne pepper


ground black pepper

6/7 garlic cloves or equivalent paste

2.5cm piece of fresh ginger, peeled

and chopped finely or equivalent paste


300ml water

6 tbsp vegetable oil

110g onion, chopped finely

175g passata


1 tsp garam masala


200ml double cream (heavy USA)


If you are using raw garlic and ginger then blitz them in a blender, add a drop or two of the water and blend until smooth. Alternatively mix both the garlic and ginger pastes together.

Mix the spices marked * above.

Using a large frying pan add the vegetable oil and heat. Seal the diced chicken on both sides and set aside.

Fry the onion for 2/3 minutes and add black pepper. Add the garlic and ginger paste then the spices and fry for 2/3 minutes. Mix the passata with the remaining water and add to the mixture. Add the sealed chicken fillet, bring to the boil and simmer gently for 30 minutes.

To complete the dish add the garam masala and the double cream and mix.

Sunday, 19 December 2021

Editors December Picks #12 - Crostini Spreads

Editor's note: And now for something completely different in the middle of the darker months! Pesto is not just for the summertime, it's a wonderful flavour that should be enjoyed all year round. Good pesto doesn't cost the earth but why wouldn't you want to give such a straight-forward recipe a whirl? Absolutely essential to serve with the drinks!


Crostini spreads – to buy ready-made or not to …

...that is the question!

Do whatever suits you – there are some great quality tapenade and pesto products out there. If you're going to use ready-made buy as good a quality as you can afford.

Here are recipes for both :


Tapenade


100g black olives, pitted

4/5 cloves of garlic (or equivalent tsps of paste)

1 tbsp of extra virgin olive oil

black pepper

lemon juice – try a dessert spoon – you can always add more

4 finely chopped anchovies, drained

75g chopped capers


Blitz the olives, then add the garlic, capers and anchovies and blitz again, briefly – you want a rustic paste, not mush. Tip into a bowl and add the oil, lemon juice and black pepper to taste – remember to taste as you go you can't take it back!

Pesto is vibrantly green! It's made from crushed basil leaves, toasted pine nuts, garlic, Parmesan and olive oil.

The following recipe serves 4, is easy and takes 10 minutes to make.


1 small garlic clove or equivalent roasted

pinch of sea salt

25g pine nuts, lightly toasted

50g fresh basil leaves

juice of half a lemon

125ml extra virgin olive oil

Parmesan to taste


Use a small food processor. Put the garlic and salt in the bowl and pulse, then add the pine nuts and repeat until roughly chopped – don't overwork. Add the basil and pulse gently until well mixed but still retains texture. Turn into a serving bowl and add the Parmesan and lemon juice. Pour in the olive oil and mix to a paste. Season to taste.

You could make the pesto ahead and transfer to a jar with a tight lid (sterilised of course) – drizzle a layer of olive oil over the top of the pesto. It will keep in the fridge for up to a week.

If I had to choose one to make from scratch it would be tapenade every time – it really is scrumptious.

Tomato paste is a bit strong for my taste - if it's not cooked it has a bitter taste but preparing some of each will cater for everyone. A tip – a thin scrape of paste is all that's required!

One might say the Crostini is fiddly, but, almost all of it can be done in advance and you can take short cuts for example, you can buy sliced pitted olives, ready to blitz after draining.

Coming up – the risotto “spin-off” dishes

Editor's December Picks #11 - Dorset Apple cake revisited

Editor's note: I absolutely love apples in desserts, and those made by MiamMiam are second to none. I recently picked up a ready made apple pie from one of the big supermarkets and disappointment wasn't the word. I wasn't expecting to be wowed but this was a crime against desserts. I know that the recipe for Dorset Apple Cake was mentioned recently but without the photo guide - check it out!


Dorset Apple Cake photos …

or, as I have now re-named it, Comfort Cake!

Photos for you :

the cake in the tin


and out of the tin


a portion with the clotted cream


Comfort Cake sounds so much better. This will be my Christmas Cake this year – the bonus – you get a cake or a pudding, hot or cold!


Editor's December Picks #10 - Guinness and Treacle Soda Bread Photo Guide

Editor's note: A picture is worth a thousand words, and some of them are definitely going to be 'yum'. Again my personal tastes are a big influence here but I can't be alone in learning that you can make bread using beer and not want to give it a go! The last photo is surely enough to persuade even the hardiest soda-bread purists out there.


The Guinness and Treacle Soda Bread photo guide


Here goes :


the dry ingredients


the jugs – Guinness and yogurt


the bowl of black treacle


slowly add the Guinness to the treacle

to loosen


add the yogurt to the Guinness and treacle

and whisk together


the dry combined with the wet

ingredients


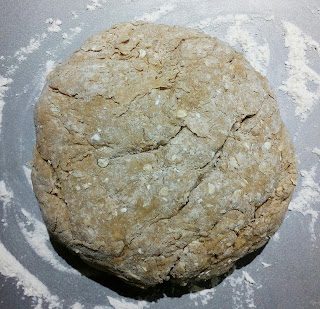
the bread on the baking tray – see the

dusting of flour underneath


the loaf, marked into quarters -

the long handle of a wooden spoon works

beautifully!


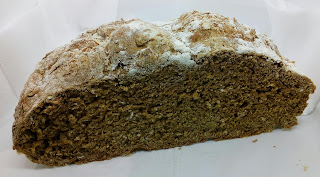
Ta dah – fresh from the oven


sliced in half – looks good enough to eat


a quarter, ready with a pot of butter

it would be rude not to!


Editor's December Picks #9 - Guinness and Treacle Soda Bread

 Editor's note: This week from the archives is a fab recipe for soda bread that's most certainly a bit of something different! Baking bread became a big trend during the lock-downs and I would like to point out that this posting originally came the month before we were all confined to barracks - ahead of the curve some may say! This introduction covers what you need, and how to assemble but stay tuned for a pictorial walk-through.


I promised a treat or two … one savoury, one sweet – here's the savoury

Every now and again a recipe catches my eye. It has been a while but recently I came across “Guinness and Treacle Soda Bread” in the January edition of Waitrose Food January 2020 -The Feel Good Issue.

I have always had a weakness for good bread. There's nothing like home-made bread – the only problem is that it's a bit of a faff and it takes too long … unless you're making soda bread – no yeast or kneading needed – what's not to love.

Not surprising then that this caught my attention. The recipe looks easy – the photo is fab so lets give it a go. This is genuine research – so many recipes are a let down, inaccurate – you're drawn in by the clever photography and the Food Stylist.

What follows is the exact recipe from the magazine, followed by some hints and tips and finally a photo guide.

Wholesome, rustic soda bread looks and tastes like something that hours of love and care have gone into. In reality, it's wonderfully simple and with no yeast or kneading required, a warm loaf can be out of the oven in about an hour”.


Guinness and Treacle Soda Bread


400g strong white bread flour

extra for dusting

100g strong wholemeal flour

50g jumbo oats

10g fine salt

1 tsp of bicarbonate of soda

40g unsalted butter, cubed

150g Guinness

175g natural yogurt

60g black treacle


You can see why I fancied this loaf!


The method and hints and tips.


Pre-heat your oven 180fan/200c/Gas 6. Grease a large baking tray or line with baking parchment. Put the flours, oats, salt and bicarbonate of soda in a mixing bowl and toss together. Add the butter and, using your fingertips, rub it into the dry ingredients until the mixture resembles coarse breadcrumbs. In a jug or second mixing bowl, stir together the Guinness, yogurt and treacle, until the treacle more or less dissolves – this will take a little while, but stir patiently and it will come together.

Pour the wet ingredients into the dry and, with a spatula, wooden spoon or firm hand, bring everything together into a rough dough. Knead for a moment on a worktop, just until the dough has come together, then shape into a rough ball and put on the prepared baking tray. Dust the ball of dough liberally with flour, then use the handle of a wooden spoon to press a deep cross into the dough, ensuring you don't go all the way through the dough, so all 4 quarters are still connected. Bake for 50 minutes until golden, crispy and steaming.


This is the recipe taken directly from the magazine. I've a few suggestions that will make life easier.

It mentions “grease a large baking tray or line with baking parchment”. In all my bread making I've never greased or lined a baking tray. I sprinkle a non-stick baking tray with flour and “swirl” so it covers the tray. The bread doesn't stick – ever.

If you take your butter straight from the fridge as you begin, weigh and cut it into small cubes and place on a piece of cling film by the time you've weighed the remainder of your ingredients your butter will be soft enough to rub into the dry ingredients.

With regard to the “wet” ingredients you'll find life much easier if you begin by weighing the black treacle directly into a small mixing bowl. Weigh your Guinness and yogurt in separate jugs. Make sure your mixing bowl is set on a non slip mat – if you don't have one then use a dampened j cloth.

Gradually drizzle the Guinness into the treacle, stirring all the time and it will loosen, continue until combined. Use a small whisk when adding the yogurt to prevent it splitting. The process takes no time at all.

There's more …


Friday, 10 December 2021

Editor’s December Pick #8: Smoked Mack Stack

Editor's note: As always, MiamMiam doesn’t disappoint with a handy photo-guide to give you some hints and tips - bonus points for the fantastic title. 


the Smoked Mack Stack


If you'd like an idea for a supper/dinner party starter, that's light, fresh and tasty, reduce the size of your ring – 6cms/2½” in diameter.

Have a look :


the Smoked Mack Starter Stack


Here's the alternative beetroot idea :

If you have a spare 30 minutes over the weekend make a batch of the Bazzin' Beetroot Relish and make a two tier stack instead of three. The recipe for the relish is given in Radio Recipes 23rd September 2019.


the Bazzin' Beetroot Relish, glossy and gorgeous

  • like I say it's excellent hot or cold


Editor’s December Pick #7: You don’t eat meat but do eat fish…

Whilst perusing the fish category I thought I’d continue the theme, and this one is a doozy.  I'm a huge fan of mackerel - it's an oily fish and the beetroot balances it perfectly. This one is going to go down well with pescatarians or omnis of any kind. Mackerel is a fish that lends itself to lots of recipes but isn’t the first choice for a lot of us. It's quick and easy to prepare - a win-win! 


You don't eat meat but do eat fish ...

I said that we were going to try and cater for everyone – now for a recipe to suit the pescatarians.

If you love your fish I think you'll enjoy this dish :


Smoked Mack Stack


Serves 2 - generous portions


230g of smoked mackerel, flaked

2 tbsp of mayonnaise

2 tsps of creamed horseradish

black pepper, mix together gently


250g of roasted beetroot, cut into small cubes

(or an organic vac pack)

1 tbsp Balsamic vinegar and

black pepper - mix together


1 sharp eating apple – a Cox would be

perfect – a medium sized apple weighs approximately 140g -

quartered, peeled and cut into small cubes

add a glug of lemon juice and mix


You'll need a ring measuring 9cms in diameter – 3½” in

old money


Now it's just a matter of assembly :


an important note to self – make sure the ring is

placed in or on the serving dish or plate before you begin!


Place the ring in the centre and begin with two tablespoons of beetroot, pressed gently into the base. Add two tablespoons of the smoked mackerel mixture, pressed gently on top of the beetroot so that it sticks together. Finally add a generous tablespoon of the cubed apple.

Gently ease the ring away from the stack, slowly is the key!

Some hints and tips coming next … then a photo or three.


Editor’s December Pick#6: Time for cake!

Now this is a personal showstopper. I remember a time before I acquired the taste for fruitcake of any kind – peeling icing and marzipan off Christmas cake anyone?! – but now I have embraced it wholeheartedly. Some amazing tips included here - check out the photos - do yourself a favour and try this instead of a Christmas Pudding this year.  I feel like it was written for me - I love it when recipes are specific and to the point.


Time for cake …


there's a recipe on the blog called Grandad Jack's Tea Loaf – tea loaves are great – they contain eggs but no other fat. The moisture comes in the steeping of the fruit in hot black tea overnight.

You have to be careful that you get the balance of ingredients right – if a tea loaf has a downside it's that it can be dry but you won't know that until you've cut it – it's too late.

I'm always on the look out for something different – here's the Orange Fruit Tea Loaf.

Here's the recipe :


Orange Fruit Tea Loaf


for a 900g loaf


300g mixed dried fruit of your choice -

cranberries work well

150g dark brown sugar

grated zest of two oranges

300ml of hot tea – without milk – just in

case you were wondering

1 egg, lightly beaten

300g self raising flour

a pinch of salt


Mix the dried fruit, sugar, orange zest and hot tea together, cover and leave overnight.

Pre-heat your oven 130fan/150c/Gas

Grease your loaf tin.

Stir the egg into the fruit mixture then add the flour and salt. Transfer the mixture into your loaf tin and bake for about 1½ hours until risen and firm. Use a bamboo skewer inserted into the middle of the cake and comes out clean. Turn out and cool on a rack.


Now for a grumble rather than a rant. The recipe is exactly as I found it. When I read it I realised that it mentions “1 egg, lightly beaten”. So often recipes are badly written – not deliberately – the author perhaps presumes the reader will know – NO! Baking is a science and accuracy is important.

I mentioned moisture in your loaf, texture is equally important. I follow my own rule – if it isn't clear always use large eggs.


Hints and Tips

All is not lost if you produce a dry loaf – you'll just have to toast a slice and add butter – breakfast treat?!

I added ½ tsp of orange extract to the mixture. You can definitely smell the orange zest, I just wanted a little extra boost of flavour.

The secret to the success of this loaf is adding the sugar to the mixed fruit, zest and tea and steeping overnight. Other tea loaf recipes I've come across are based on, for example, “2 cups of flour, 1 cup of sugar” - treating the sugar as a dry ingredient – including it as part of the wet ingredients gives a much better consistency, you can gauge as you're adding the flour gradually to the mixture. “Gradually” is the key, ensuring that the flour is folded in before adding more. I'd already decided to add fresh orange juice if it looked too dry – not necessary!

Old habits die hard – I set my timer for 45 minutes and then turned the loaf tin around. I tested the cake at 1 hour 20 minutes with the skewer which came out clean – out it came. Ovens will vary – a timer will help and remind you to check.

Have a look :


As always, taste tested … “the best slice of fruit cake I've had in a long while”.

A great result!


Editor’s December Pick #5: Here’s what I mean by resourceful and creative

Editor's note: I’ve been craving some flavour lately after a fair few cold evening meals of soups and the like and this recipe is just the ticket. Spiced Salmon is a tried and tested favourite of MiamMiam and just the ticket for a little something different. It's recipes like this that inspire the most – I would never have put salmon in a frittata without reading it here, but you won’t look at a plain cheese omelette the same again!


Here's what I mean …


by resourceful and creative – a canapé that can turn into a lunch or a supper.


Spiced Salmon Frittata


For the spiced salmon marinade :

Marinade


2 x 4oz Salmon fillets

2 garlic cloves, crushed

1 tsp powdered star anise or one star anise

1 tbsp dark soy sauce


Mix together the marinade, pour over the salmon fillets, turning to coat thoroughly, cover and leave in fridge for an hour or so – preferably in a foil tray – much easier to transfer straight to the oven later.


Pre-heat your oven 180fan/200c/Gas 6. If you've used a foil tray to marinade the salmon then wrap it in foil and bake it for 10 minutes. Remove and set aside to cool. When the salmon has cooled flake it into small pieces, ready to add to the frittata.


For the frittata :

5 spring onions, finely chopped

tiny drop of rapeseed oil

100g/4oz mature cheddar cheese, grated

4 large eggs

salt and black pepper


Whisk four eggs in a large mixing bowl, add the cheese and whisk again. Add a touch of salt and plenty of black pepper.


Using a non-stick frying pan – as a guide 28cms/11” in diameter. Heat a tiny drop of rapeseed oil and add the spring onions. Sauté until softened, sprinkle in your salmon pieces including any residual marinade, then pour in the egg and cheese mixture. Cook on your hob for 2/3 minutes to set the bottom. Transfer the pan to the grill - cook for 2/3 minutes REMOVE USING OVEN GLOVES – SEE WARNING!


Words of Warning!


Pre-heat your grill – BEFORE YOU TURN IT ON ENSURE THAT THE FRYING PAN YOU'RE USING WILL SLIDE EASILY INTO THE SPACE LEAVING AT LEAST TWO INCHES GAP BETWEEN THE PAN AND THE GRILL ITSELF, OTHERWISE YOU'LL BURN THE TOP AND THE MIDDLE WON'T BE COOKED.


Using a fish slice gently flatten down the frittata so that you break the top – you may find that the

mixture is still not quite cooked. Place back under the grill for another 2/3

minutes and check – it should be golden brown but if your preference is for a darker colour

carry on to your desired taste.


For a canapé I used a straight sided cutter measuring 6cms/2½” in diameter and you should get 12-14 canapés depending on how careful you are cutting out.

Minimum effort – maximum taste. Can definitely be made ahead as a canapé. A frittata is excellent served cold in whatever guise!


Don't forget to salmon fillets to your freezer shopping list. There are good deals out there – usually individually packaged – in bags of six. You can pull out whatever you need. The bonus is that they don't take up too much space in the freezer.


What to serve with … hmm


Saturday, 4 December 2021

Editor's Pick - Tartare Sauce – faster and the building of the burger!

Editor's note: Throw black olives in anything and I'm there in a flash. So adding them to a sauce is even better. It will hopefully amuse some but I hadn't ever considered the ingredients of tartare sauce included olives until I read the MiamMiam recipe. Assemble your sauce, fry up some halloumi to taste and boom! Just make sure you've enough sauce for another meal.


Tartare Sauce – faster and the building of the burger!

I appreciate that not everyone wants to make their own mayo, which is just fine – use a good quality brand – two heaped tablespoons as mentioned previously – you'll need to add lemon juice and Dijon mustard and I'd suggest you begin with 1 teaspoon of each. You may need a little more – it's a matter of personal taste, together with a little celery salt and white pepper. All that remains is to add your capers, cornichons and black olives! Don't forget a drizzle of double cream to loosen the consistency.

A note of caution with seasonings, as I'm fond of saying, add gradually and taste as you go, you can always add a little more, you can't take it back!

If you'd like a vegan version, use a vegan mayo and a vegan plant alternative to double cream.


Now for the burger!

A few of my favourite ingredients :


Brioche buns – warmed in the oven or toasted

Spiced Halloumi – shallow fried in a drop of rapeseed oil

Roasted sliced onions – made ahead

Sliced avocado

shredded lettuce

sliced beef tomatoes

This is just my take on a burger stack, filled with stuff I love – it's whatever floats your own boat – I'd probably include beetroot too in some form – either sliced and added to the stack or a relish on the side.

It's important how the burger is assembled – a brioche bun, split and warmed – or toasted if you prefer – a generous spread of dressing on each side, add the avocado, lettuce and tomato to the bottom half, add spiced Halloumi to the top, add another spread of dressing and fold together!

This is not set in stone – it's just an example of what you could “build”, the world is your “Big Veg”.

I'm thinking that by calling this “burger dressing” a version of tartare sauce everyone will have the thought of scampi and chips in their heads! It began life as an homage to the dressing in the Big Mac and so I think it deserves a name of its own so, I name this sauce Quasi-T - it seems appropriate since its meaning is partly or almost a tartare sauce!

Finally the Spiced, Sliced Halloumi …

I make no apology for repeating the Spiced Halloumi recipe, it's much easier when you've got all the elements for an idea at your fingertips!


Spiced Halloumi

Serves 4


225g/8oz Halloumi sliced into 4 pieces

45g/2oz plain flour mix with

1 tbsp of seasoning of your choice

Rapeseed oil for shallow frying


The 225g pack will give you four portions, sliced lengthways – 8x7cms/3x3½ inches approximately. Open the pack and discard the liquid, pat the cheese dry with kitchen roll and then slice into four. Pat each slice dry, then box and fridge ready for cooking.

The seasoning for the Halloumi is your choice – a good quality shop bought version is fine and on that note here are a couple of suggestions :


the Chip Seasoning is suitable for vegetarians,

it is mild in flavour, a blend of paprika, onion & garlic


Old Bay is “bolder” in flavour but does not blow

your head off!


Both seasonings are versatile and excellent store

cupboard additions to zhuzh your veggies, particularly

over roasted new potatoes or wedges


Editor's December Pick - Tartare Sauce and a burger …

Editor's note: This next selection is from a much more recent post, but one that is too important not to shine a light on. Both in the surprised sense, and also in a "Why didn't I think of that" way! I am a huge fan of sauces and as usual MiamMiam pulls out the great idea adding homemade tartare sauce to a burger. A condiment I accidentally tried as a child when I thought a waitress was mispronouncing tomato but following that, couldn't get enough of. A deliciously different idea for the accompanying burger - hits the spot every time. Can't be bad!


Tartare Sauce and a burger …

not a combination that immediately springs to mind I know – bear with me!

I don't normally crave “fast food” but I confess that for some while I have been dreaming of a burger.

If you live in a village the “fast food” options are limited and because we don't have any fast food outlets the nearest are in the next village which, I think you'll agree, rather contradicts the “fast” element since you have to get in your car to go get it, kinda defeating the object.

When the time comes to go get the food I've lost the will – taking into account the drive, the queue to pick up the food and drive home I could have made it myself.

I decided I'd create my own burger, making sure I had the ingredients in the store cupboard and added any I needed to my shopping list.

What has tartare sauce got to do with a burger? This might seem a convoluted train of thought but, think of the famous Big Mac – I remember vividly indulging many years ago and the stand-out element I remember most of all is the dressing – it wasn't mayo, nor Thousand Island or any other you could name – it was the dressing that belongs to the Big Mac.

Here's my veggie homage to the Big Mac with my tartare sauce as the dressing but before I begin, here's what I call a useless bit of information – the Big Mac was first introduced in the UK in 1974 – gulp – that's 47 years ago – enough said!

A dressing on a burger is not just important – it's vital - which brings me to tartare sauce or rather my version of it – it's a sauce that is almost exclusively associated with fish. Shop bought versions vary with most being either too sloppy or too vinegary – solution – make your own! What follows gives a fast recipe using ready-made good quality mayo and then a fastish version making your own mayo.


Here are the capers, cornichons and

black olives, finely chopped – whilst it's not

compulsory, it's worth taking the time to achieve

as fine a result as you can


ta dah! Here's the sauce, now all you need

is ideas for creating your own version of

the “Big Mac” - could this be a “Big Veg”?!


Coming up, an even faster recipe just in case you don't want to make your own mayo!


Editor's December Pick - Posh Chilli

Editor's note: This recipe and photo-guide combo is coming up on it's second blog birthday which is hard to believe. I still maintain that this is the only one I've seen in my limited culinary adventures that suggest using something other than mince as the base, and after trying, it's a wonderful way of zhushing it up!


December thoughts – Posh Chilli method

Seal the diced steak in batches in a large frying pan using a drop of rapeseed oil then set aside in your slow cooker.

Gently fry your onion and garlic, using another drop of rapeseed oil if necessary. Add the spices and cook together so that the spices are able to release their deliciousness!

Add the passata and the chilli sauce and bring to the boil. Add to the sealed diced steak and then slow cook for 4 hours. Turn off and then leave to cool. Freeze in boxes to suit your needs – remember – you can pull out two boxes if you need to, rather than have to throw away from a larger quantity.

Defrost thoroughly in your fridge. Re-heat gently on the stove adding your kidney beans, sweet baby peppers or chorizo.


For the optional extras :

Use a large frying pan and fry the chorizo gently so that it releases its oil. Set the chorizo aside, leaving the oil in the pan.

Sauté the sliced, sweet baby peppers in the chorizo oil.

If you enjoy a spicy hit you can use mixed beans in a chilli sauce instead of ordinary red kidney beans.

Serve with rice if you like but I think it's fab in a bowl with a blob of sour cream served with some rustic bread of your choice on the side or with wraps with bowls of relish of your choice – mango would work well.

Freezing serves dishes like chilli or curry very well – the freezing process allows the spices to develop. Here's a thought – you could double the recipe and serve as a supper or as part of a larger supper buffet. Hot food seems to go down so well and it's easier to cook and serve.

A great New Year Party idea – but you might want to double the recipe!

And now for a photo guide:

Sealed diced steak in the slow cooker


softened onion and garlic


the four “c”s – cumin, coriander

cinnamon and chilli


the four “c”s cooked out with the onion


the chilli – ready to slow cook and perform its magic!


glistening with the beans and a blob of

sour cream


ditto with flat breads