Sunday, 26 May 2019

The Cornish Pasty


Cornish tin miners eventually had to search elsewhere for work when the mines closed. They moved around the UK and all over the world too – for example, between 1861 and 1901 it's estimated that 250,000 Cornish migrated to Australia. It's not surprising therefore, that you'll find pasties, or versions of them, all over the world. There's a very successful company in Australia “Cousin Jacks Pasty Co.”. In case you were wondering where “ Cousin Jacks” comes from – it's an affectionate nickname for Cornish people – “Cousin Jennies” too.

Legend has it that there are “Knockers” or “Knackers” - mischief making leprechaun like creatures who lived deep in the tin mines, knocking on the walls and supports. They could be good or bad depending on your point of view. To some, the knocking served as a warning of impending disaster and so protected the miners, to others these mischief makers caused cave-ins. Which brings me to the “end” of the pasty. The miners would save, literally, the last bite - the end of their pasty and throw them deep into the mine to either appease the bad knockers or thank the good. A help or a hindrance?

Not to be confused with the “end” of a pasty - there's also a “corner”. A “corner”, is said to be a portion of a pasty saved to eat later on in the long shift – larger than we'd call a corner, probably about a third of a pasty.

The iconic crimped crust of a pasty isn't there for decoration. Mining was a dangerous occupation and arsenic poisoning was not unusual. There were no bathrooms – you couldn't just pop off and wash your hands before lunch, the miners' hands were ingrained with dirt and chemicals, arsenic being one of them. The miners held their pasty by the thick crimped crust to prevent being poisoned. How smart is that.

Iconic is the word – a delicious, complete meal in a pastry blanket.

Coming next – the golden rules for the contents and the making of the pastry!


Portable Summer food …


it could be for a picnic, a survival kit whilst travelling, part of your al fresco summer parties or an impromptu get together. In other words, food that is easily or conveniently carried or moved around. Some may say that packing a survival kit whilst you're on the move is not worth the effort. For me, I've been disappointed and ripped off at Services for poor food and expensive snacks – the coffee has improved but that's about it! I take a “kit” for a long journey – 4 hours plus. Similarly if you holiday in the UK and choose a self catering option, unless you want to spend your holiday in a supermarket – that you have to search for – the more you think ahead, even in a small way, the better. Don't get me wrong, I'm not suggesting you cook up a storm and spend your holiday serving it all, far from it.

My plan is that if I'm away for seven days I take the basics, condiments, staples, breakfast bits, a few treats and the wherewithal for two meals – ish.

The ideas and recipes that follow are all portable and suitable for any of the above occasions!

On that note - have you ever made a Cornish Pasty?

They've been around “recently” for about 200 years but history says that they were with us well before in some form. A Cornish pasty has to be the ultimate in “portable” food. Cornish tin miners took a pasty to work every day – it's hard to comprehend that they walked long distances to the mine, then down the shaft for a long shift. It was hard, gruelling work and the pasty provided sustenance.

There are loads of stories and superstitions and golden rules too for the contents of a pasty and the making of the pastry itself.

It's difficult to know where to begin – some of the stories are based on fact, some fiction and others somewhere in between – I'll give it my best shot and hope you enjoy the read – who knows you might have a go at making a pasty!


Granola Gravel – a post script


Whatever Granola Gravel you have left, box or bag it and add it to your treasure chest. An instant supply for a sweet hit – perfect with British strawberries – I had some yesterday and they were delicious, the best I've tasted in a long while.

Finally, I made the Gravel again, this time adding 200g of hazelnuts to the original recipe, it worked like a charm, as they say!

Take a look :


Thinking about it there's a use for the soft version or with extra hazelnuts. Since we're embarking on “portable” food, take a box of Gravel from the freezer – bash it smaller if you wish. Prepare a box of strawberries or other seasonal fresh fruit. Pack individual yogurts of your choice – an instant portable dessert.

More portable food ideas up next!

Granola Glacé


Out of every recipe that you aren't satisfied with, there is always a silver lining, here's mine :


If you wanted a fun idea for a picnic or a BBQ I think this makes the grade.

I love it when a plan comes together and the moral of the story is – never give up!


Sunday, 19 May 2019

Granola Glacé – and another idea


which requires a visit to another of my favourite shops, local to me, SCS Packaging, Units 1 & 2 Orchard Road, Finedon, Wellingborough, Northamptonshire, NN9 5JG to be precise! In addition to the packaging business they have a small shop which is an Aladdin's cave of all things related to cake decorating and other stuff too.

I was on a mission for ice cream pots – if you're old enough to remember going to the cinema back in the day you'll also remember you could buy small individual tubs of ice cream with a tiny “spade-shaped” spoon.

My efforts were rewarded – have a look :


Rainbow and Hot Pink
7cms diameter x 4.5cms deep or
2¾” diameter x 1¾” deep in old money

Exactly what I wanted!

These little beauties are actually baking cups so no more need for muffin tins.


These little pots are so useful, they are sturdy and as well as baking or filling with ice cream they are ideal for sweet or savoury treats – an absolute must for all those summer parties or picnics or BBQs.

They have a range of colours and you'll want all of them! How good would the aqua colour cup look, filled with mint chocolate chip ice cream! You don't have to live in the area - check out their website for the full range www.culpitt.com.

Have a look at the photos coming next to see what you can do.

Granola Gravel … nil desperandum


For those who aren't familiar - “never say die”

I'm going to make a batch of vanilla ice cream, cut the gravel into smaller pieces and fold it through to make a Granola Glacé – ta dah!

The transformation :


A quick recap of the recipe :

Vanilla ice cream

Prep – 5 minutes
Total time – 5 minutes
plus freezing at least 6-8 hours
or until firm

Gives you 1.6 litres of ice cream is equal
to 18 scoops

1 x 397g tin sweetened condensed milk
1 x 600ml double cream
2tsp vanilla bean paste

  1. Put the condensed milk, cream and vanilla into a large mixing bowl and beat with an electric hand whisk until the mixture is quite thick and stiff, like pipeable whipped cream.**

  1. Spoon the mixture into a lidded freezer-proof container and free for at least 6-8 hours or until firm.

** My variation – make a batch of sticky toffee sauce and fold 260g through the ice cream. For the sticky toffee sauce recipe see Sauce labelThe ultimate … sticky toffee sauce. You can buy a ready-made version but it's nowhere near as good!

and then I had another idea


Granola Gravel – chapter, verse and verdict


The story so far …


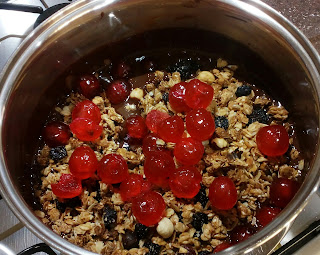
In the pan with the granola and the cherries


Into the tray, ready to fridge


Out of the fridge, cubed and into a bowl

The verdict … at first I wasn't 100% convinced, a smidge too soft for me – don't misunderstand, it was good enough to send a boxful to my testers and it vanished. I gave H a small box to road test and after a minute or two he asked me to take it away, otherwise he'd finish it!

Then I had an idea …

Nothing ventured … nothing gained


Okey dokey, lets get this show on the road, here's my Granola Gravel – Take 1 recipe :

Granola Gravel – Take 1

250g dark chocolate
150g M&M's hazelnut spread
175g soft butter, unsalted
4 x 15ml tbsp golden syrup
350g Granola – mixed sizes
200g glacé cherries


Put the granola into a freezer bag and bash gently with a rolling pin so that you get different sizes.

Break the dark chocolate into small pieces, or use chocolate buttons made for melting and tip them into a heavy-based saucepan to melt with the M&M's spread, butter and syrup over a low heat.

Take the pan off the heat and add the granola and cherries. Turn the mixture carefully so that all the ingredients are coated with the syrupy chocolate.

Tip into a foil tray (I use a tray bake size – 31cms x 8.5cms x 3cms or 12” x 17½” x 1¼” in old money ) smoothing the top as best you can, although it is not meant to be perfectly flat.

Fridge until firm enough to cut, which will take about 3 hours. Take the set block out of the tray. With the long side in front of you cut it into half – set one aside. Slice 6 slices down and 4 across so that you have 24 squares – this will give you a good sized cube – cut smaller if you prefer which will obviously give you more. Repeat with the remaining half.

Freeze for up to 1 month.

If it lasts that long!

Chapter, verse and verdict next up.

Sunday, 12 May 2019

Messing about in the kitchen …


I'm always thinking of new stuff to pass on to you and it's amazing what can set off a particular train of thought. Recently I was picking up spices at one of my favourite places – Daily Bread Co-operative Limited in Northampton – if you haven't visited you have to put this gem on your list! Have a look at www.dailybread.co.uk. On my way to pay I walked past cereals of all kinds but right in my eye line was their own Granola. I bought a large bag – I love the stuff as a cereal but that wasn't why I bought it - I thought the Granola would be a great ingredient for another variation on a theme of Rocky Road. Hmm.


Before I continue with the story and the recipe(s) I should introduce my latest purchase which figures in this latest recipe. Crispy M&M's – it's described as chocolate hazelnut flavoured spread with coloured crispy pieces. Hey sometimes you've just gotta do what you've gotta do.


Do I have your attention?

The story continues … stay with me!


The BBB – bits and bats


The joy of this dish is that you can make it what you want. It's perfect for a working week supper – as I've said, make sure you take the BBB out of the fridge before you leave home and place it somewhere covered and cool during the day. All you have to do when you get home is turn on the oven whilst you're pouring yourself a well earned glass of something and then pop it into the oven for 40 minutes or so. Set your timer to add whatever to go with – baked sausages or serve cold with slow cooked gammon and a salad. The dish then stands (or rests if you prefer) for 10 minutes so in effect you've 50 minutes to multitask – or relax. A quick shower and change into your pjs – job done!

You'll love the aroma from your oven, it's nothing short of yum.

Have a look at it after cooking :


Now for the bits and bats – this dish would be great for a brunch, great cold for lunch at the office with salad and some Asian Spiced Salmon Saturday 14th May 2016 – The F Word … “It's too boring”, as part of a picnic or you can fancify it – my new word – it seems to fit what I'm trying to say to you. You can use a smaller cutter and place a portion in an individual pot, like this :


The cutter used is 8cms/3” in diameter

Perfect as a side or even as a starter but … a warning note ... it is filling. I realise that portion control is personal I just thought I'd mention it!

In the hope that we may get some decent weather soon, it's time for some ideas for portable food but before we begin, a treat me thinks.


The BBB result!


Check this out :


Out of the oven – left to stand for 10 minutes


Cut out a generous portion for supper tonight – I used
a cutter 10cms/4” in diameter


I had sweet baby peppers which I diced and fine asparagus tips which I snapped and blanched for 30 seconds. To complete the dish I decided to use 125g of diced chorizo. I fried the chorizo on a medium heat and as it began to colour I added the peppers and the asparagus.

Here it is :


Supper is served!

What was the verdict?

There it was – gone!

I rest my case!

The BBB – Assembly


and step by step photo guide :


Layer the bread, overlapping


Soak the bread in the egg mixture and the onions


Sprinkle the layer with half of the grated cheese


Add another layer of bread


Add the remainder of the egg mixture


Complete the dish with the remaining grated cheese


Wrap the dish in cling film and fridge. Fast forward to the following morning … don't forget to take it out of the fridge to allow to come to room temperature or keep covered and in a cool place if you're leaving for work and won't cook until later in the day.

The result up next!


Sunday, 5 May 2019

The BBB – Hints and Tips


The BBB is a large savoury dish – it will serve 4 huge appetites and 9 smaller – the small measuring 7.5/8 cms or 3”x 3” in old money.

You might be saying to yourself “I never have that much French bread/baguette left over, let alone stale”. That's fine – say hello to the latest addition to your Store Cupboard – the part baked baguette. If you've never used the product now might be a good time to start. Each pack contains 2 baguettes and weighs 300g, it takes 12 minutes to bake.

Let the baguettes cool, then cut into small slices – you'll get 12 per baguette. You won't use the ends, or heels as they are known.

You can make this dish what you want it to be – veggie as per the recipe, add ham hock, sausages, bacon or whatever you fancy for a mid week supper. If you want to be a little more fancy to serve as a brunch or a supper fry diced chorizo, set that aside and then use the oil to stir fry thin slithers of baby sweet peppers and fine asparagus (I blanch it for 10 seconds after having snapped the stems and discarding the woody unappetising ends).

Lets begin with the photo guide :


You could use a foil dish if you want
to save on washing up!


The sliced bread showing the heels to
discard


Whisk your eggs, cream et al


Add your finely sliced spring onions


I said it was a cheese fest!

Now we're ready to assemble!


The next WWS idea – the Strata …


or as I call it “Bread and Butter Brunch” - “BBB”. Strata meaning layers is an American breakfast/brunch dish – a sort of savoury bread and butter pudding but not any old mush – this is a cheese fest too.

This dish has so many uses, I hope you'll find it invaluable for your collection in the “Crowd Pleasers” category. Use it for a working week supper but equally for a weekend breakfast, or as part of a larger brunch. The best part is that you prep this dish ahead and fridge it, ready to bake the following day. How easy is that!

All you have to decide is what to serve with it.

The late Spring Bank Holiday is at the end of May – I discover it's now called “Summer Half Term”, anyway if you want ideas for a weekend brunch, this is the recipe for you.

Here's my recipe :

BBB
(or Bread and Butter Brunch)

French stick (225/250g), preferably stale,
sliced
6 large eggs
200ml milk
200ml sour cream (or double will do)
1 tbsp Dijon mustard
salt and black pepper
Bunch spring onions, finely chopped
100g Mature cheddar
175g Gruyere
100g Red Leicester
(all cheese grated and mixed together)
Chopped chives to garnish

Your serving dish should be approximately 24cm square – greased if not non-stick.

Whisk together thoroughly in a large bowl the eggs, milk, cream, mustard, salt and black pepper. Stir in the spring onions.

Arrange half the bread in the dish, overlapping slices to fit. Pour over half the egg mixture and sprinkle with two thirds of the cheese. Cover with the remaining bread, again overlapping the slices. Pour the remaining egg mixture over the bread, gently press down to help the bread absorb the mixture. Sprinkle the top with remaining cheese.

Cover with cling film and fridge it overnight.

In the morning take the BBB out of the fridge and uncover so that it can come to room temperature, ready to bake at lunchtime.

Preheat your oven to 180fan/200c/Gas 6.

Bake for 40/50 minutes or until puffed and golden. Check after 40 mins.

Let it stand for 10 minutes to set the “custard” before serving. Sprinkle with chopped chives.

The first batch of photos plus hints and tips coming up.


Halloumi smash and grab – assembly photos


Here they are :


I would never recommend any dish that hasn't been tried and tested – this one was, by me - I assure you I'm my own worst critic – it was fab and I loved it - I've already passed it on. The success of any recipe is measured by how frequently you'll use it and how it morphs into variations on its theme – this is a keeper.

I hope you try it and love it too!


Halloumi smash and grab – final flourish!


Measure your frying pan – the one I used was 20cms/8” in diameter.

Turn on your oven to warm your bread – 160fan/180c/Gas 4. The bread takes 2 minutes to warm in the oven – you can dry fry for 30 seconds each side if you prefer – I think it's less faff to use the oven, no need to multitask if you don't need too. You might want to set your timer.

Heat your frying pan on a medium heat and then add a drop of rapeseed oil – don't walk away! Add a piece of the coated Halloumi to test – when it sizzles add the remainder and fry until it is golden and just crispy on all sides – like this :


looking good

It just occurs to me that you could warm and split pitta breads and stuff them with the avocado, Halloumi and dressing as a filling and add any other salad bits and pieces of your choice – a little more substantial me thinks!

Final assembly photos on their way – get ready to grab your snack.