Saturday, 28 March 2020

Time on your hands – lets not waste it!


Wasting food is bad at any time – even more so at the moment.

I'm as guilty as the next person. Here's my latest “rescue”. I'm keeping track of what fresh fruit I have and particularly which perishes first. I forgot to check the apples. I suppose I thought they'd have a longer “fruit bowl life” than grapes – oops!

Enter my four Pink Lady apples – they were not as fresh as they could have been - here's my solution based on my “I'm not wasting food” philosophy - “Toffee Apples” :

Toffee Apples

4 Pink Lady apples, peeled, cored & sliced
60g unsalted butter
656g soft dark brown sugar
2 tbsp of orange juice

Cook in a large frying pan for 10 minutes, and you get these :


Shazam!

My four apples gave me 466g of toffee apples which I divided into two boxes and popped into the freezer. Serve warmed for a few seconds in the microwave, over vanilla ice cream.

I cannot tell you how good it feels to rescue food and turn it – in this case – into a yummy pud!


A Croque, the relish and a wedge


Cooking doesn't have to be complicated – the simpler the better. Here's an example - recipes for a sandwich, with two sides.

The beauty of these recipes are that they are straight forward – the Croque can be made ahead, ready to fry whilst your wedges are in the oven.

I know the Croque is indulgent – it's meant to be – perfect for the weekend in front of your favourite film.

The Croque :
Croque Monsieur


4 slices of medium sliced wholemeal bread
2 tsp Dijon mustard
75g (3oz) Gruyere cheese (grated)
2 slices of ham or try 45g of cooked ham hock
if you can get it – omit the ham for the vegetarians
30g (1½oz) unsalted butter

Preheat oven to 160fan/180c/Gas 4

Spread ½ tsp of mustard over each slice of bread.

Spread half the cheese on two slices of bread followed by the ham, remaining cheese on top. Sandwich together with the other two slices of bread.

Heat the butter in a frying pan until foaming – fry your Croque Monsieur for 1-2 minutes on each side. If your frying pan is suitable for the oven then pop in for 4-5 minutes. If not then transfer the Croque to a baking sheet.

If you haven't got or can't get hold of Gruyere then use Mature Cheddar instead – nothing is set in stone!

Adaptable for meat eaters and vegetarians too.

The relish :
Bazzin' beetroot relish

300g vac pack of organic cooked beetroot
drained and cut into small cubes
1 sharp eating apple, peeled, cored and cut
into small cubes
1 medium onion, finely chopped
75g soft dark brown sugar
1 tbsp balsamic vinegar
1 tbsp olive oil
salt and black pepper

Don't forget to use gloves when prepping your beetroot!

Mix well and place all the ingredients in a medium saucepan – 16cms in diameter. Simmer on a low heat, uncovered, for 30 minutes, stirring occasionally until all the liquid has been absorbed.

Take the pan off the heat and allow to cool. Box up and fridge until ready to use.

Finally the wedges :

You can use Charlotte or any waxy potato for wedges. If in doubt check the instructions on the bag. King Edward potatoes are great too – crispy on the outside – fluffy on on the inside. Cut your wedges into similar sizes and place on a large baking tray, drizzle with rapeseed oil and pop into a pre-heated oven 180fan/200c/Gas 6 – 20 minutes then shake and repeat. The more wedges you have the longer it will take for them to be crispy and brown. Tip into a bowl and sprinkle with a seasoning of your choice – Chinese 5 Spice, Chilli Flakes, or Classic Paprika & Onion, to name but three. Shake again and serve.

The dumpling stuff!


Vegetarian suet is a truly wonderful product and dumplings are really easy to make.

100g/4oz of self-raising flour
50g/2oz of vegetable suet
large pinch of salt
80ml cold water

Mix the flour, suet and salt with the water

Divide and shape into four for large or eight for smaller versions

Drop into simmering soup and cook for 20 minutes

Here's the thing … traditionally dumplings are placed on top of a casserole with a tightly fitting lid. Casseroles have a thicker consistency than soup and obviously, usually, slow cooked in the oven. Soup simmers on top of the hob and saucepan lids “sit” on top of the pan and are not what I'd describe as “tightly fitting”. Here's my tip - tear off a sheet of foil large enough to overlap the pan, push down slightly and then secure with the lid. Make sure your soup is simmering gently before you add the dumplings and seal with foil. 20 minutes later you'll have dumplings the size of which you wouldn't believe!

A bowl of soup with dumplings – what's not to love and it can be veggie or not!


Radio Information


As promised here are the labels to be found on the blog and recipes and the bits and pieces mentioned too during my chat with Bernie Keith, on his Radio Show, The Bernie Keith Show, BBC Radio Northampton on Thursday 2nd April, 2020 at 11.45am

Veggie label

Dressings and home-made mayo

Halloumi

Bazzin' Beetroot relish using
Vac pack beetroot

A roast or a pie?

Jack Fruit

A raw slaw

Pasta

Fettuccine Alfredo – the ultimate
pasta and sauce

Orzotto – fast risotto – no rice involved!


Comfort Food

Rummage Pie

Champ or Colcannon?

Soup

Chowder

Cream of Chicken

Carrot, Coriander and Chickpea

Pastry

Where has all that flour gone? If you have some :

Wholemeal pastry

Fast Flaky pastry

Pasty Pastry

Bread

Beer bread

Soda bread

Cheese & Onion Muffin Loaf

Fish

Fish Mornay

Fish Pie

Fish Cakes – the best ever!

Asian Spiced Salmon

Smoked mackerel paté


Beef label

Posh Chilli – doesn't have to be steak, mince
will do!

Posh Cottage Pie

Steak pie filling – slow cooker style

Stew and dumplings

Burgers and meatballs

Desserts

Where would life be without a sweet treat?!

No-churn ice creams – check out the Ice Cream label too

Cakes

Compotes

Chocolate stuff – Bark and Rocky Road

Sticky Toffee Sauce

A Muddle or a Hodgepodge (aka a Mess)

Tiramisu – NOT coffee

Microwave Lemon Curd

There are Labels for Meal Planning and Hints and Tips too.

None of the above is exhaustive, it's just to give you ideas.


Saturday, 21 March 2020

Time on your hands – roasted garlic photo guide


I had a larger foil tray so roasted three bulbs -
it never gets wasted


consider it therapy


I love saving time!

I filled eight pots which I bagged in Bacofoil SafeLock bags – four pots in each. Handy to stash in that small freezer tray that never gets used because you never have anything small enough - another problem solved.

The best garlic - no bitterness - sweet and ready to use. Just think how easy it is to make your own garlic butter with a sprinkle of celery salt - don't forget to add a handful of chopped flat leaf parsley too - ready to bake with mushrooms and/or to spread on a French stick, wrap in foil and bake for your own garlic bread … just another thought or two!

How about a recipe for leftovers?


Time on your hands … roasted garlic recipe


You might think this recipe is a faff in itself since you have to “pop” the garlic cloves from the bulb and box in your tiny pots – messy I know - I can only say it's worth it.

Roasted Garlic

2 bulbs of garlic
olive oil/rapeseed oil for drizzling
2-3 sprigs of fresh thyme - optional
salt and black pepper

Pre-heat your oven to 200c/180f/Gas 6.

Slice the tops off the bulbs or not, as you wish and place in a small ovenproof dish, garlic roaster or foil dish so that they fit snugly. Drizzle with oil and season with thyme, salt and black pepper.

Roast in the oven for about an hour – until the garlic has softened.

Squeeze the garlic cloves out of the bulb. It's a good idea to wear gloves and to have a compostable bag ready for disposal. To store in the fridge, add a little more oil and keep in a screw top jar.

You can use the paste in the same way as you'd use fresh garlic – the difference is that the roasted version is sweeter and ready to use!

The paste will keep in your fridge for one to two weeks or you can freeze in the baby pots mentioned.

If, like me, you forget to take stuff out of the freezer another plus here is that because the pots are so tiny they don't take long at all to defrost!

Next up ... the photo guide

Time on your hands?


We're all in the midst of “Corona virus” and lets hope that we all keep well.

We need to turn a negative into a positive – if we're staying indoors or out of the way generally then lets make the most of the time.

We'll do a series of a sort of back to basics recipes and may even be motivated to do those jobs we've been putting off for ages - mainly because we've never got the time – then we'll move on to a spot of reorganisation.

My first back to basics recipe is roasted garlic.

I hate wasting time and believe in having all the ingredients ready to roll for any recipe. On that note – who doesn't hate faffing with peeling and chopping 1 or 2 cloves of garlic for one recipe?

There is an answer – the obvious being to cheat and buy any of the ready-made versions available in the supermarket. Personally I prefer to roast whole bulbs of garlic at the same time. If you use garlic regularly this paste makes life so easy especially when you've no time.

You can keep it in a screw top jar in the fridge or decant into tiny pots and freeze.

I use the “tiny pots” and freeze option. If you're interested check out the baby aisle in the supermarket/cheap shops for tiny pots – inexpensive and don't take up space in your freezer. If they are safe enough for a baby then they are perfect for other uses too.

Here's a photo of my “baby pot” :


a neat piece of kit
the measurements are 5cms x 4cms x 3cms deep
or 2”x 1½”x 1” in old money

You probably won't be surprised to know that I've had mine for years. If you're interested you can buy Baby Freezer Cube Trays, BPA Free from your favourite on-line grocer!

A hint and a tip – bear in mind you won't be able to use the pots for anything other than garlic. I use hot water and washing up liquid, as hot as I can bear - when you've emptied a pot make it the last item you submerge so that it doesn't taint anything else. Shake the pot when clean and rest, upside down on kitchen roll. I then bag and clip all the pots together, ready for the next garlic roast!

Recipe and photos up next ...


Remember the geographical bread roll?

Before I begin this piece I said at the end of the previous missive that I may have another idea for the chowder. It's not rocket science, just a thought – add a dumpling – probably not what you'd expect in a chowder but the recipe given can be vegetarian or not - so a dumpling vegetarian or not - would lift a bowl of soup to a more substantial – and a speedy idea – for a mid week supper.

Back to the title. The “geographical bread roll” reminded me of another childhood treat that falls into a similar regional difference.

Is it a crumpet or a pikelet - that is the question!

It can be either – both originally from Wales and the regional name, certainly in the Midlands is a pikelet. Most of us know what a crumpet looks like – where I came from a crumpet was posh – a pikelet definitely wasn't! The difference is that a pikelet is thinner than a crumpet.

Back in the day there were portable stalls just outside the entrance to the Market Hall in Derby City Centre selling pikelets from what I can only describe, these days, as a portable ice cream cart. You can still get variations on a theme of a pikelet in that neck of the woods. I visit the market town of Ashbourne in the Derbyshire Dales occasionally and there's a stall where you can buy pikelets or the nearest to them I've seen in recent years but they are called Derbyshire Oatcakes, larger and flatter than the originals but definitely worth a taste!

Here they are :

see what I mean – flatter but still with the “crumpet holes”


Back to the crumpet, widely available everywhere in the UK. It's important that crumpets should be toasted twice if you're using a toaster, well done if under the grill – they have a tendency to be “claggy” (sticky) otherwise.

Whether a pikelet or a crumpet, other than smothering in butter, try adding grated cheese and grill or – a delish weekend breakfast treat – top with a poached egg.

Here's my other suggestion. “Double toast” your crumpet, spread with cream cheese and then drizzle with honey or, my personal favourite, maple syrup.

I don't have a sweet tooth but the balance of the crumpet or pikelet, cream cheese and just a hint of natural sweetness with either honey or maple syrup is wonderful.


There's a thought!

Saturday, 14 March 2020

The Chowder ...


a photo guide from the beginning :


onions, carrot, sweet peppers
and butter in the pan


a ladle from the pan


a bowl of chowder

My final chowder idea is to add smoked haddock – it's a perfect partner and makes the chowder more substantial.

Poach 250g of smoked haddock in the milk, then strain so that your milk is ready to use – set the fish aside, cool, box and fridge until you're ready to use. Continue with the recipe. Flake your fish into small pieces and add to your chowder ten minutes before serving so that you can warm through gently – don't stir or mess with it – you'll break up the haddock and it will look horrible.

Note to self. If you're going to add the smoked haddock be careful how much salt you use at the beginning of the chowder. Taste it at the end and then adjust – you can add – you can't take away!

Garnish your chowder as before with flat leaf parsley and serve with Tabasco and Worcestershire Sauce.

I may have another idea for the chowder ...

Tips and more tweaks


... for the chowder and it turns out that there are more than three tweaks – there's a surprise!

There are three thickening choices to add to a chowder, crushed crackers, the hardtack ships biscuits also crushed or a roux. The recipe given uses the roux method.

If you're Lactose intolerant, use stock to replace the milk and a plant based spread that is suitable for cooking.

In case you were wondering why the diced potato wasn't added to the other veggies when sweating it was entirely deliberate. Potato tends to stick like cement to a pan because of the release of starch and so will wreck your soup base. Submerging the potato and the corn later into the soup is a perfect solution – problem solved.

Speaking of corn - it is definitely not sweetcorn season and I mentioned cobs of corn in the recipe. When the season arrives and you use cobs you'll need to strip them. Please note you don't have to risk your fingers stripping a cob. Years ago I treated myself to a piece of kit that really does what it says – say hello to my sweetcorn stripper – I bought mine in South Carolina, Charleston Cooks to be precise and it's made by Oxo. I found, researching recently, the same one imported at a ridiculous amount of dosh. There are however alternatives out there.

Here it is :


the stripper with its guard


the stripper without


More photos – from the beginning


The second tweak ...


There are traditional accompaniments or garnishes to add to a chowder - Tabasco and Worcestershire Sauce both would be served at the table so that each person can add to create whatever strength and flavour they prefer and entirely optional.


the chowder with blobs of Worcestershire Sauce


the chowder sprinkled with chopped flat leaf parsley too


Next … tips and more tweaks


Three tweaks for the Chowder


The first tweak is not just for the chowder but useful in all sorts of ways. Way back when I started the multitasking ideas and filling your oven whilst cooking your Sunday roast, one of my favourite tips was to pop a tray of bacon into the oven – 180fan, 15 minutes turn and repeat. Let the bacon cool on the tray and then break into tiny pieces, box and fridge.

Add a sprinkle of bacon bits on top of the chowder especially for the meat eaters – the bonus here is that you don't have to wreck a veggie soup or dish. The bits can be placed in a bowl and people can help themselves.

It looks like this :


There are deals to be had out there – I got two packets of Wiltshire Cured Smoked Back Bacon – 8 rashers in each – 480g in total - for £5 and you can freeze it.

If you'd like another “bacon” idea then you could fry diced chorizo until crispy then sprinkle with the released oil over the Chowder.

More tweaks …


Sunday, 8 March 2020

Back to mid week supper ideas …


another soup – with tweaks to follow.

There are so many soup recipes to try - here's my version of a Sweetcorn Chowder.

The Chowder originates from long journeys by ship – they used ingredients that would survive and the soup was thickened with hardtack. Hardtack we know as a “ships biscuit” - it was inexpensive and long lasting – perfect for long sea voyages. It arrived in North America from England and France. Probably the most famous version, certainly in the USA, is clam chowder but there are many variations. It is principally a soup with cream or milk, although you can use stock, adding potatoes, sweetcorn and other veggies or add fish and seafood if that's your bag. I suppose you have to like sweetcorn but, by its nature, it's quite popular with the kiddies.

Sweetcorn Chowder
Serves 2 large or 4 smaller portions

300g/10½oz Charlotte potatoes, peeled and finely diced
1 medium carrot, finely diced
1 medium onion, finely diced
90g/3½oz Two small red sweet baby peppers, finely diced
50g/2oz of unsalted butter
175g/6oz sweetcorn or two cobs, stripped
1 tbsp plain flour
2 pints of milk – I use semi-skimmed
(568ml or 1.2 litres)
celery salt and pepper – white or black
chopped flat leaf parsley to sprinkle

Sweat the carrot, onion and peppers gently in the butter for 10 minutes, covered. Add the flour and the celery salt and pepper of your choice. Add the milk gradually – I use a whisk - this will prevent lumps. Add the diced potato and sweetcorn and simmer for 20 minutes, stirring frequently. Taste and adjust the seasoning to suit. Check the thickness of the soup – if it's not thick enough, again to suit you, blend a ladle or two and add it back to enrich.

You don't have to use celery salt, you can use sea salt if you prefer. I love the extra oomph it gives – a fab flavour, especially in soups. I also mention a choice of white or black pepper – it's entirely a matter of choice, either is fine. If you're not fond of black flecks from black pepper then white is right!

Coming up - three tweaks and a photo guide …


A geographical guide to a bread roll …


or when is a bread roll not a bread roll?

Do you ever come across bakery products and bread that you've never seen before? If you holiday in the UK then that's quite likely.

I grew up and worked in the Midlands and I'd pop to the local bakery to buy my lunch – usually a cheese cob – it could be soft or crusty.

Years later I moved to London to live and work. I followed the same routine for lunch and asked for a cheese cob – they did give me a strange look, clearly thought they'd misheard this funny girl with a weird accent and offered me a large uncut loaf – that they called “a cob”. Having translated my cheese “cob” became a “cheese roll”. I'm sorry to appear picky but – as far as I'm concerned – a roll is a shape that means just that . When in Rome and all that – I conformed and my bread education began.

From London I relocated to the North West, lived in Bolton and worked near Eccles, where they make the cakes – the smell on baking day was divine!

In the North West there's the muffin – not “roll shaped” at all – soft and flat. Then there's the tea cake – please note, not to be confused with a toasted teacake version that contains currents and sultanas – just plain.

The barm cake is from Manchester and the surrounding area. It's not much different to my Midlands “cob” but on reflection I don't think I've ever seen a crusty barm cake.

My favourite from the North West and North Derbyshire too is the oven bottom – flat as can be and so called because it is said they were baked on the bottom of the oven. It's more likely that they were made with the remnants of the dough when the loaves had been baked. I feel I should set the record straight – the oven bottom is a much later name – the original “oven bottom” originated in the North East and is called a “stottie” (or Stotty).

Most of us know the bakery Greggs which began as long ago as 1939. Its first shop opened in 1951 in Newcastle upon Tyne and is now the largest bakery chain in the UK. Greggs baked the best oven bottoms ever and I used to buy them freshly baked in bags of 6. Even when I'd left the North West I'd stock up when I visited and freeze them. Imagine my joy at the thought of an oven bottom when Greggs opened in the South – such joy was short lived. With the exception of the pasties Greggs bakery products are completely different – definitely in Northamptonshire and I now discover in the South generally. What a disappointment - they are missing a trick, as they say!

I can't say I'm up to date with bakery products in London but I wouldn't mind betting they still don't know of an oven bottom or, for that matter, a barm cake.

I felt I should set the record straight and if you're not confused now – my husband is a Lancashire lad. One of his favourite lunches is a currant teacake with cheese. There's nothing better than a fresh currant teacake, buttered and topped with thin slices of Crumbly Lancashire cheese - you can get a Creamy Lancashire version too. If you live in Lancashire or the North West you'll also be able to buy Lancashire Tasty cheese – it's exactly the same as the crumbly version but matured for longer and gives a more mature taste – yum!

I've recommended the currant teacakes with cheese to lots of friends and they love them – I say “them” one never seems enough!

Next, back to more mid week supper ideas


The Daim Road serving idea …


simplicity itself – use your freezer.

Here's a product you may be interested in – particularly if you are fond of sweet stuff. This Swedish Glace “ice cream” is vegan, dairy free, lactose free and gluten free – I think that just about covers it!

The “ice cream”
raspberry flavour – available in vanilla and chocolate too


There are heaps of Swedish Glace dessert products to choose from – check them out when you're browsing!

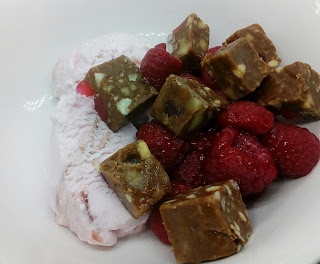
The story so far – we have frozen Daim Road and Swedish Glace. The final touch and probably the most important – frozen raspberries – no sprinkle of anything, particularly sugar, there's enough in the Daim Road to sink a battleship!

It's a handful of this and a scoop of that and restraint with the cubes of Daim Road. You could use any sharp fruits of your choice to balance the sweetness.

Here's my “freezer” dessert :


You'd never know the Swedish Glace isn't a traditional ice cream – it's delicious.

The moral of the story … make your freezer work for you, not as a receptacle for ready-meals you've bought!

Coming up – a geographical guide to a bread roll and then back to more mid-week supper ideas.


Daim Road photo guide


The XXL bag – 460g

The saucepan with the tiny Daims, the butter
and the golden syrup

A tray full!

A bowl of the bite sized beauties

As with any of the “Rocky Road” recipes this version freezes well.

A serving idea up next …