Sunday, 25 February 2018

8 down 1 to go – the Pets Photos


or should it be “fart fotos” - I'm so sorry.

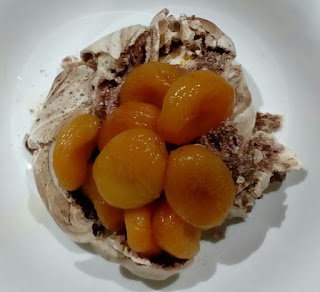
Usually photos that appear in fancy cook books bear no resemblance to reality – in this case - dare I say it - they were even better!


Of all the recipes in The Little Book of Chocolat that we've road tested I think this is both the easiest and has the “wow factor” - not that I'm that bothered about the “wow” but it has to be said if you're wanting an impressive dessert for a supper/dinner “do” this is the one for you. It's easy, can be made ahead and served with whatever takes your fancy.

The test run was served with apricots in liqueur and was a roaring success.

As you would expect hints and tips on the pets up next.


8 down 1 to go


Cast your mind back to 7 down … I mentioned separating your egg whites into two boxes - two in one and the remaining four in another and all you needed to remember was to freeze them.

Here's why - the penultimate choice from The Little Book of Chocolat, Pets D'Ange.

Meringues have existed under various names since the seventeenth century. In the Loire region of France they are still sometimes known as pets or pets d'ange (angel farts) for their fluffy, cloud-like consistency. They are doubly angelic for being entirely fat-free – even a tiny trace of fat can cause the beaten egg whites to collapse. For this reason, my grandmother always wiped the mixing bowl with a piece of lemon before adding the egg whites – although her explanation was more fanciful: she said that the lemon juice was to squirt into the Devil's eye, to keep him out of the cooking … “

Defrost the box containing 4 whites and lets have a go :

Pets D'Ange

Takes 4 hours/serves 6

4 large egg whites
200g unrefined caster sugar
10g cocoa powder

Pre-heat oven to 120fan/140c/Gas 1. Line a baking sheet with baking parchment.

Whisk the egg whites with an electric whisk until stiff and standing in peaks. Add half the sugar, whisk again, then add the remaining sugar and whisk once more. Sieve in the cocoa powder and stir just once with a metal spoon to create a marbled effect – it should not be too evenly blended.

Spoon out on to the baking sheet into six large meringues. Place in the middle of the oven and cook for 3 hours for gooey, soft middles or, if you want the meringues dry all the way through, switch off the oven when cooked and leave them in overnight to dry out. Serve on their own or with whipped cream and seasonal berries.

Looking good …

Crumble photos and hints and tips too


Here are the cherries and conserve mixed


and with the crumble topping, ready for the oven


and fresh from the oven


As a guide the ramekins measure 9cms x 5cms.

If you decide to make your own crumble then anytime will do - then freeze it – preferably in portions that are practical for you – you can always take out two bags if you need to!

The crumble recipe given makes a shed load so you'll have loads left over – you've guessed it – freeze it. You can always halve the recipe if you don't want to bother.

Serve with whatever is your guilty pleasure – custard, cream or ice cream – or all three!

In the style of … the muddle


or, as it is now known, “the muddle principle”.

It is so cold and miserable at the moment, even by February standards, we still need comforting treats.

To cheer you up after a cold journey home from a days toil, here's another contender for your dessert store cupboard, which as you know includes your store cupboard extension, the freezer. Check out “Frazzled” and “Stock the store cupboard” for reference. I mentioned then that frozen cherries are an essential part of your freezer store cupboard – here's an emergency dessert using them.

This has to be the fastest crumble ever.

Cheery Cherry Crumble

Makes 6 individual ramekins

500g Dark Sweet Cherries – defrosted
370g jar of Black Cherry Conserve

Add the conserve to the cherries and mix together

Top with crumble of your choice

Bake in a pre-heated oven – 170fan/190c/Gas 5
for 25 minutes

You don't even need to make the crumble topping – you can buy it ready-made with a decent shelf life and keep it in your store cupboard. A step too far for me – my favourite crumble recipe is one of Nigella's and at the risk of repeating myself but to save you time, here it is again :
150g unsalted butter, diced
250g self-raising flour
150g demerara sugar
200g pecans finely chopped

Using a large mixing bowl, rub the butter into the flour – you can use a mixer if you want but I don't think it's worth the washing up – by the time you've arranged the equipment you could have rubbed the butter into the flour! Mix in the sugar and the pecans. I blitz the pecans – I like the nuts to be of a similar size and it's quicker – personal choice as always.

An added bonus – the cherries count as one of your five a day.

I'm doing my best!

Sunday, 18 February 2018

Sorry to have kept you waiting!

Remember the marquise? As promised here's the end of the story.

The original recipe suggests you blend the raspberries to make your coulis, reserving some for decoration. You don't need to use a blender to achieve this is if you're using frozen raspberries. Once defrosted they are really easy to “mash” with a fork and then pass through a sieve. I transferred the coulis to a squeezy bottle – much easier to control when serving.


To serve - get yourself organised. I took half of the marquise (remember I froze it in two pieces) and placed it in the fridge as I served the main course.

Have your serving plates ready. You'll need a jug of boiling water and a chef's knife. Dip your knife into the water, wipe the knife and then cut a slice (portion size to suit your guests). The knife is HOT – use dry kitchen roll to cover the sharp end of the knife and slice through the marquise evenly using both hands – this way you'll protect yourself and get a perfect slice.


No need to worry about the freezer life of the remaining half – an impromptu visit to Son and Dil (much nicer than the mouthful of “daughter-in-law” and the nickname has stuck). I always try and take something nice - I must have known - I packed a small cool bag and transported the marquise and frozen raspberries, ready to eat or stay frozen. It stayed frozen.

I left instructions for serving and the feedback, two days later … “Well, the choccy wokky doo dah was loverly – not too rich at all. Sliced well which made it easy to dress with sauce … loverly!”

You might realise that the feedback is a verbatim quote – two “loverlys” is a good score, I'll take that any day of the week.

I've just realised that it proves that the marquise travels well too. A candidate for your next posh dessert whether at home or away.


Vollie Alternatives

If you don't fancy the puff pastry option, you have alternatives. You could try a wholemeal pastry – the following recipe is one that I use all the time and it's great.

Pastry case

200g plain wholemeal flour
100g unsalted butter
pinch of baking powder

ice cold water to bind

Rub the butter into the flour and baking powder until it resembles breadcrumbs, then gradually add a glug of water and use a round bladed knife to bring the pastry together.
You can use a processor to reach the breadcrumb stage if you prefer – I'd then tip the pastry into a mixing bowl and add the water by hand.

Rest the pastry in the fridge for 30 minutes then roll out and use to suit your preference – a bottom and a top or just a top.

You could make individual pies or pasties – the world is your lobster.

You could add grated cheese to the pastry for extra flavour – add 60g of grated mature cheddar cheese to the recipe or 25g finely grated Parmesan. Add at the breadcrumb stage.

You don't have to go to the bother of making a sauce supreme. You could call upon our favourite Alfredo or, make a quick onion sauce – another perfect partner for roasted veggies.

You can use whatever veggies you want – for example potatoes, parsnips, turnips and beetroot to name but four would be great – the more the merrier. All you need to remember is that your veggies are of a similar size dice so that they roast evenly.

Part roasted veggies resembling bullets are not good at all – particularly when you're trying to impress those not enamoured to begin with!


Vollie Assembly

Unroll the puff pastry sheets. Remember that the sheets should be removed from the fridge before use to enable them to reach room temperature – this will avoid the pastry sheet breaking up at the edges.

You want 16cm squares – each sheet will give you two cut from the sheet and a third rolled from the remaining pastry, so six squares from the two sheets. Egg wash the edges of each square and place 2 generous tablespoons of the roasted veggie filling in the centre. Pinch each side together so that you can see the filling in the centre. Egg wash the vollie and place in the fridge to chill for at least 10 minutes.

Here they are, chilled and out of the fridge ready to bake.


If there is a trick to this recipe it is in the chilling. I made mine in the morning and fridged to chill, ready to bake early evening. It gives the pastry, filling and egg wash a chance to glue together and it won't split and spill all over the baking tray and into a real disaster.

Bake in a pre-heated oven 180fan/200c/Gas 6 for 25/30 minutes until golden brown.

They look like this :


Not too shabby I hope you'll agree!


Veggie Vollie – the photos so far

... and the sauce too.


Your sauce recipe :

Sauce Supreme

500ml stock – vegetable or chicken
ideally cold
30g unsalted butter
30g plain flour
1 tsp Dijon mustard
400ml double cream
salt and black pepper

Melt the butter, take the pan off the heat, add the flour and whisk. Return to the heat and cook out the flour for 2-3 minutes, stirring continuously making a roux sauce – do not walk away.

Tip your cold stock straight into the roux and whisk until smooth, then cook on a low heat for 30 minutes. Season with salt and black pepper.

Add the mustard and the cream and simmer for 5 minutes then cool, cover and fridge.

You can make ahead and freeze the sauce if it's more convenient – it's every bit as good from the freezer.

I have made double the normal quantity of sauce - add 3 generous tablespoons to the roasted veggies so that they hold together – you are left with extra sauce to drizzle over the baked vollies. Fridge them both, covered.

Assembly coming next!

Sunday, 11 February 2018

Whilst we're waiting …

another foray into speedy, comfort eating suppers.

Not fond of root veggies, or is it that you haven't the time or inclination to dismantle a swede or a squash? I love them both but they ain't easy to prep, especially when expected to wield a large chef's knife!

Here's my answer – cheat – buy ready diced root veggies, which is exactly what I did to produce Root Veggie Vollie or, my version of a vol au vent.

Root Veggie Vollie

350g diced butternut squash and sweet potato
450g diced carrot and swede
1 medium onion, finely diced
3 cloves of roasted garlic or
equivalent amount of paste
salt and black pepper
50g unsalted butter, diced
Generous drizzle of rapeseed oil

Two sheets of puff pastry

Sauce Supreme

All the major supermarkets sell root vegetables diced and ready to use. I did refine the size – you want fine dice not huge chunks.

As is my usual practice I'm giving you alternatives at the end.

Pre-heat your oven 180fan/200c/Gas 6.

Tip the veggies into a large roasting tin (or in my case, as you know, a large foil tray). Sprinkle with salt and freshly ground black pepper. Dot the butter over the veggies and then finish with a flourish of rapeseed oil.

Place in the oven for 20 minutes, then turn – whilst turning squidge the garlic cloves so that they become amalgamated with the butter and oil.

Return to the oven for a further 20 minutes. Leave to cool, then cover and fridge. As you might expect this can be done ahead of the game and in fact probably enhances flavours too so a win win.

Coming next are the photos so far and the sauce too. You might think this is long winded - it just seems like it because I waffle as I go – it'll be worth it!


7 down – 2 to go – Raspberry Marquise …

the photo story so far :


You can see what I mean – if you didn't see the cling film at the top of the tin you wouldn't know it was lined.


When the colour looks like this you know it's going to taste good.


Now it has the “mousse” look.


Ready for the freezer.

Whilst we're waiting …


Raspberry Marquise – Hints and Tips

I used unsalted butter and ordinary caster sugar.

A tip or two when lining a loaf tin with cling film and trying to avoid creases.

Don't tear off a huge piece of cling film – you know what'll happen, you wrap yourself in the stuff and get very cross!

You'll need two single pieces of kitchen roll. The first scrunch up and pour a tiny drop of vegetable oil into the tin and use the kitchen roll to grease it thoroughly – every nook and cranny.

Place your cling film into the tin and gently ease it as flat as you can. Scrunch up the other piece of kitchen roll and smooth out the bottom of the tin – it really does work.

Here's the best tip. When you separate your eggs have two boxes ready. Place two of the egg whites in one and the remaining four in another. The only trouble with using six egg yolks is what to do with the remaining whites.

All will become clear in the fullness of time – all you need to remember for now is to freeze the egg whites.

You can chill the marquise overnight or up to 2 days. Serve straight away or freeze for up to one month.

In the ordinary course of a recipe I'd complete it and there'd be photos of it served and decorated. I'm putting the marquise straight into the freezer, cut in half and double wrapped in cling film and then foil. I've got supper with friends later this week so I'm going to use one of the halves then. It makes perfect sense that I've got two opportunities to serve the dessert and all I have to do is keep my eye on the date, so that I use the remaining half within a month.

You'll have to wait a while for the end result!

7 down – 2 to go: Raspberry Marquise

We are nearly at the end of this journey. As has been my habit during our experiment what follows is the recipe taken from “The Little Book of Chocolat” by Joanne Harris and Fran Warde.

Raspberry Marquise

This is the ultimate chocoholic's dessert. Grown-up, rich and seductive, it's best served with a fresh raspberry coulis to cut the richness of the chocolate. Perfect for dinner parties, a little goes a long way – and because it's flourless, it's the ideal chocolate fix for cacao addicts everywhere.

Takes 20 minutes, plus 2 hours (minimum)
to set
Serves 10-12

175g butter
175g unrefined caster sugar
400g dark chocolate, broken into
small, even-sized pieces
40g cocoa powder

500ml double cream
6 egg yolks, beaten
cocoa powder, for dusting
250g raspberries


Carefully line a 11.5 x 25.5 cm tin with cling film (try to avoid creases).

Place the butter, sugar, chocolate and cocoa in a bain-marie, melt and stir until smooth and blended. Whisk the cream in a bowl until it just starts to hold, add the egg yolks, whisk, then add the chocolate mixture and blend until smooth. Pour into the lined tin, bang twice on the work surface to remove any air pockets from the corners and place in the fridge for 2 hours or overnight to set.

Turn the loaf out on to a flat board or place, peel away the cling film and lightly dust with sifted cocoa. Blend half the raspberries and sieve to remove the seeds. (Fran suggests doing this, but I never bother. I guess it depends on whether you care about raspberry seeds). Just before serving, arrange the remaining raspberries on top of the loaf, drizzle with the coulis and serve. Have a jug of hot water to dip the knife into before each slice, this will help to achieve a neat cut.

This is looking promising!

Friday, 2 February 2018

Ascoughs – the birthday treat

I wouldn't normally go out to eat to celebrate a birthday – in fact the last “birthday treat” was an unmitigated disaster. Thank you Ascoughs for restoring my faith – but don't take my word for it.

I was impressed to receive a very polite message from Ascoughs on the day, asking me to confirm my booking – attention to detail.

Some useful information – the current lunch and dinner menus are available from 9th January to 3rd February so another change of menu is due. You can take a sneaky peak at the menus ahead of the game on line and ponder your ultimate choice – another smart move. If you tend to be a tad indecisive and then regret it later this is the perfect solution.

What did catch my eye was “Over Night Braised Hoggett, Champ Potato Cake, Confit Shallot, Red Currant Jellies and Pan Jus”.
For those who aren't sure what hoggett is, let me explain. Lamb is considered to be up to a year old. Hoggett comes next between 1 and 2 years old, mutton follows – over two years old. If you are a fan of lamb you might be interested to know that hoggett is considered to be the most flavoursome of the options.

Lets cut to the chase and borrow a well known phrase - “... here are some of the choices and results from the Stanwick Jury”.

Here's the hoggett :


... “excellent – very generous portion, melt in the mouth”

Next up for the vegetarians :

Winter Vegetable En Croute, Spinach, Spring Onion Mash, Baked Onion, Sauce Roti


… “delicious - it's rare for me to finish a plate of food but I gave it my best shot!”

Finally, the dessert choice :

Frangipane Slice, Cherry Gel, Glazed Baby Pears, Salted Caramel Almonds, Cherry Sorbet


… “all my favourite flavours on one plate – it did not disappoint”

There are two strokes of genius here – the cost is beyond reasonable and the menus are changed each month so you don't get bored. Out for lunch or dinner once a month at these prices – what's not to like.

Can't wait for my next treat!


Ascoughs – the return.

In May 2017 I mentioned this restaurant in Market Harborough, Leicestershire. (Travels with my friend 1-4).

If you are really impressed with a restaurant you are in two minds whether to re-visit for fear of disappointment. Never let it be said that I don't have your best interests at heart! I'm ringing the changes this time and sampling the dinner menu. Dinner costs 2 courses £19.50 and 3 courses £24.50 although some dishes attract an extra charge.

My first visit took place in December, just before the holidays – a good time to road test a restaurant – so often the quality plummets and the price rockets. I was more than impressed that the prices were exactly as stated.

I appreciate that December has come and gone but, to illustrate the quality of the food you can expect, here's a snippet from the starter and dessert menus.

To whet your appetite :


This is Cauliflower (charred, pickled, purée, crisp, beignet) with Golden Raisins and Mint Salsa


This is Butterscotch Mousse, Hazelnut Brittle, Chocolate Sphere, Truffles, Hazelnut & Caramel Sauce

Value for money – without question.

Would I go back? In a heartbeat – I've already booked!

Ascoughs Bistro – telephone 01858 466966


Fly by the seat of your pants!

You'll notice that I've not been specific about size or weight of potatoes. As a guide (to serve 4 generous portions) I'd use 3 medium/large baked jackets or 800g of potatoes to boil for mash. In my house I always cook more than I need. I find cooked potatoes, in whatever, form extremely useful. I should also mention that cooked new potatoes fall into the same category.

Learn to “fly by the seat of your pants” and think ahead. If your oven is on fill it (with at least six medium to large baking potatoes) - if you're prepping veggies – potatoes et al - cook more than you need. Grate mature cheddar cheese and fill a bag or box and fridge.

To illustrate how the potatoes and the cheese can help you - using your “hob to oven” frying pan, sauté cubed potato with onion and any other leftover veggies or those lone fresh ones lurking in the fridge that you never seem to use before they become wizened and inedible.

Add beaten eggs – one per person – and a handful or two of grated mature cheddar cheese from your boxed stash, whisked together or sprinkle the cheese on the top. Cook the bottom on the hob for 3-4 minutes on a medium heat, then finish under the grill for 10 minutes or so – don't walk away! You could, if you prefer, cook the veggies in the frying pan and then add the remaining ingredients and then bake in a pre-heated oven on 170fan/190c/Gas 5 for 35/40 minutes.

It's vegetarian as it stands – add whatever you want to enhance – sprinkle with bacon bits! A perfect speedy mid week supper and an even better “portable” lunch, cold, the following day.

Either way a fab frittata - I rest my case.

To mash or not to mash

Toppings on pies are a serious business - shall it be mash - if not then what?

If you choose a mashed potato topping and you want it lump free then put the pototoes through a ricer – don't add milk or butter. Set aside to cool.

You can add grated mature cheddar cheese, a teaspoon of Dijon mustard and black pepper to the riced potato before you complete your pie.

Mashed potato seems to be on “the definite list” - definitely yes you love it or definitely no you hate it! If you're in the no camp then try sliced baked potatoes.

Whether mashed or baked the beauty of this dish is it can be made and assembled ahead and then baked in a pre-heated oven 180fan/200c/Gas 6 for 30 mins.

Here it is, in the frying pan and baked in the oven.


Since this is a posher version of the norm I'm treating the GOM and topping with grated Gruyere cheese, a knob or two of butter and black pepper.


A third of the pie left – oh goodie enough to freeze for another day.

This is my favourite method of winter cooking especially when you want a meal as quickly as possible when you arrive home – turn on your oven to pre-heat when you've taken off your coat and by the time you've juggled a few more balls or spun a few more plates your shepherd or cottage – posh or not - is in the oven - ready for the hungry hordes.


Simple stuff but it hits the winter comfort spot!