Saturday, 29 January 2022

Editor's January Pick #17: Julienne Peeler

Editor's note: After last week's selections it would be remiss of me not to round them off nicely with a further related tip from the archives in the form of a julienne peeler. Now I'm a pretty modern person and rather rashly thought at first glance "That's just a peeler" but aha! How little do I know, this little gadget is ingenious and I'm eternally grateful for the tip. Grateful. Is this mic on? Anyway, £10 and change on Amazon and will do you more than just coleslaw. And into the bargain I now know what julienne means! 


The coleslaw conundrum …continued … say hello to your new best friend!

The julienne peeler - every serious cook should have one!

Here's another thing that gets on my wick – entirely related to shop bought coleslaw you understand – carrots either sliced so finely they are mush or so chunky and uneven you have to make an unscheduled trip to the dentist – without being ridiculous your slaw should be of a similar size.

Carrots bleed if you grate them – not to mention pebble dashing every nook and cranny in your kitchen – how is it possible that grated carrot can jettison so far?

Ta dah – enter the julienne peeler.

Here it is, along with the uniformly sliced strips of carrot it produces :


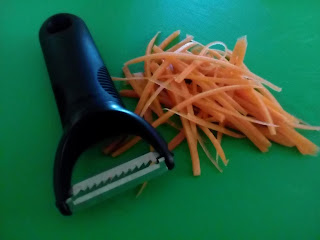
A neat piece of kit and inexpensive too.

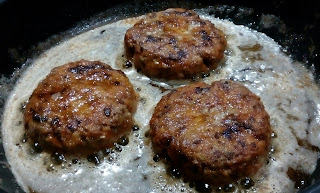
The result of all your hard work looks like this :


Of course you could, if you prefer, dust off one of the gazillion attachments that belongs to your food processor/mixer for which you paid an exorbitant price and, if you can remember which bit goes where, use the slicer cum grater. Oh and create a washing up mountain to boot!


Saturday, 22 January 2022

Editor's January Pick #16: Coleslaw Conundrum - an uphill battle!

Editor's note: It's hard to read a single blog post and then not carry on, and whilst I wouldn't want to overstay my welcome so I've chosen the follow up post that talks through more options and tips on making coleslaw - it's too good to miss. I wholeheartedly agree that buying ready made from a shop is at best a form of culinary roulette!


The coleslaw conundrum - an uphill battle!

I have friends and students who really dislike coleslaw and would pull a face that you're not supposed to see and then decline. The most frequent comments are - “it's tasteless and too much dressing” “I like the combination of vegetables but the dressing is too creamy and sickly”

I do like a challenge and consequently was delighted to hear “completely different to shop bought” “the dressing is very light not like the shop bought stuff”, “refreshing, tangy and delicious”.

If you don't want to be bothered with slicing and dicing then you could choose a good quality or your favourite shop bought brand of coleslaw and enhance it – there is without doubt a world of difference out there – it does not necessarily follow that the most expensive is the best, if you get my drift.

Obviously industrial processors are used for the mass produced product, hence the huge chunks of tough, woody cabbage in the mixture. So, if you are going to use a ready prepared version and make it your own you might want to fish out the larger pieces of cabbage and slice/chop/dice at will!

Add any of the variations mentioned in the Coronation Slaw recipe – to begin with the curry powder, lime juice and mango chutney then the apricots and sultanas. Add chopped nuts – walnuts or pecans would work well or a sharp flavoured apple, peeled quartered and diced. It's whatever floats your boat but is more practical if you don't have the time to slice and julienne the cabbage and carrots.

There is another speedier option – you can buy bags of coleslaw mix – in theory ready to use. The downside is that this product is mass produced as is the ready-made coleslaw and suffers the same fate - large inedible slices of cabbage et al. However it's nothing a chefs knife can't put right – tip it onto a chopping board and refine! The upside is it's practical and if you want to road test creating your own slaw it's worth a shot.

I don't want you to get the idea that I'm a coleslaw snob – too late was the cry!

Editor's January Pick #15: Coleslaw Conundrum

Editor's note: I often find myself with random cravings for food and coleslaw is one of the foods one which hopefully isn't that unusual. So when I do it's a sure-fire thing there'll be a blog post up on MiamMiam to either talk me through what I'm doing, give me inspiration to try a twist, or tell me where I might be going slightly wrong. So for one of the finest takes, I present from 2017...

(As a side note and not connected with this piece at all I found out whilst glancing through the blog that deglazing a pan it turns out does not involve a power sander, and I wish I was making that up...)


The coleslaw conundrum - Coronation Slaw


My quest for a good quality coleslaw has been going almost as long as the vegetarian burger.

I mentioned the slaw in My Quest with a photo of it, alongside the corn and chickpea burger and promised that the recipe would follow, here it is :


Coronation Slaw


110g white cabbage, finely sliced – approximately

one third of a medium size cabbage


1 carrot – peeled and sliced with a

julienne peeler

1 spring onion – 15g finely sliced


salt and black pepper


30g ready to eat apricots, finely diced

30g sultanas soaked in mango and apple juice


50g mayo

50g sour cream

1 tsp mild curry powder


squirt of lime juice

1 tbsp mango chutney


If there's one thing that gets on my wick it the huge lumps of woody cabbage you always find in shop bought coleslaw.

If you are of a similar mind and decide to try this recipe, I promise you that attention to detail is worth the effort. Here's what I mean :

First up slice a “cheek” of cabbage – a sharp paring knife is the best piece of kit – smaller and more easy to control – with care!


The recipe given will give you a box of slaw – measuring approximately 11cms x 6.5cms x 5cms. One box lasted me a week, a spoonful here and a spoonful there – you'd be surprised how well it fits as a side to lots of main dishes and particularly as part of a sandwich.

To be continued ...


Editor's January Pick #14: Kofta canapés, meatballs and burgers

Editor's note: Now you've read the rules, time to expand on them if you so wish! It didn't feel right to bring up the recipe without showing off the accompanying photo-guide. And, possibly more importantly, the idea of using the recipe for other dishes, like a burger. Same deal, same process, just a different shape and how you zhuzh it up. 


Kofta canapés, meatballs and burgers …

the photo guide

Use a foil tray with 2 tbsp plain flour – it enables you to roll around the koftas to coat with flour without having to “assist” them.


If you would prefer a larger version then use a dessert spoon of mixture, treated in exactly the same way, like these :


Finally, if you're in the mood for a burger – but one with Indian flavours, have a look at these :


These burgers are 110g or 4oz in old money.


Editor's January Pick #13: Kofta canapés

Editor's note: Now this selection was originally posted along with the onion salad from last week (editor's further note - this was everything I wanted from a side dish when I made it earlier on!) - some people are huge fans of lamb so felt it only fair to bring this one to the forefront. It's a great way to use minced lamb and a kick too with the spices - read on!


Kofta canapés

How about a kofta for a canapé – these Indian meatballs are a real hit. As you'd expect from me they can be made ahead and frozen. Easy to spear on a cocktail fork or a cocktail stick. Serve with small bowls of sweet chilli sauce or raita or mango chutney or all three.


Kofta canapés

makes 25/30 ish


500g of minced lamb


*salt and black pepper

*2 cloves of garlic, crushed or 2 tsps of paste

*1 tsp of ground cumin

*1 tsp of ground coriander

*pinch of garam masala

*pinch of chilli powder


1 heaped tbsp of tomato paste

1 egg


sprinkle of plain flour

kitchen gloves or damp hands


Rapeseed oil for shallow frying


a foil tray 23cms x 23cms


Place the mince in a large mixing bowl then add the ingredients marked * and mix well. Add the tomato paste and the egg and combine. If you find the mixture too wet, then sprinkle a little plain flour into the mixture and fold in gently.

Using either gloves or damp hands your mixture should aim to be the size of a walnut (or 1 heaped teaspoon). Roll the mixture between your hands and when you've 8 or so heat the oil in a large frying pan. Seal the koftas on a low heat and carefully shake the pan to turn them – use tongs if you are accident prone!

At this stage you can continue to cook the koftas in the pan or you can transfer to an oven-proof dish and pop into a pre-heated oven 160fan/180c/Gas 4 for 15 minutes.

Alternatively let the koftas cool once sealed, transfer to freezer bags and freeze until required. Defrost and then place in a foil tray and warm in a pre-heated oven as above for 15 minutes.

Easy peasy and really tasty – photo guide next.


Saturday, 15 January 2022

Editor's January Pick #12: No-churn Ice Cream

Editor's note: A lot of people enjoy sweet with savoury, and even as my tastebuds realign to find fruitcake tasty and other such things I never saw myself enjoying, something I will never fathom is butter on cake. But I am very much in the minority there! So, for those who want something a little sweet to go with the aforementioned (blowing my braincell budget right there...) banana bread, I present MiamMiam's no-churn ice cream. If you struggle to get fresh berries then frozen ones are definitely get-able, so grab a bag of whatever fruit is your fancy (strawberries if we're following closely) and see just how easy it is to make!


Speaking of seasonal fresh fruit

I don't think there is a more evocative scent of summer than that of a bowl of strawberries, it's just divine and makes your mouth water. Sadly these days shop bought fruit can bring disappointment since a lot of strawberries are forced and taste, quite honestly, of nothing. Buy locally at farm shops or pick your own if you can.

The following recipes give you two ideas for alternative uses for a glut of strawberries.


No-churn strawberry ice cream

The recipe will give you 960g


750g/1½lb strawberries

juice of two lemons

1 x 397g condensed milk

300g light brown muscovado sugar


Top the strawberries, cut in half or quarters if large then blitz to a purée, add the lemon juice. Tip the blitzed berries into a large sieve and allow the purée to pass through. As you're passing the strawberries there's no need to hull the berries.

Place the condensed milk and brown sugar into a large mixing bowl and whisk on high for 10 minutes. I used a hand whisk. Eventually the sugar is beaten into the condensed milk and will give you a ribbon effect. Set your timer and have patience – it's worth it. You can help your strawberry pulp through the sieve with the back of a metal spoon. Fold into your sugar and condensed milk and mix until combined. I split the mixture into two boxes. Freeze for at least 6 hours. Remove from the freezer 10 minutes before serving – no longer – it softens very quickly.

If you want a perfect scoop dip the scoop into boiling water and pat dry.

As the cook I think you're entitled to taste the ice cream ahead of serving. I confess I'm not a huge fan as a rule but I was intrigued so I took a teaspoonful as I boxed it – one word - “wow” - I ditched the spoon and took another, just to be sure.


It's the best I've ever made – I hope you feel the same!


Editor's January Pick #11: Banana Bread

Editor's note: Not sure if it's cheating to have two bread recipes in this week's selections but hey, perks of the job! Banana bread is one of my favourite treats, only made on occasion as I frequent the kitchen thinking of ways to accidentally happen upon another piece. One small tip (In addition to the useful ones mentioned in the following piece) - try with some peanut butter spread on it. 


Back to the new book … Four down, five to go!

Here's the next choice from “The Little Book of Chocolat”.

It wouldn't be right not to bake a cake for JJ so, here's :


River-Gypsy Banana Bread


Takes 1 hour / serves 8


butter for greasing a tin or a cake liner

200g self-raising wholemeal flour

1 tsp baking powder

100g unrefined brown sugar

100g milk chocolate, broken into small

even pieces

2 eggs

100ml vegetable oil

3 ripe bananas, mashed


Pre-heat your oven 160fan/180c/Gas 4. Grease a 1kg loaf tin and line with baking parchment or use a cake liner.

Place the flour, baking powder, sugar and chocolate in a mixing bowl and mix well. In a jug place the eggs, oil and bananas and whizz until smooth – use a hand-held blender or hand mixer. Pour into the flour mix and blend quickly until stiff.

Pour the mixture into the prepared tin, sprinkle the top with some extra brown sugar and place in the middle of the oven and bake for 45 minutes. Test for readiness by inserting a skewer into the middle of the cake – it should come out clean when it's ready. Turn out the cake onto a cooling rack. Eat warm or cold.


The nitty-gritty!


I didn't use milk chocolate, I used plain chocolate chips. The result is that because plain chocolate has higher cocoa solids it does not melt like milk chocolate does - so, when sliced, you got perfect little hits of melted chocolate with the banana – yummy!

This is in no way any reflection on the recipe proper – if you're going to tip your hat at “sort of” healthy by using wholemeal flour using milk chocolate seems to cancel it out if you know what I mean. It's whatever makes you happy.