… is
that everyone has their own idea of the perfect pizza and made well
it's the best “fast food” whether you prefer a thin, thick or
stuffed crust.
Saturday
night should be designated “slob night” - by slob I mean lazy –
feet up in front of your favourite film at the weekend, so easy,
uncomplicated but tasty food is required and I don't mean reaching
for your favourite takeaway that I know you have on speed dial!
Those
who are kind enough to have been reading my blog for a while will
know that my mission is to make your life in the kitchen easy and so
am not averse to recommending, for example, using a puff pastry sheet
instead of making your own. Why not, when there's a quality product
available! Which brings me to pizza bases. They are available in
all sorts of guises from ready cooked bases where you add your own
pizza toppings – probably more suitable as a Frisbee
– to packet mixes and dough mixes and then there's the ready rolled
dough i.e. just like a puff pastry sheet but pizza dough in a box.
I'm
on a mission, which is to find the most convenient and delicious
pizza base – if you like it's a half way house for my Saturday
slob, not home-made but freshly baked with a decent product.
Everyone
deserves a night off!
You
can of course buy a ready-made pizza so there's nothing to do at all.
If however you want to build your own and/or give your gang a chance
to create a masterpiece then the best place to start is at the
beginning and the base, or more accurately, the dough.
I
have the answer … The Northern Dough Co. gives
you two individually wrapped balls of dough each giving you a 12 inch
pizza whether classically flat or folded into a Calzone. The dough
is the best texture, not too sticky and after lightly dusting your
surface with flour it does exactly what it says on the box – you
can roll, push, cajole and persuade into your shape of choice. The
dough comes ready frozen so check out your freezer aisle. You can
defrost in your fridge and then roll out or you can microwave –
whichever method suits you best. It really is divine dough!
Here
it is :
The
Northern Pizza Dough Co.
A
divine dough ball – ta dah!
My
favourite style of pizza is a calzone – you know the one I mean,
you cover the whole base with sauce then half the base with toppings
of your choice and fold it – it always reminds me of an Italian
version of a Cornish pasty – which is meant to be a huge compliment
to both iconic delicacies!
Here's
my own “outside the pizza box” wacky idea.
First things first - a tip - place your base on a mesh pizza mat
or a pizza stone if you prefer – before you begin to “build”
your pizza. If you don't you'll be very upset when you realise
you've got to move your loaded base – too late was the cry - unless
of course you're a champion juggler!
My “tomato
sauce” is hoi
sin and spring onion sauce and for the purpose of this experiment I
used a ready made stir fry sauce - spread 2 tablespoons over the
base.
I like to keep it
simple and choose say three or four toppings and load half the pizza
base.
You'll also need
one egg, beaten to glaze and help glue the edges of the calzone.
Portabella
mushrooms, peeled and finely sliced. I used six or 60/70g.
A
handful of torn pieces of Mozzarella cheese – approximately 75g or
half a ball.
Finally
a sprinkle of pitted black olives, sliced – my handful is about
30g.
Let
your inner Jackson Pollock go
and create your own masterpiece!
Fold
the unfilled half over and twist the edges to seal. Glaze the
calzone with the beaten egg and bake in a pre-heated oven
220fan/240c/Gas 9. I baked mine for 12 minutes to suit my taste.
Add another couple of minutes if you prefer a darker colour.
This is what I
mean :
the
divine dough folded then egg washed
the
divine dough baked
the
Calzone cut in half
Alternatively,
you could try adding Quorn pieces (100g) cooked in hoi sin and spring
onion sauce – a couple of tablespoons of sauce is fine – 12
minutes cooked ahead and fridged when cool - the pieces continue to
marinade.
Don't
forget, as before, place your base on a mesh pizza mat or a pizza
stone – it will be impossible to move having loaded!
Here
are the photos :
Quorn
pieces, cooked and left
to
marinade
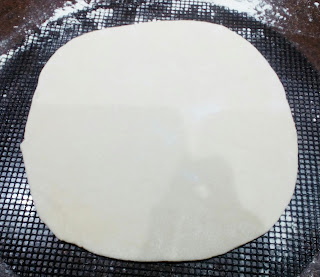
The
divine dough on the pizza mesh
The
divine dough with sauce
The
divine dough – the loading begins -
the
Quorn
the
sliced mushrooms, the black olives
and
the mozzarella
Fold, egg wash and bake as before and you're good to go!
The verdict … I am my own worst critic and I loved it. It was
too big for me so I ate half and then wrapped the other in foil and
re-heated for supper the following evening – it was excellent.
I
know I'm very fond of saying that recipes are only meant to be a
guide and so not set in stone – here's another - rules are meant to
be broken and one thing is for certain, I'll be repeating my wacky
idea and serving it to friends!
Here's
the next “takeaway” idea … for those who don't want to be
bothered!
There
are two of us in this picture – me and my Nephew Lucas, Editor in
Chief, IT Guru and a vegan/vegetarian/lactose intolerant. Confession
time … and memory lane - I loved the lunch deal they used to serve
in Pizza Hut –
the salad bar, loads of pizza choices on the hot plate and a couple
of pastas too. That memory evokes good pizza … here it is and the
good news … it's vegan, a stuffed crust and a very dangerous
product!
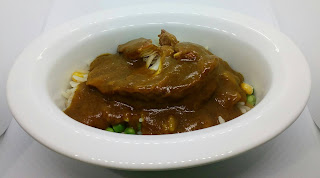
I
give you Chicago Town Tomato Stuffed Crust Takeaway
Pizza – Saucy Vegan with Sticky BBQ Jackfruit
– not a scrap left – yum!
Here's
what it looks like :
This
is the best shop bought pizza I've ever
eaten
and I'll always have one stashed in my
freezer.
There's only one problem … I eat more
than
I should!
Then
there's the ingenious idea for “little fingers” or for those of
us who don't have huge appetites!
Stromboli
is
a small version of a pizza shaped like a pinwheel and very practical.
Stromboli
400g prepared pizza dough
4 tbsp tomato paste
100g thinly sliced salami
120g baby spinach
100g thinly sliced mozzarella cheese
1 tbsp olive oil
Generous sprinkle of oregano or garlic Italian seasoning
Pre-heat your oven 220fan/200c/Gas 8. Place a large baking
tray in the oven.
Place a dampened J cloth on your work surface. Place a piece of
baking parchment on top of the cloth – it will stop it sliding –
make sure you leave enough to get hold of – you're going to lift
it onto the hot baking tray that's in the oven at the moment. Unroll
the pizza dough gently on the parchment.
Spread the tomato paste onto the base. Add the slices of
salami, followed by the spinach and then the mozzarella and sprinkle
with the oregano or garlic Italian seasoning. Roll up the base from
the shortest side and brush with the olive oil - make sure it's
seam-side down when placed on the tray.
WITH CARE remove the tray from the oven and then carefully lift
the parchment and the rolled up pizza onto it. Place back in the
oven for 20/25 minutes until golden brown – check at 20 minutes.
When removed from the oven slice into portions to suit and
serve.
This pizza is a big hit. Make your own pizza dough or not -
choose any of your favourite pizza toppings to create your own
Stromboli – it's the fastest pizza you'll ever make and perfect for
Saturday night!
Don't get bored with the same old pizza toppings – live
dangerously!
What's
the worst that can happen?!