Saturday, 8 January 2022

Editor's January Pick #5: Italian/Malaysian Fusion?

Editor's note: My first introduction to arancini was from MiamMiam, and having recently sampled an amazing curry from the very same source, never was my gob so smacked to rediscover this posting from way back in 2016 that marries the two together! It feels underwhelming to palm a reader off with 'just look at the photo!', but it does a dash decent job of showing off the combination of the crispness of the coated and fried rice and the perfection that is the Rendang curry. So, have a go!


Fancy …

Italian/Malaysian fusion?


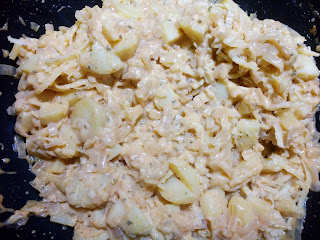
Another suggestion for serving the arancini. If you think about it you generally eat rice with a curry … why not in a ball with a crispy shell?

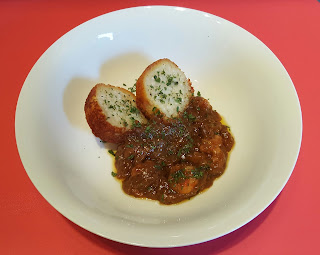
Why not serve the rice ball with a rendang curry? You can cheat if you like a buy a ready-made paste and add it to coconut milk or, a sort of half way house, make your own but speedily.
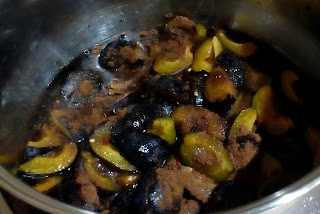

Rendang Sauce


100 ml coconut cream

50ml water

3 tsp brown sugar

2 tsp curry powder

(I used mild)

1 tbsp kecap manis

(also known as sweet soy sauce)


Combine all the ingredients in a saucepan over a low heat and

serve. Can be made ahead and re-heated.


There's nothing wrong with a short cut or two – it may not appeal to the purists out there – some of us haven't got time!

The world is definitely your lobster – you can add prawns or chicken, whatever you fancy. Just in case you think I'm making this stuff up – here's what it looks like, with prawns in the rendang sauce :


Happy New Year!


Saturday, 1 January 2022

Editor's January Pick #4: - Side for your Salads: Chickpeas

Editor's note: This post ticks a number of boxes right now - healthy, quick, filling, cheap, and there's a massive probability that like me, you'll have a tin of chickpeas on hand! Good as either a snack or part of a main, it couldn't be simpler! I recently made a vegan Thai curry and followed this recipe before I added the chickpeas to the sauce and it was a winner. Versatile!


Side for your “Salads”

Did you think that chickpeas (aka garbanzo beans) were just used as an ingredient in hummus – think again!


Cheeky Chickpeas!


1 x 400g tin of chickpeas

2 tbsp olive oil

salt


Pre-heat your oven 210fan/230c/Gas 8

Drain the chickpeas and rinse. Lay the chickpeas on kitchen roll and pat dry.

Place the chickpeas in a bowl and toss them in the oil. Season with salt. ** Add optional spices.

Spread the chickpeas on a non-stick baking tray and bake for 30 minutes – shake gently after 15 minutes – check again after a further 10 minutes – the chickpeas should be golden brown – note to self, do not walk away! Ovens vary as do the size of the actual chickpeas and you do not want them to burn and spoil.

Check out these photographs.


If you like spice you could mix together a pinch of chilli, sweet paprika and garlic powders or any spice you like – sumac would work well. Sprinkle the spices over the chickpeas and mix well at ** above.

You could use them as texture to top a salad – warm or cold – or just munch away from the bowl – I warn you they are moreish!


Editor's January Pick #3 - Let's Make Afters

Editor's note: Some of us start January with a fresh outlook on being healthy, but for the rest of us - back to business. This post was written with cooking with kiddies in mind, but even with my "wing and a prayer" approach, I think I could give it a go! After a recent disappointing experience with store-bought cinnamon rolls I believe this recipe is aching for a road test to prove that if you want something doing right, do it yourself!


Lets make afters

My first “afters” offering in “get them hooked on cooking” is Pinwheels. Once again minimum work in the way of prep for the supervisor, only a few minutes and the night before works well for me! No stress and maximum fun for the budding chefs.


Pinwheels


1 sheet of frozen puff pastry, thawed in fridge (375g)

15g butter, melted

50g dark chocolate drops (or finely chopped)

25g ground almonds

25g dried cherries, finely chopped

25g craisins, finely chopped

1 egg, lightly beaten with 1 tbsp milk


Preheat your oven 180c fan/200c/Gas 6. Line a baking tray with greaseproof paper or similar. Unroll the pastry sheet and lay with the short sides left and right, you are going to roll to form a log.

Brush the surface of the pastry and melted butter then scatter the chocolate and ground almonds leaving a border at the top end of the pastry to enable you to “glue” the log when rolled. Then scatter the cherries and craisins over the chocolate and almonds. Carefully roll up from one of the shortest sides as tightly as you can forming a log.

Using a sharp knife, cut the log into 12 even slices. Place on the baking tray and brush with the remaining butter, then the beaten egg mixture. Bake for 15-20 minutes until puffed and golden.


Fondant Glaze


75g icing sugar

2-3 tsps boiling water


Pour the boiling water slowly over the icing sugar in a small bowl while stirring the mixture with a wooden spoon. Pour in only enough water to make a creamy mixture that has the consistency of pancake batter. Cool. You need to make sure the mixture isn't too stiff, you need to be able to drizzle the glaze over your pastries.

Here's some helpful illustrations and the end result.


Take a tip or three :

Use the greaseproof wrapping with the pastry sheet as a base to roll the pinwheels.

Place a damp j cloth on your worktop and then the sheet on top – it will avoid it ending up on the floor!

When you get to the stage of slicing into 12 portions mark the roll in the middle, and then each half again (i.e. quarters) and then divide each quarter into 3 – there's a fighting chance of reasonably even pinwheels.

I warn you – these will vanish at the speed of light – it's a good idea to have two batches 1 x 2 kids.


Editor's January Pick #2 - The back catalogue – what to do with the Asian Plum Sauce

Editor's note: Well, I can't say I'm surprised - I think I'm being original and then find out that there's a MiamMiam blog post that beat me to it. When I picked the plum sauce post all the way back from 2017 I hadn't stumbled onto the follow-up that talked about adding to chicken or Quorn. I didn't want to leave this out as there's a brilliant tip about thickening sauces using something that again - I read about here first!


The back catalogue – what to do with the Asian Plum Sauce

I know it's not rocket science – but the sauce screams stir fry so here it is :


Serves 2

300g chicken fillet, cut into thin strips

Use quorn fillet for a veggie option

1 dessertspoon of rapeseed oil

200g of julienne veggies – of your choice

spring onions, finely chopped

carrots

sweet peppers

sweetheart cabbage


1 tsp ginger

100ml of plum sauce

40g of cashews – chopped

1 tbsp soy sauce


Serve with a side of kecap manis – aka sweet soy sauce


Before we begin – just in case you're not sure – julienne is a term that means your veggies should be cut into short thin strips – 1/8” wide if you want to be specific! You could use your trusted julienne peeler – that way you're certain to get a uniform “strip”.

Heat the oil in a wok or large frying pan on high, add the chicken and stir fry for 3 minutes or until golden. Transfer to a heatproof bowl.

Stir fry the veggies in the oil and ginger for 2/3 minutes, add the chicken and the plum sauce, cashews and soy and stir fry for a further 2 minutes until the sauce thickens.

You can serve with rice or noodles, in either case they should be cooked and ready to serve. Place a portion in each bowl and then top with the stir fry.

Two notes :

If you've made your own plum sauce you may find it's a tad thin. You can thicken it, ahead, with arrowroot then set aside. Arrowroot thickens well – it also gives you a glossy shine and it has no taste so will not interfere with your sauce. Mix 1tsp with a drop of water, heat 100ml of sauce and then gradually add the arrowroot to thicken. Ready to use.

If you've not made your own sauce you could of course buy a ready made version!

Your julienne veggies are available in the supermarket so if you're feeling lazy then you can buy them ready to use. You might want to check – without being too finicky – that they are all of a similar size.

Next up … a treat that's not in the back catalogue - other than it contains damsons - so it qualifies!

Editor's January Picks #1 - Plum Sauce

Editor's note: The festive period came and went, hopefully with good times had by all. For a taste of something different I trawled around the blog and found this fantastic recipe for making your own plum sauce. A lot of us try to start the New Year with a healthy outlook, so what could be better than foregoing the takeaway and making yourself a delicious sauce to add to your healthy January menus!


The last kilo …

I have all sorts of ideas floating around - one in particular uses a classic Asian plum sauce, traditionally served with duck.

So, using 400g, here it is :


Asian plum sauce


400g plums, stoned and quartered

50g demerara sugar

75ml (3fl oz) white wine vinegar

pinch of chilli flakes

1 whole star anise or ½ tsp of ground star anise


Cook for 20/25 minutes until the plums are soft. Leave to cool and then pass through a sieve – reserve the sauce. The recipe will give you 200ml of sauce. I have frozen it.

Here are two photos – the beginning and the end, before passing through a sieve.


How luscious does it look?!

Moving swiftly on, I now have 600g of plums left so I'm going to “open freeze” the plums – like I did previously in “Share the spoils” it's always helpful to include a method.


Open freezing plums/damson plums


Wash them and pat dry. Halve the plums and remove the stones. Place them on a shallow tray – try and make sure they aren't touching and then place in the freezer. Leave them overnight – you'll then finish up with perfect frozen plums, to use whenever the mood takes. Bag the frozen beauties and pat yourself on the back.

It's so satisfying.

You do realise that I'm going to bore the pants off you with all sorts of recipes using plums and damsons for the foreseeable future!


Sunday, 26 December 2021

Editor's December Pick #16 - Back to the dessert!

Editor's note: If you want a summary on why this dessert is worth a whirl, then fast-forward to the end of this post for a photo of the finished article. Once you've seen it, whizz straight back to the top for the ingredients. Like a lot of the editors picks, the important information is in the hints and tips that came separately, so after the post you'll find a link to the MiamMiam method - absolutely indispensable. An excellent choice for New Year!


Back to the dessert!

This is definitely decadent and not chocolate. The recipe comes from the Vegetarian Society Cookery School. Before you close down and run – it's called Biscoff and Salted Caramel Cheesecake – interested?

I've been a member of the Vegetarian Society for decades. I get seasonal magazines which are brilliant, full of information and ideas. You don't have to be a vegetarian or vegan for that matter – it's all knowledge! When I received the Summer/Autumn magazine I was intrigued to read about their “Online Cookery Classes” - you could choose Easy Veggie Favourites (Part 1) or a Vegan version. For £15 you get six months' unlimited access to video content. You're also able to download and keep the recipes plus other stuff too.

It seems like a good deal for £15 plus the fact I saw two recipes advertised that I really liked the look of. Cheesy Lattice Pie and Biscoff and Salted Caramel Cheesecake.

I'm always telling you not to try a recipe for the first time when you're under pressure - you've no idea how accurate the recipe is and whether it needs tweaking – into the unknown! My Christmas is going to be very strange and quiet this year so I'm road testing this cheesecake now, ignoring all my own rules, so that if you fancy having a go it might be an idea for New Year?

What follows is the verbatim recipe and method – I'll add my tweaks and hints and tips with the method. It might look long winded but the upside here is you can spread the tasks and the elements aren't difficult.

Here goes :


Biscoff and Salted Caramel Cheesecake

Serves 10


Preparation – 30 mins plus 1½ hours setting time

Cooking – 20 minutes


You will need an 8” deep spring-clip or loose bottom

cake tin


For the base


150g oat biscuits

125g Biscoff Lotus biscuits

125g butter, melted

large pinch of salt


For the filling


500g plain full fat soft cheese

300ml double cream

100g icing sugar, sifted

3 tbsp Biscoff crunchy spread

2 tsp of vanilla extract


For the sauce


200g golden caster sugar

60g butter

125ml double cream

1 tsp vanilla extract

1½ tsp salt


For the topping


80g Biscoff Lotus biscuits


Method and tips are to be found here - http://www.miammiamcookery.com/2020/12/biscoff-and-salted-caramel-cheesecake.html


Editor's December Pick #15 - Cheesy Lattice Pie - My version

Editor's note: Now for this selection I'm just going to let the photos do the talking. If like me, you have to know how to make your own, then the recipe is here: http://www.miammiamcookery.com/2021/01/cheesy-lattice-pie-my-version.html

The first bite really is with the eyes!


My version - photo guide

Here they are :


shallots, finely diced sweated

with the garlic and sweet paprika


add the cheese, potato and parsley


ready to go!


with the lattice top and egg washed


baked and ready to inhale!