Sunday, 10 June 2018

Kitchen Kit – saucepans


It has been a while since we talked about kitchen kit and I don't think I've ever mentioned saucepans.

I think long and hard these days before I spend dosh on kitchen equipment. I don't want to repeat the bread maker debacle. You remember – everyone needed a bread maker and couldn't possibly survive without. Three months later when you'd used it three times and you got so fed up with moving it to create space you finally committed it to the top shelf in the garage so that it could gather dust until you forgot about it altogether!

These days we are bombarded with advertisements promoting expensive kitchen kit – usually endorsed by a celebrity chef. Where saucepans are concerned you'd think they'd been in the foundry forging the pans themselves – pardon the sarcasm.

I've used the same make of saucepans since “Adam was a lad” - stick with what you know is my motto! My Dad bought me my first saucepans - a set of Prestige saucepans with copper bottoms. They served me well for 20 years and so when they became tired and it transpired that the wooden handles weren't suitable for a dishwasher, I replaced them with a new set complete with handles that would. If it ain't broke ...

Fast forward to last week.

On holiday in Cornwall for a week with friends (Rose came too) we rented a house. The house had a very well equipped kitchen – very impressed. I was even more impressed with the saucepans.

If you're in the market for new pans check out “Procook Gourmet Stainless Steel Induction Strain & Pour”. There are offers out there – I found a set of 4 pans reduced from £204 to £79.99 with free delivery. What I loved about these pans, apart from being a good weight – it's a fine balance between breaking your wrist trying to lift without any contents, or so lightweight that the pan will tip over without any help – not good and certainly not safe. The strain and pour element worked really well too – you may never need a colander again! Finally, as well as being suitable for induction the pans are suitable for any hob – gas, electric and ceramic. Dishwasher safe and oven safe too, up to 260c – which is very hot, that would be 240fan and gas mark 10 - in other words you can move from the hob straight to the oven. I think a pair of industrial oven gloves would be in order too.

I'm sure you know what's coming next – the new saucepans are on their way as I write.

Excited and what a bargain – how sad am I?!

P.s. I'm not deserting my copper bottoms – it's a bit like a shoeaholic except with saucepans.

SHS – Mac n Cheese Photos – Part II


The end is in sight!


I ate the vegetarian version, i.e. without the chorizo and oil drizzle. Believe me I am my own worst critic – I ate the lot and may be I shouldn't say so – it was delicious.

I hope you'll give it a try.

SHS – Mac n Cheese Photos – Part I


I apologise in advance - there are quite a few photos - which is why they are in two parts – it's no good doing half a job!


Stay with me – I think you'll be glad you did.


Sunday, 3 June 2018

Summer Holiday scoff - Mac n Cheese …


... my way

Everyone has their own version of this classic dish. Here's mine - designed as always, to be quick, easy but above all tasty.
Mac n Cheese

Serves 4

Alfredo Sauce
125g diced chorizo
50g Parmesan, finely grated
16 Cannelloni tubes
2tbsp flat leaf parsley, finely chopped

Make an Alfredo Sauce – there's a surprise – and ahead of the game is even better. Remember though - it only has one downside and that is it cannot be microwaved – it will split, so cover - let it cool in the saucepan and then fridge. Here's a quick reminder :

Alfredo Sauce

2 tbsp unsalted butter (50g)
400ml double cream
100g freshly grated Parmesan
freshly ground black pepper

Gently heat the butter and the cream together, stirring, until the butter has melted, then stir in the Parmesan. Slowly bring to a gentle boil, turn down the heat and simmer, stir continuously for a minute or so until you have a smooth, creamy sauce.

The sauce can be made ahead and fridged or you can freeze it too.

For the diced chorizo

125g diced chorizo

Using a frying pan, heat the pan and fry the chorizo until it's just beginning to crisp and releasng its delicious oil. Remove the chorizo, cool fridge and box. Leave the oil in the pan. Cover and set aside in a cool place. Again, can be made ahead.

For the Parmesan Tuile

Pre-heat oven 160fan/180c/Gas 4.

Line a baking tray with baking parchment. Place a 5cm circular cutter onto one corner of the tray. Using it as a template fill the ring with ¼ of the parmesan to create a disc shape. Repeat with the remaining cheese until you have 4 discs on the tray. Place the tray of discs in the oven and bake until golden brown – 8-10 minutes. Set timer for 8 and check. Remove from the oven and set aside until you're ready to serve.

Last minute :
The cannelloni

Bring a large saucepan of salted water to the boil over high heat. Add the tubes and cook until al dente, about 9 minutes – drain and set aside. Set your timer for 6 minutes – reset it for 3. Warm your Alfredo Sauce and the chorizo oil during the 3 minute interval.

Assembly :

Divide half of the Alfredo between 4 shallow serving bowls. Arrange 4 of the cannelloni tubes on top of the sauce, dress with the remaining Alfredo and sprinkle with chopped flat leaf parsley followed by the diced chorizo – again divided between the 4 bowls and drizzle with the warmed chorizo oil. Garnish each bowl with a parmesan tuile.

This seems like an awfully long winded recipe but I promise you it's not. Another bonus – you can feed the veggies too – omit the chorizo and oil. The veggies might like a drizzle of sweet chilli sauce instead!

Loads of photos on their way.

P.s. Use the end of a wooden spoon to lift out the cannelloni and drain on kitchen roll – you won't damage the cannelloni or scald yourself - check out the photos.

Summer holiday scoff – scone photos


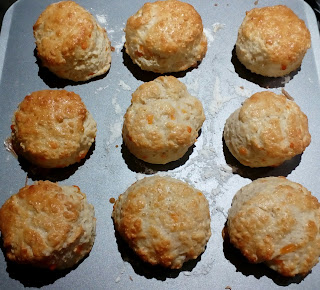
You'll notice on the baking sheets ready for the oven that they are non stick. I always sprinkle a little flour over the tray, ready to receive the scones. I've never had a scone welded to the baking sheet yet!

I halved the batch and froze. I took one bag still frozen in a cool bag to Cornwall and then immediately transferred to the fridge. They were a perfect part of a throw it all on the table al fresco lunch. Probably better when you lunch at your holiday home so they can be warmed. 180Fan/160c/Gas 6 for 10 minutes will do the trick.

So much better than bread and the good news – I've still got the other bag in my home freezer!


Summer holiday scoff


I found the cheese scone recipe in How to be a Domestic Goddess by Nigella Lawson - Lily's Scones, on p.67 to be precise. As you've come to expect it isn't exactly as in the original - either way I don't get any complaints.

Lily's Scones

Makes 16

500g plain flour
1 tsp salt
2 tsps bicarbonate of soda
4½ tsps cream of tartar
75g unsalted butter, diced
25g Trex*
50g each of mature Cheddar and Red Leicester cheese, grated
300ml milk
1 large egg – beaten for egg-wash
round fluted cutter – 6cms diameter approx
baking sheet – non-stick and floured
or lightly greased if not non-stick

*The original recipe states 25g Trex or use another 75g of butter instead.

Pre-heat your oven to 200fan/220c/Gas 7.

Sift the flour, salt, bicarb and cream of tartar into a large bowl. Rub in the fats until it resembles damp sand. Add the grated cheeses and mix.

Add the milk, mix briefly and bring together with a round bladed knife, cut the dough in half and tip onto a floured board. I don't roll out the scone mixture. Knead it gently and then work into a round until 3cms deep approx - push down gently so it's even. Cut out your scones – you may need to bring together the remains – keep going until you've used as much as you can. You should get 8 scones per half. Brush the tops with the egg-wash. Cook in the oven for 10 minutes until risen and golden.

Never throw away any leftover mixture. Add the pieces to your baking sheet – they make perfect “tasters” and another old trick – if you don't use a kitchen timer and forget, these small pieces cook more quickly than the scones so serve as an early warning system.

I would never use 16 scones unless it was a deliberate batch cook for a “do”. The good news – when cooled and bagged they freeze very well. Easy to take out however many you need.

Photos coming next.


Summer Holidays …


and Rose came too.

For the last two years we've decided that whatever else we decide to do, we're taking at least one holiday in the UK, ticking off places we've had on our “holiday bucket list”.

If you're taking the dog then you need to book early, especially if you want a nice “home from home”. If you're fortunate enough to have family or friends to share with you then so much the better.

There's probably one downside to this scenario. You're self catering, or at least in part. After the initial glow has worn off and you really can't be bothered to get ready to go out you still need to eat.

We usually aim to sample the local delicacy on the day of arrival – too tired to think about anything complicated.

Balance is required – how big is your car – can you stand the stress of “will it all fit in” - you don't want to bring it all back – unless you want the most well travelled smoked salmon known to man!

Having done this a few times I thought I'd share a few ideas.

Basic breakfast stuff is a good start. You don't have to take a huge box of cereal unless of course you know you'll use it all. I asked H to pour himself a portion which I weighed and then x the number of days required. Please don't shout at me for stating the obvious – there may be someone out there who might think it's a good shout.

Lunches in – or picnics out. They can be so boring – I gave some thought to what would go down well and came up with what might sound obvious – a cheese scone. I don't know many people who don't enjoy a scone and I've used the same recipe for the best part of 15 years and it never fails.

It's not mine I hasten to add … it's coming next.