Saturday, 15 January 2022

Editor's January Pick #10: Onion Salad Side

Editor's note: This recipe is a sure fire winner. Also, I feel like I've been taken to one side and been told a trade secret when it winds up tasting just as good as the stuff they serve you in a restaurant. Annoyingly enough they usually take it away when they bring your main – surely it's to be eaten “across the board”, so why take it away?!

It's so moreish – provided of course you like onions!


Have you ever wondered how they make the “onion salad” served with the poppadoms? I know that it varies from restaurant to restaurant but, many moons ago I was given a recipe which, to this day I've never committed to paper. It has to be said that it's quite hot and obviously you have to like onion.

Here goes :


2 medium onions, finely chopped -

weight 150g per onion approximately

salt and black pepper

2 tbsp fresh orange juice

1 tbsp lemon juice

1 tbsp tomato paste

pinch of chill powder


Place the onions in a large mixing bowl. Add the remaining ingredients and mix well.

Place the salad in sealed airtight containers and store in a cool place.

The secret to this salad is that you should not serve it for at least a day, preferably two after making it. It's important that the orange and lemon juice and the tomato paste are allowed to “mature” - leaving it to infuse takes away any harshness from the onion and the tomato paste.

This is a perfect accompaniment for the koftas but is equally as good with any curry.

Here it is :


If you are a lover of all things spicy then this onion salad is excellent with cold meats or, best of all, with a strong mature cheddar cheese.


Editor's January Pick #9: The Alternative Lunch - Cheese and Pecan Loaf

Editor's note: There's a few times when I've been selecting my personal highlights that I've been taken aback by how good the photos look (not biased of course!) but this one definitely falls into that category. DIY bread is obviously still big following the lockdown boon, but this post was originally from 2015 so a little ahead of that curve. Why not give it a go - what's not to love about cheese bread!


The alternative lunch

As with most of my posts, nothing is set in stone - if I trigger an idea of your own or inspire you to tweak, then my work here is done. The following menu could be taken as a vegetarian alternative or, give you choices that you may like to include as part of your own lunch.


Bread and Butter or

Cheese & Pecan Loaf with Butter
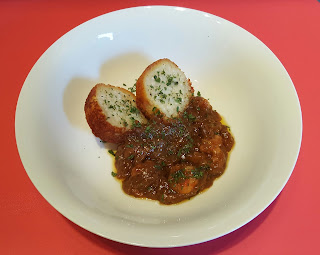

The Pie

Roasties

Maple glazed beetroot

Stir fried sprouts


Judy's Jars


I promised in the post The Method in my Madness – The Creaking Table that the Cheese & Pecan Loaf was on its way, here it is – have a glance at the photos – scrummy. Who doesn't like bread and butter – if you wanted to you could serve the bread and butter with the winter coleslaw – add cheesey, nutty and crunchy to the scrummy – you could even kid yourself it's healthy – NOT!

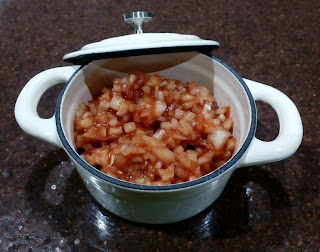
The Pie ticks the vegetarian box if you need to cater, alternatively you could serve it as part of your turkey roast – just add a sprout or six!

The roasties can be made ahead and frozen. I've always used Nigella's roast potato recipe and on the basis if it ain't broke I have no intention of fixing it.

Maple glazed beetroot – sweet and colourful.

Stir fried sprouts – sprouts are like Marmite you either love 'em or hate 'em. This suggestion would firmly squash the idea that contrary to popular belief they do not need to be cooking on the hob in October to serve on Christmas Day!

Judy's Jars is my bit of fun – created for my friend's birthday in December, it's a sharing pud – there's nothing quite like a fight to get to the last crumb!


Cheese & Pecan loaf


60g Parmesan cheese, grated

350g plain flour

1 tbsp baking powder

pinch cayenne pepper

125g mature cheddar cheese, cut

into small cubes

60g chopped pecan nuts (or walnuts

if preferred)

4 spring onions, trimmed and chopped

250ml full fat milk

1 large egg

170ml tub of sour cream

salt and black pepper

900g (2lb) loaf tin, well buttered and

lined


Pre-heat your oven 180c/160fan/Gas 4

Sprinkle half the grated Parmesan cheese into the loaf tin to coat the base and sides.

Mix the flour, baking powder, cayenne pepper, 1 tsp salt and lots of black pepper into a large bowl. Mix in the cheddar cubes, nuts and spring onions.

In a separate bowl whisk the milk, egg and cream together then fold into the dry ingredients.

Spoon in the loaf tin, smooth the top and sprinkle with the remaining grated Parmesan cheese.

Bake for 50/55 minutes until golden brown – skewer test i.e. insert skewer into loaf, on removal should be clean. Cool in the tin for 5 minutes, turn out and transfer to a rack to cool.

Serve warm with lots of butter.


I shouldn't be blowing my own trumpet but having a savoury tooth rather than a sweet one, this is my kinda food.

You can freeze this – defrost thoroughly before you want to use it – slice thickly, wrap in foil and pop into a warm oven for ten minutes before serving.

It's easy but I would suggest that you do your mise en place – in other words, weigh out all the ingredients, ahead, it's just a bit time consuming so if all the boring stuff is done you don't even notice.


Saturday, 8 January 2022

Editor's January Pick #8: The perfect partner

Editor's note: This recipe is a sleeper, something you wouldn't find yourself making every week, but if you make the chutney when you find the time, you'll have something special to add to a meal. You won't be sorry!


What's up my sleeve?

I just love a recipe that lends itself to all manner of uses.

Here's my first :


Roasted Garlic and Sweet Onion Jam


1 garlic bulb

1 tbsp olive oil

170g sweet onion – finely chopped

85g sugar

85g Granny Smith apple – finely chopped

120ml balsamic vinegar


Here's the make ahead bit :

Baked Garlic


2 bulbs of garlic

olive oil/rapeseed oil for drizzling

2-3 sprigs of fresh thyme - optional

salt and black pepper


Pre-heat your oven to 200c/180f/Gas 6.

Slice the tops off the bulbs and place the in a small oven dish, garlic roaster or foil dish so that they fit snugly. Drizzle with oil and season with thyme, salt and black pepper.

Roast in the oven for about an hour – until the garlic has softened. Squeeze the garlic out of its skin. Add a little more oil , keep in a tightly fitting container and place in the fridge.

You can use the paste in the same way as you'd use fresh garlic – the difference is that the baked garlic is sweeter and ready to use!

The paste will keep in your fridge for one to two weeks or you can freeze in small containers.


Method


Squeeze garlic cloves and any juice into a medium saucepan. Add the remaining ingredients. Bring to the boil over medium to high heat, stir occasionally then reduce the heat. Simmer uncovered for 30 minutes or until thickened and again stir occasionally.

Be patient! It will look like it will never reduce and thicken. It does.

This recipe will fill a 370g conserve jar and here it is :


A note about sweet onions. I searched high and low and found them in
Tesco – Finest Sweet Onions – a net of 3 for £1.50. You may think a little on the expensive side but I can assure you that they are worth it.

I can hear you saying “so what, it's another chutney” - yep it's good with the usual cheeses!


Editor's January Pick #7: Here's a cure for the winter blues

Editor's note: It might not have escaped anyone's notice that it's Winter in the Northern Hemisphere at the moment, or as we say in the UK - it's business as usual. Now I don't know about you but when I'm cold and it's dark at 4pm and the urge for a snack strikes, it's hard to beat a Croque Monsieur. Read on for a different spin on the classic, and whatever you do, leave the "Toastie maker" in the cupboard.


Here's the sandwich - the “Croque” …

I'm sure you've heard of a Croque Monsieur – it's a baked, or more popularly, fried sandwich which forms a crispy crust but an oozing filling in the middle. Croque literally means “crunch” from the verb “croquer” - “to bite”.

Croque, sandwich, tartine, brushetta, crostini, whatever is your favourite they should all be treated with respect. My personal favourite is a toasted version so, for a decadent treat, here's my latest :


Croque Marianne


for 4 sandwiches


8 slices of medium wholemeal bread

4 tsps Dijon mustard

75g each of Gruyere and mature cheddar cheese, grated

1 medium onion, preferably sweet or mild flavour,

finely sliced and left raw

60g unsalted butter


Spread ½ tsp of mustard over each slice of bread. Spread the cheese onto 4 slices of bread followed by the onions. Sandwich together with the other 4 slices of bread.


Heat half the butter in a frying pan until foaming – you'll get two sandwiches in your frying pan – fry for 1-2 minutes on each side and then pop the croques onto a baking sheet and into the oven whilst you repeat using the remaining butter and two sandwiches.

You may think the onion would be harsh to the palate but I assure you it isn't, provided you use either a sweet or mild variety. The sharpness of the onion cuts through the richness of the cheese.


Serve with your fried potatoes and a salsa or beetroot chutney or even small chunk Branston.

Any leftovers wrap in foil and fridge. Pop into a pre-heated oven 200c/180fan/Gas 6 with your leftover potatoes for 10 minutes. As with the potatoes, some may say even better the next day – I can absolutely confirm you'll still get oozy delicious Croque Marianne!


Editor's January Pick #6: Now I Have Your Attention.. Arancini!

Editor's note: Well if the previous pick was enough to pique your interest, it seems only right that the accompanying guide is presented along with it. I've noticed that some supermarkets have on occasion sold ready-made versions but I wouldn't want to taint something so downright tasty after having had the real deal. What follows is the first half of the recipe for making your own, with two links at the bottom on how to finish off the perfect arancini. The sections are fantastically split as you can follow the guide below to make the first part for the freezer, bring up the second guide to complete for the day before cooking, and the third to be used on the day!


My antidote …

to over-indulgence is simple tasty food and right about now we really begin to crave it, so here we have :


Arancini


For arancini, aka rice balls, you'll need a basic risotto recipe :


1 litre vegetable or chicken stock

40g unsalted butter

1 tbsp groundnut oil

2 small onions, finely chopped

3 garlic cloves (or 3 tsps paste)

350g risotto rice

150ml dry white wine

2 tbsps flat leaf parsley, finely chopped

100g Parmesan cheese, grated

salt and black pepper


Bring the stock to a boil and simmer gently. Heat the butter and the oil in a pan and fry the onions and garlic until soft. Season with salt. Stir in the rice and fry for 2 minutes until the edges become opaque. Add the wine. Start adding the stock, a ladle at a time – the liquid should be absorbed before you add the next. Add the parsley, black pepper and the Parmesan cheese.

It's imperative that your stock is kept hot and added a ladle at a time. If you follow these basic principles you'll be fine.

Tip your risotto into a tray bake, cover and cool, then fridge. You can leave for a couple of hours or overnight – whatever suits you best. The tray measures 12” or 31cms - with the tray bake lengthways in front of you cut the risotto in half. Each half tray ( 6” or 15.5cms) gives you 9 arancini weighing approximately 80/90gm approximately. Using one half divide into 9 squares – 2½” (6.5cms) 5” (13cms) and 7½” (19cms) and set aside. I used a good old fashioned school ruler – works a treat. You can continue and make another 9 or freeze the remaining risotto as it is.


Prepping this way will give you pretty much similar sized arancini but don't lose sleep over it!

You might think there appears to be a lot of work here but the recipe is simplicity itself and it can be made in stages, whenever you have time.

Happy New Year!

Editor's note: for part 2 of how to prepare the arancini follow this link

And for part 3 of how to finish it off on the day, follow this link.

Editor's January Pick #5: Italian/Malaysian Fusion?

Editor's note: My first introduction to arancini was from MiamMiam, and having recently sampled an amazing curry from the very same source, never was my gob so smacked to rediscover this posting from way back in 2016 that marries the two together! It feels underwhelming to palm a reader off with 'just look at the photo!', but it does a dash decent job of showing off the combination of the crispness of the coated and fried rice and the perfection that is the Rendang curry. So, have a go!


Fancy …

Italian/Malaysian fusion?


Another suggestion for serving the arancini. If you think about it you generally eat rice with a curry … why not in a ball with a crispy shell?

Why not serve the rice ball with a rendang curry? You can cheat if you like a buy a ready-made paste and add it to coconut milk or, a sort of half way house, make your own but speedily.


Rendang Sauce


100 ml coconut cream

50ml water

3 tsp brown sugar

2 tsp curry powder

(I used mild)

1 tbsp kecap manis

(also known as sweet soy sauce)


Combine all the ingredients in a saucepan over a low heat and

serve. Can be made ahead and re-heated.


There's nothing wrong with a short cut or two – it may not appeal to the purists out there – some of us haven't got time!

The world is definitely your lobster – you can add prawns or chicken, whatever you fancy. Just in case you think I'm making this stuff up – here's what it looks like, with prawns in the rendang sauce :


Happy New Year!


Saturday, 1 January 2022

Editor's January Pick #4: - Side for your Salads: Chickpeas

Editor's note: This post ticks a number of boxes right now - healthy, quick, filling, cheap, and there's a massive probability that like me, you'll have a tin of chickpeas on hand! Good as either a snack or part of a main, it couldn't be simpler! I recently made a vegan Thai curry and followed this recipe before I added the chickpeas to the sauce and it was a winner. Versatile!


Side for your “Salads”

Did you think that chickpeas (aka garbanzo beans) were just used as an ingredient in hummus – think again!


Cheeky Chickpeas!


1 x 400g tin of chickpeas

2 tbsp olive oil

salt


Pre-heat your oven 210fan/230c/Gas 8

Drain the chickpeas and rinse. Lay the chickpeas on kitchen roll and pat dry.

Place the chickpeas in a bowl and toss them in the oil. Season with salt. ** Add optional spices.

Spread the chickpeas on a non-stick baking tray and bake for 30 minutes – shake gently after 15 minutes – check again after a further 10 minutes – the chickpeas should be golden brown – note to self, do not walk away! Ovens vary as do the size of the actual chickpeas and you do not want them to burn and spoil.

Check out these photographs.


If you like spice you could mix together a pinch of chilli, sweet paprika and garlic powders or any spice you like – sumac would work well. Sprinkle the spices over the chickpeas and mix well at ** above.

You could use them as texture to top a salad – warm or cold – or just munch away from the bowl – I warn you they are moreish!